


CDP part 5: user permissions management on CDP Public Cloud

Jul 18, 2023
Never miss our publications about Open Source, big data and distributed systems, low frequency of one email every two months.
When you create a user or a group in CDP, it requires permissions to access resources and use the Data Services.
This article is the fifth in a series of six:
- CDP part 1: introduction to end-to-end data lakehouse architecture with CDP
- CDP part 2: CDP Public Cloud deployment on AWS
- CDP part 3: Data Services activation on CDP Public Cloud environment
- CDP part 4: user management on CDP Public Cloud with Keycloak
- CDP part 5: user permission management on CDP Public Cloud
- CDP part 6: end-to-end data lakehouse usecase with CDP
CDP Public Cloud manages these permissions through roles, which control the scope of access to the resources.
There are two main types of roles:
- Account Roles: permissions to access or perform tasks on all resources within the CDP tenant
- Resource Roles: permissions to access or perform tasks on a specific resource, such as an environment
This article focus on setting the roles and the Ranger policies required for the group of users created in User management on CDP Public Cloud with Keycloak to complete the lab-article which closes this series.
By definition, a group in CDP is a collection of user accounts that have the same account and resource roles. Therefore we can manage all our needs at the group level.
Three remarks before starting the configuration:
- At least one user of the group has to log in to make the group visible on the CDP console.
- The PowerUser role is required to assign roles to a group.
- The EnvironmentAdmin role is required to set the Ranger Policies.
Required Roles
To give users access to all resources required to set up the lab article, we need to assign them the following roles:
- Account Roles:
- PowerUser
- DFCatalogAdmin
- DFCatalogViewer
- Resource Roles:
- DWAdmin
- DWUser
- DFFlowAdmin
- DFFlowUser
- DEUser
In addition, we need to set the Data Access Role on the IDBroker Mappings to ensure user applications can access the Data Lake.
As in CDP Public Cloud deployment on AWS, the role configuration can be done via the Cloudera web interface or the CDP CLI. Both approaches are covered.
Configuring Roles using the CDP Web Interface
This approach is recommended if you are new to CDP. It is slower but gives you a better idea of the configuration process. If you did not install and configure the CDP CLI and the AWS CLI as described in Introduction to end-to-end data lakehouse architecture with CDP, this is also your only option.
If you want to go faster and use the terminal to set the roles, scroll down to the Configuring roles from the Terminal section.
Note: You still need to use the CDP console to configure the Ranger policies since this task cannot be accomplished using the CDP CLI.
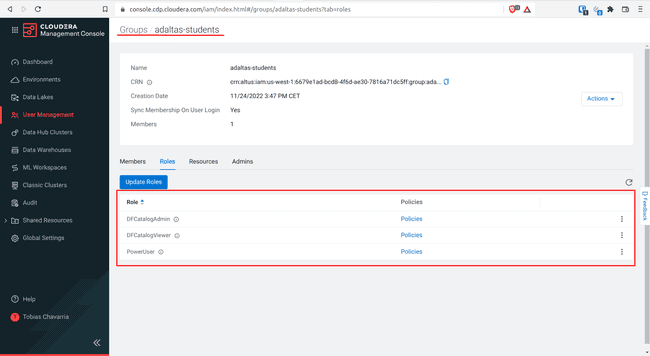
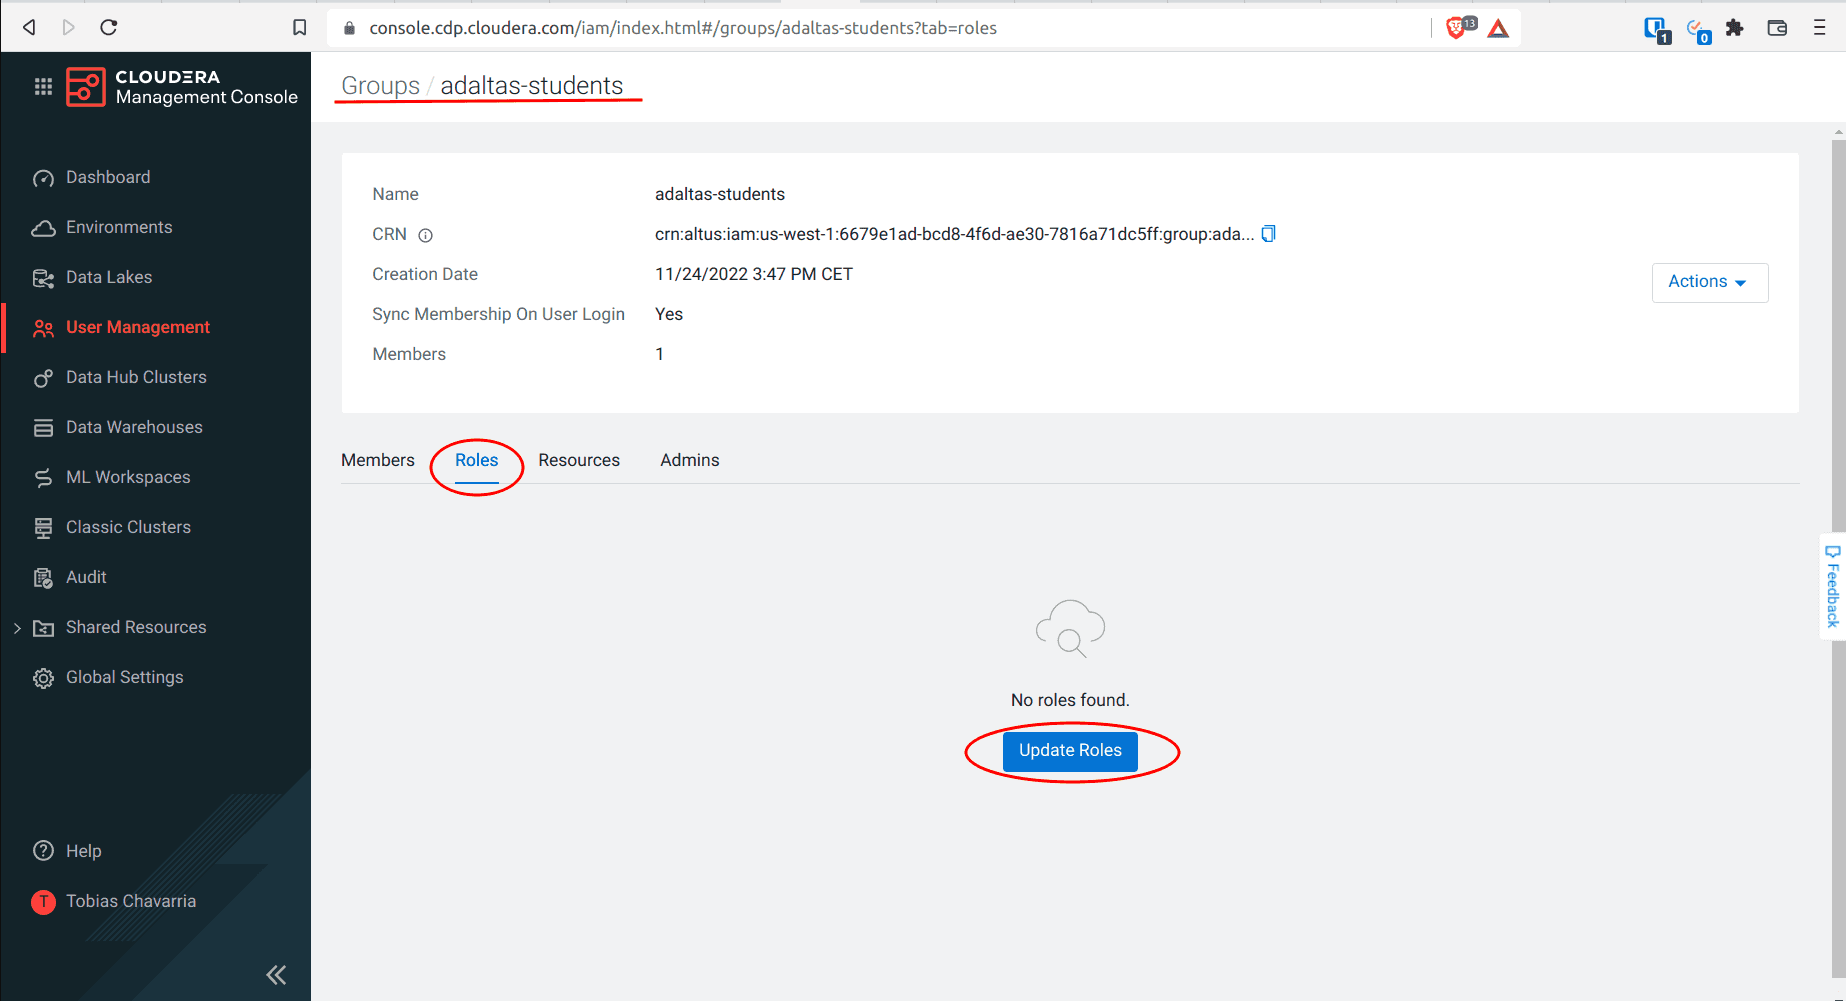
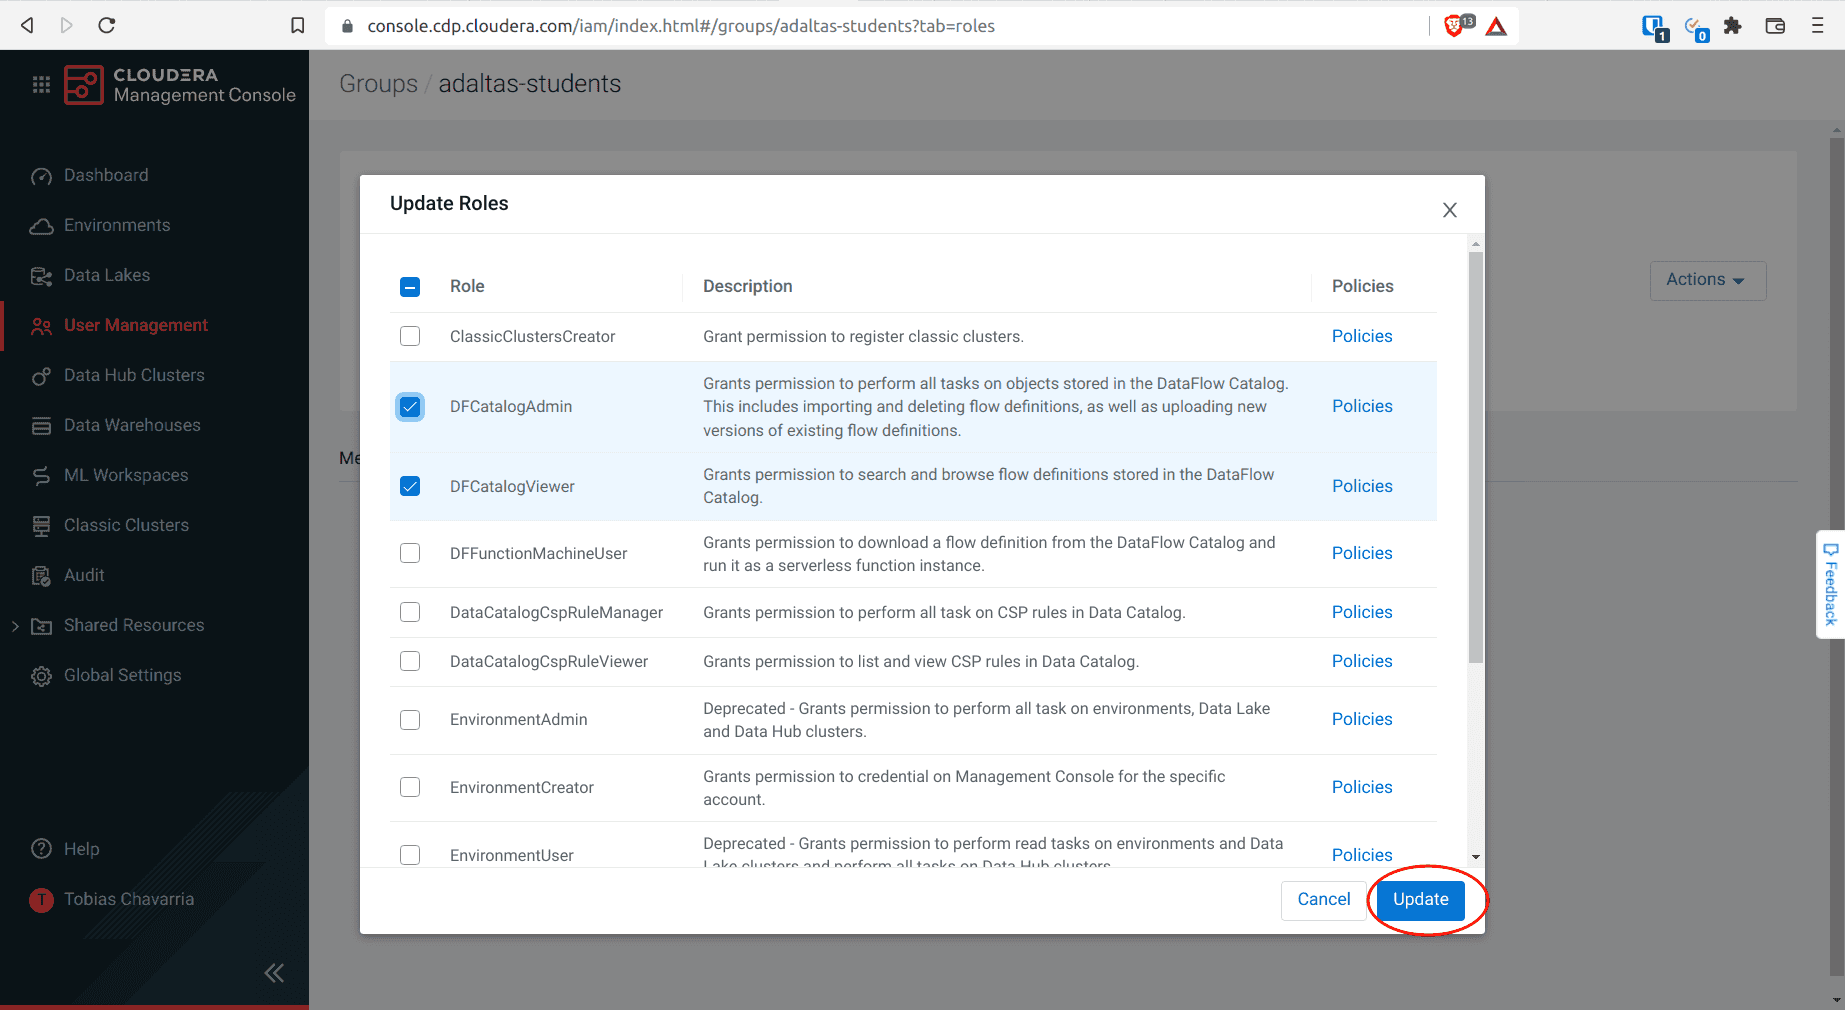
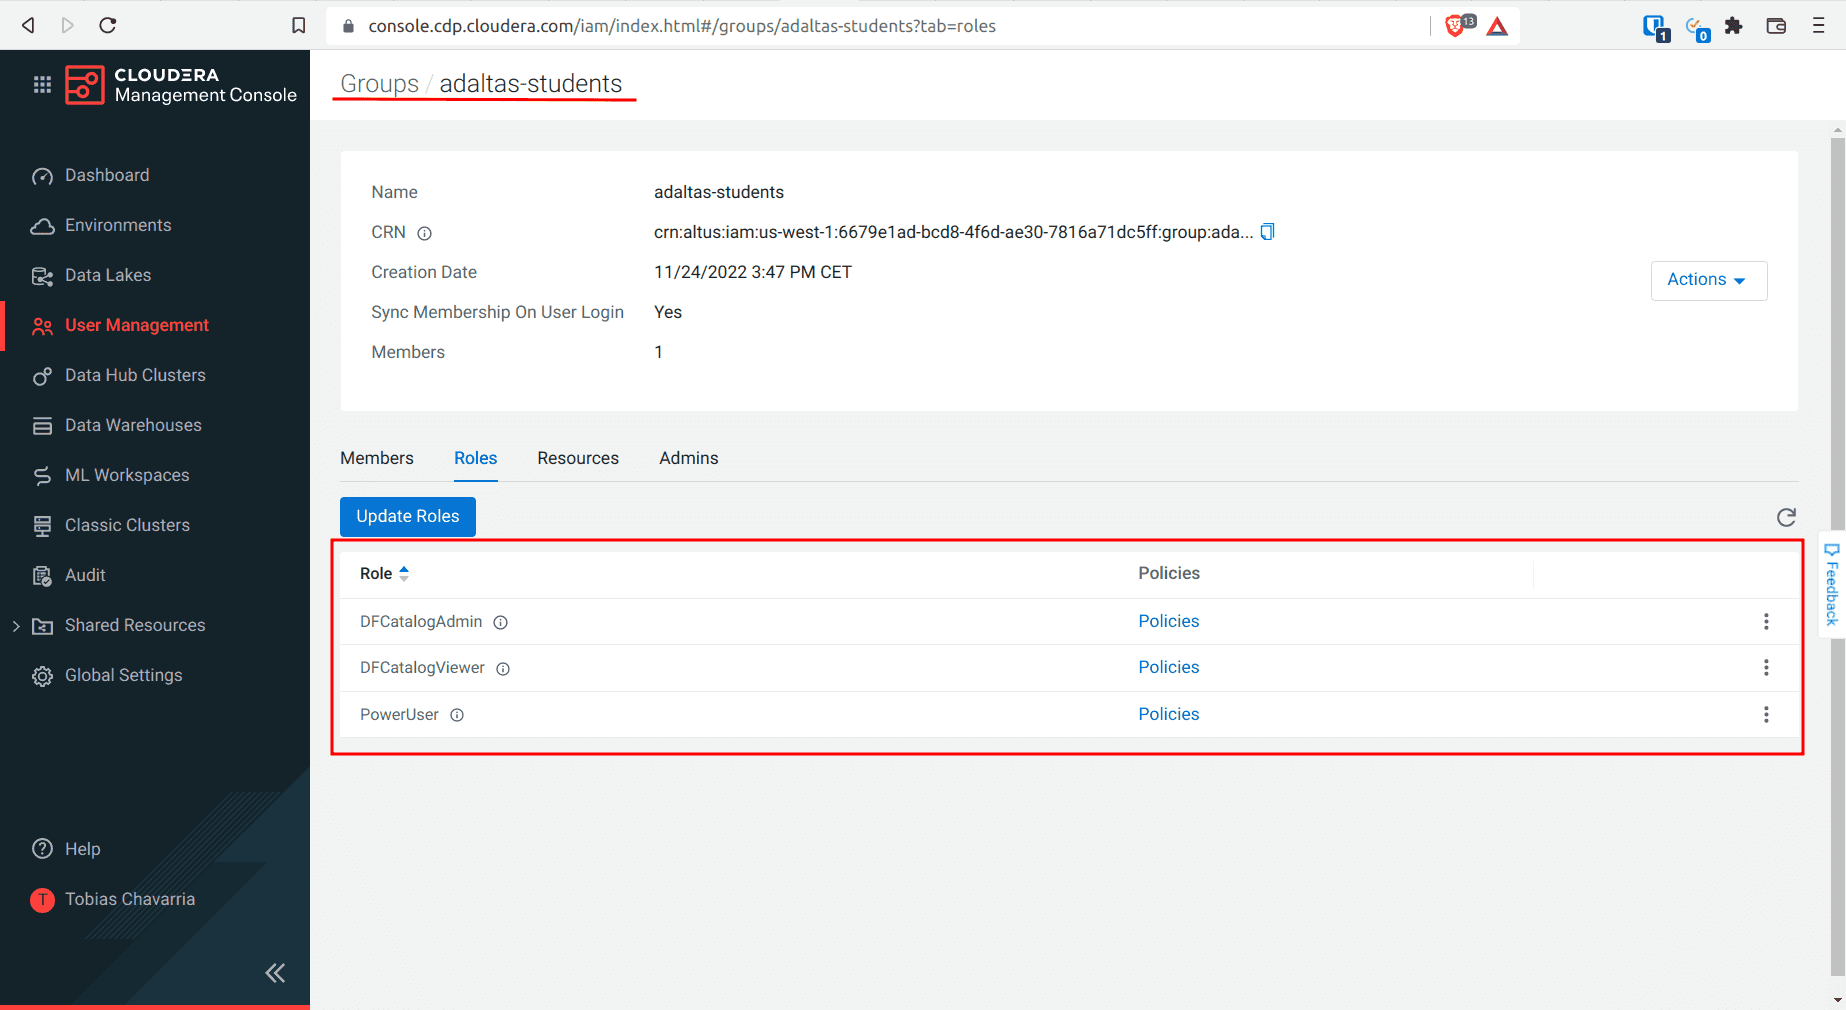
To set the Account Roles:
-
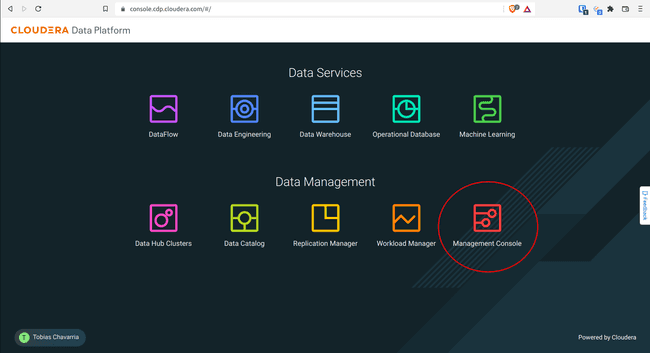
Log in to the CDP console and select Management Console
-
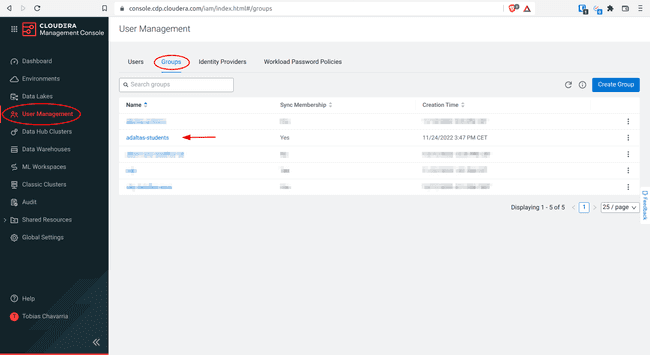
Navigate to User Management > Groups > Your group name
-
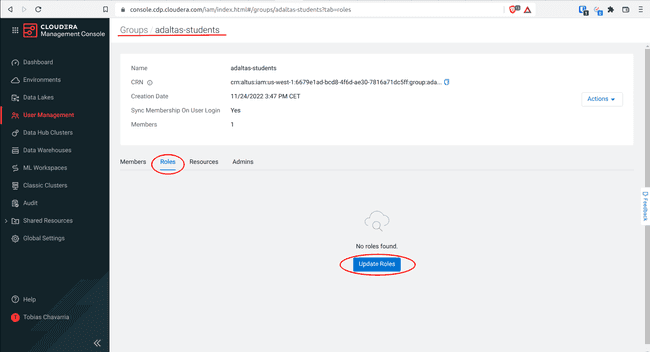
Select Roles and click Update Roles
-
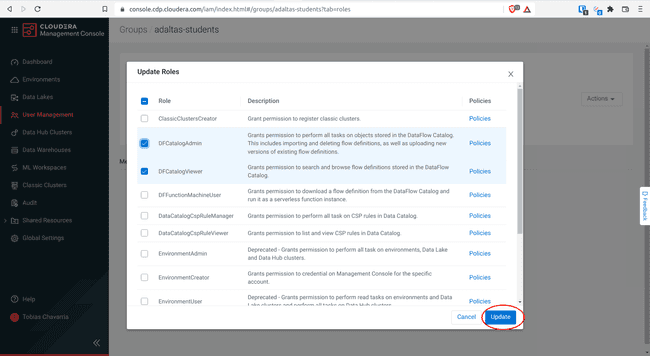
Select the account roles of the list above and click Update
-
You should get the following


To set the Resource Roles:
-
Log in to the CDP console and select Management Console
-
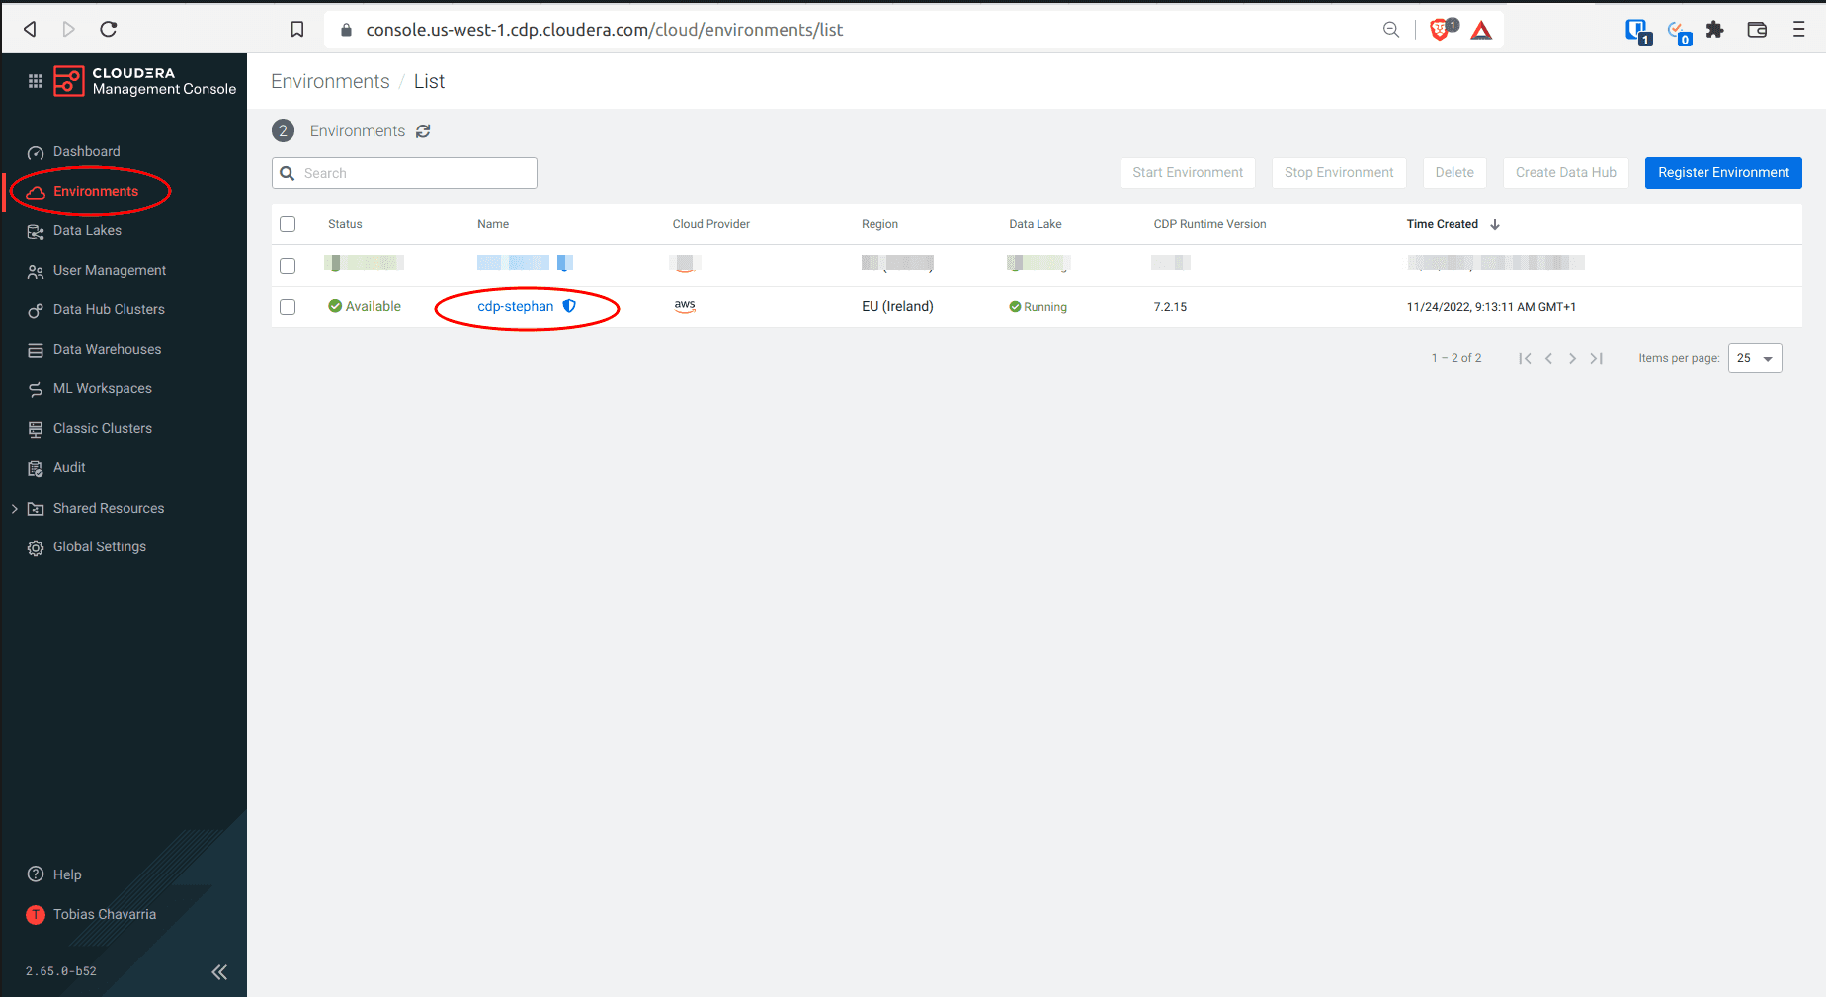
Navigate to Environments > Your environment
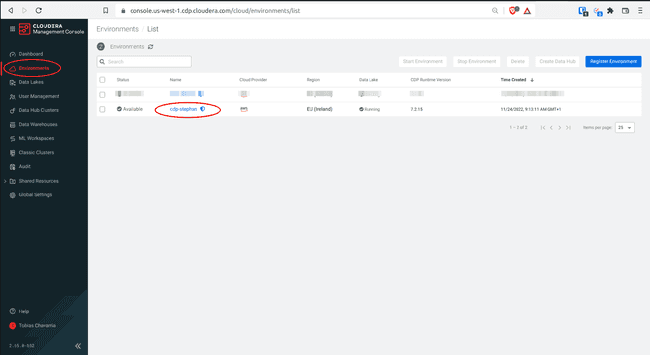
-
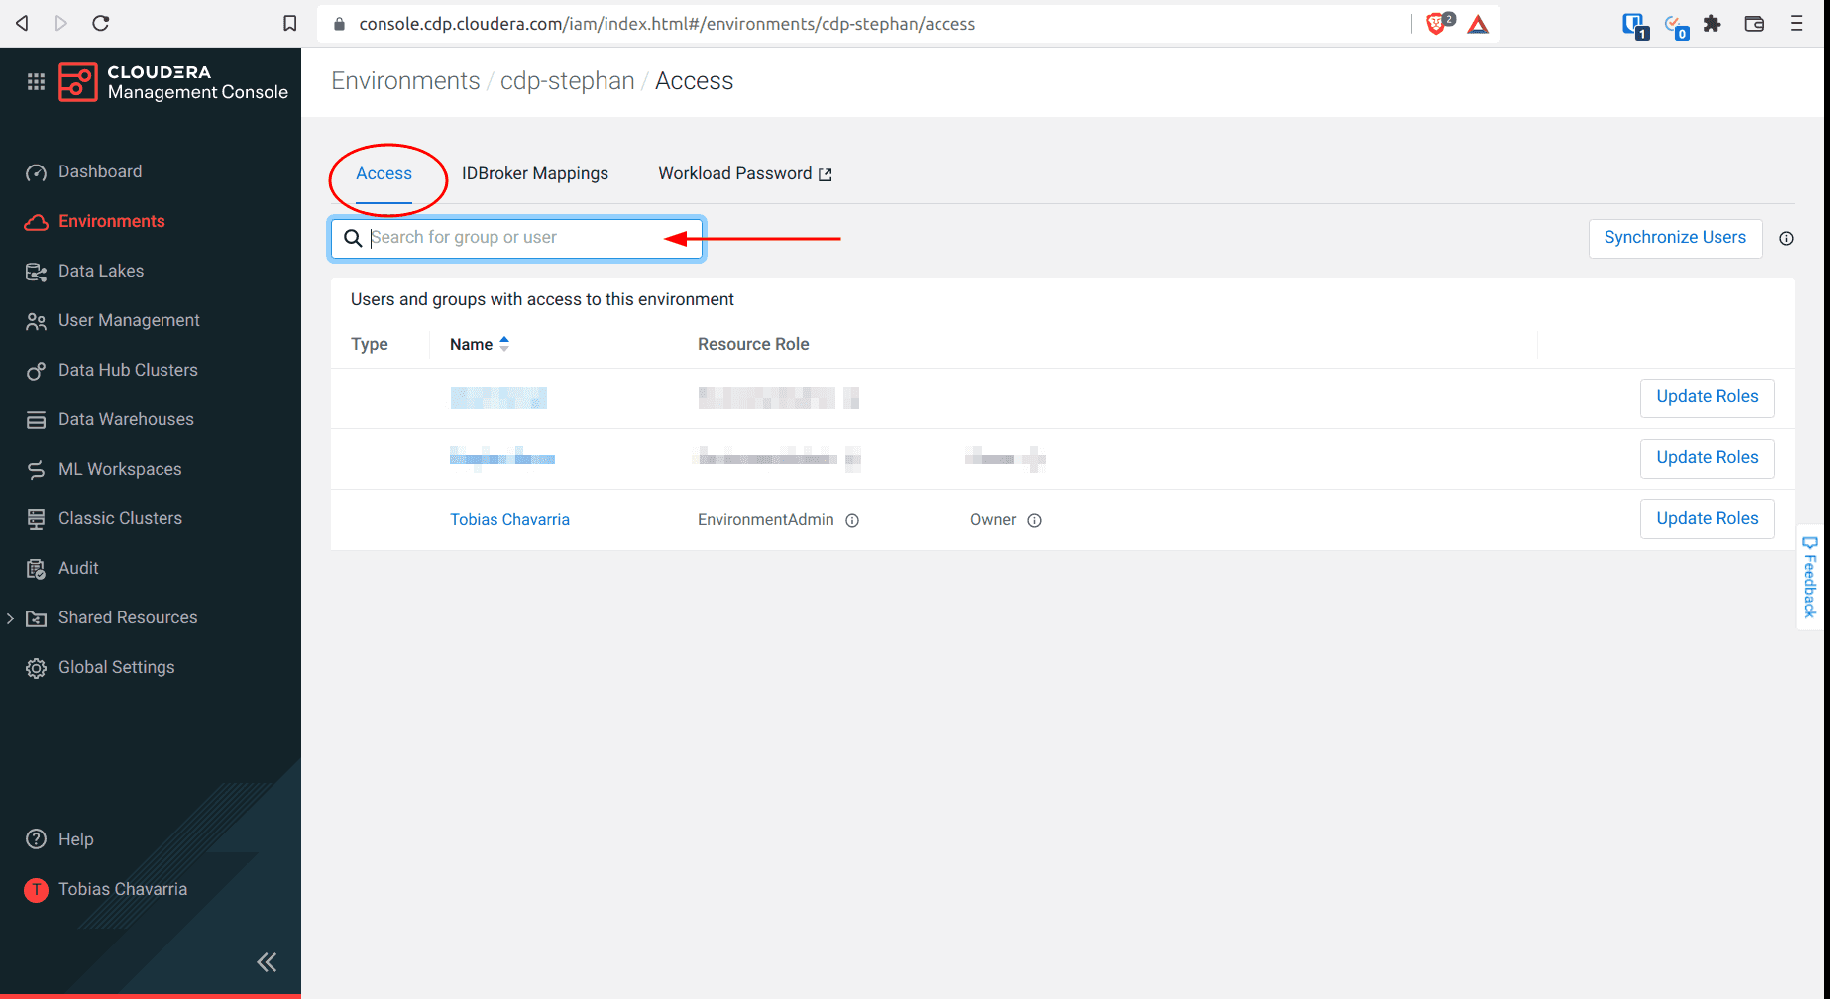
On the top right corner select Actions and click Manage Access
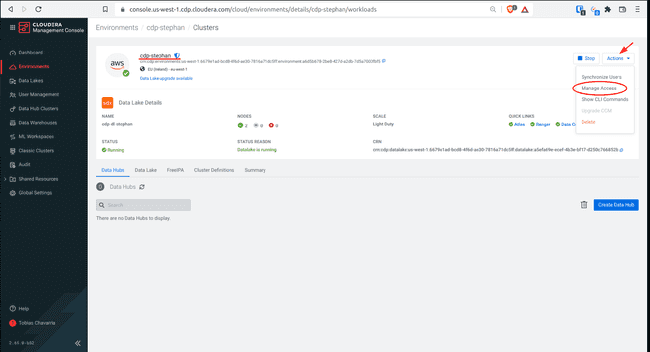
-
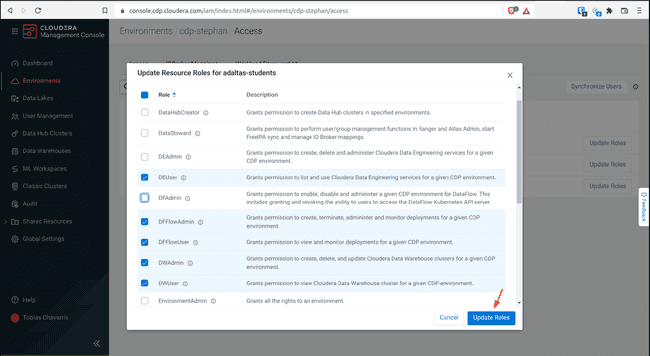
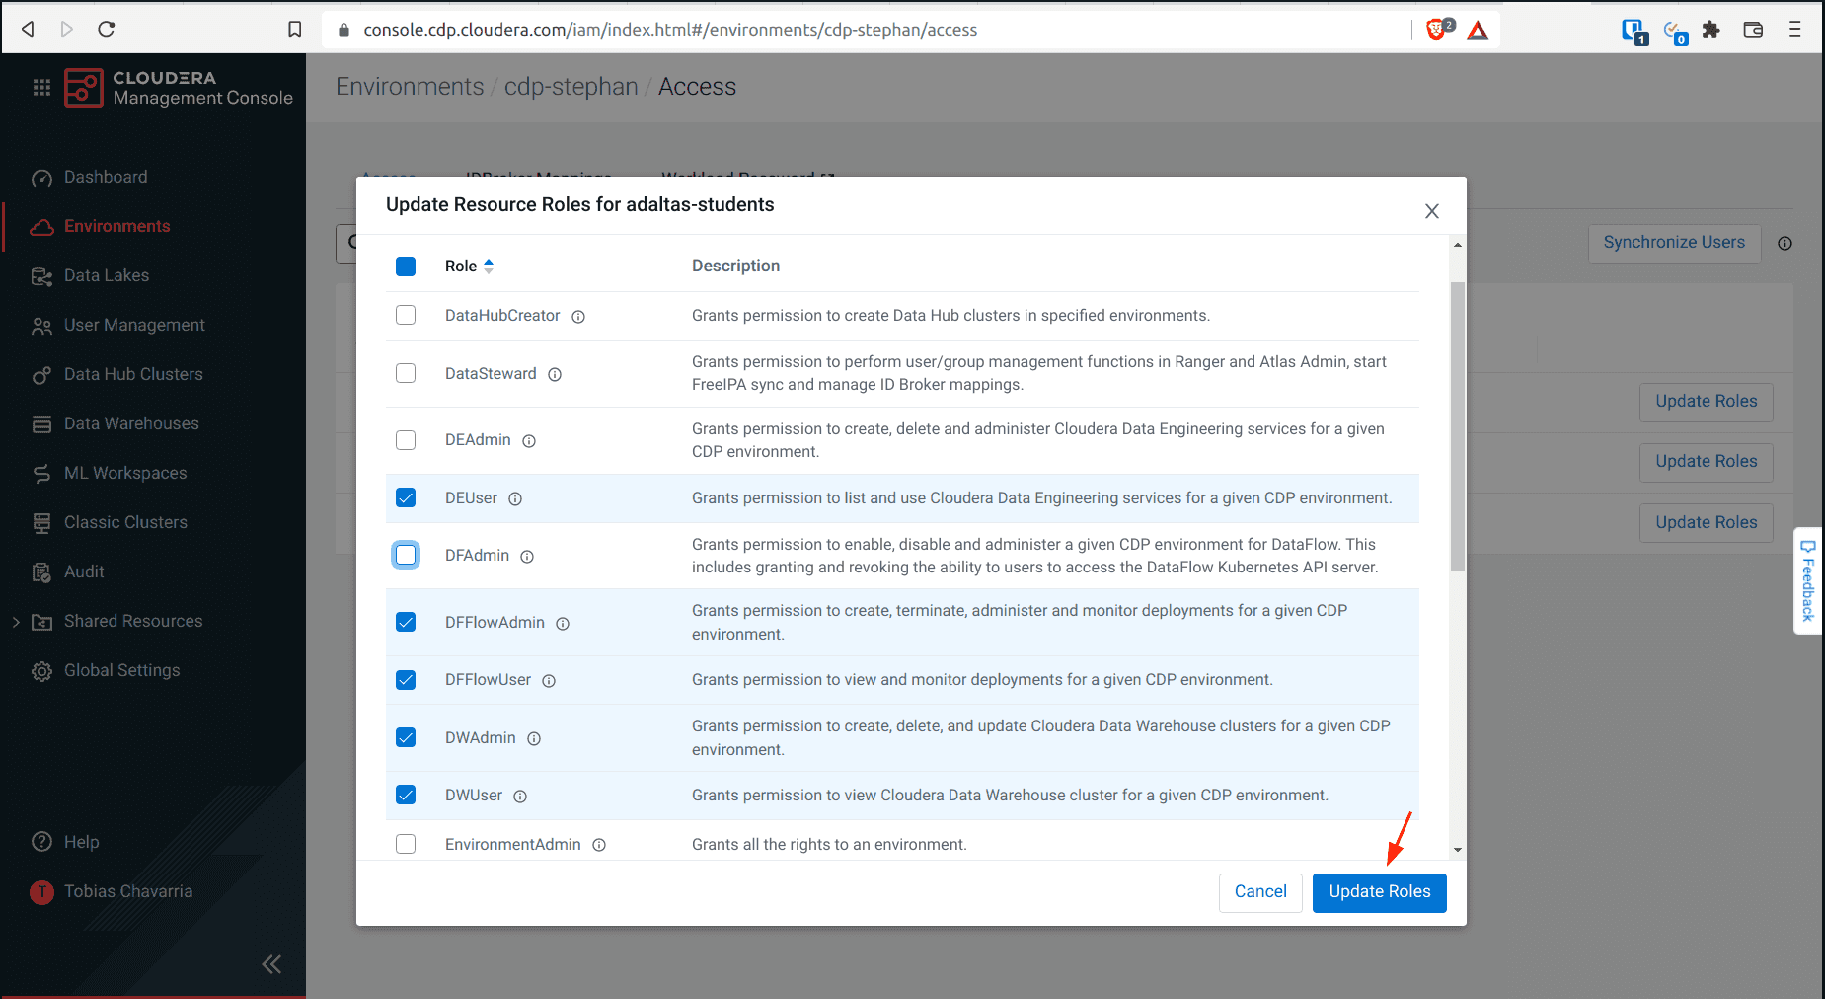
Select the Access tab, write your group name in the search box

-
Select the resource roles of the list above and click Update
-
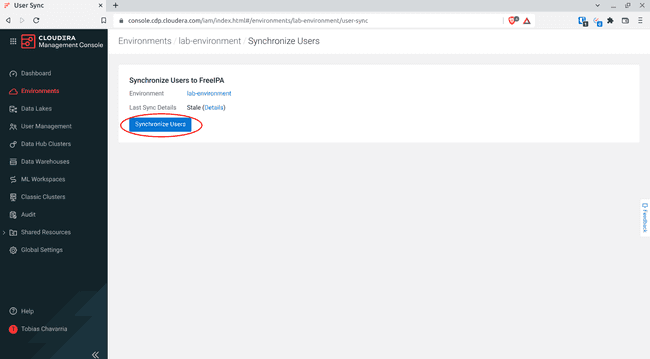
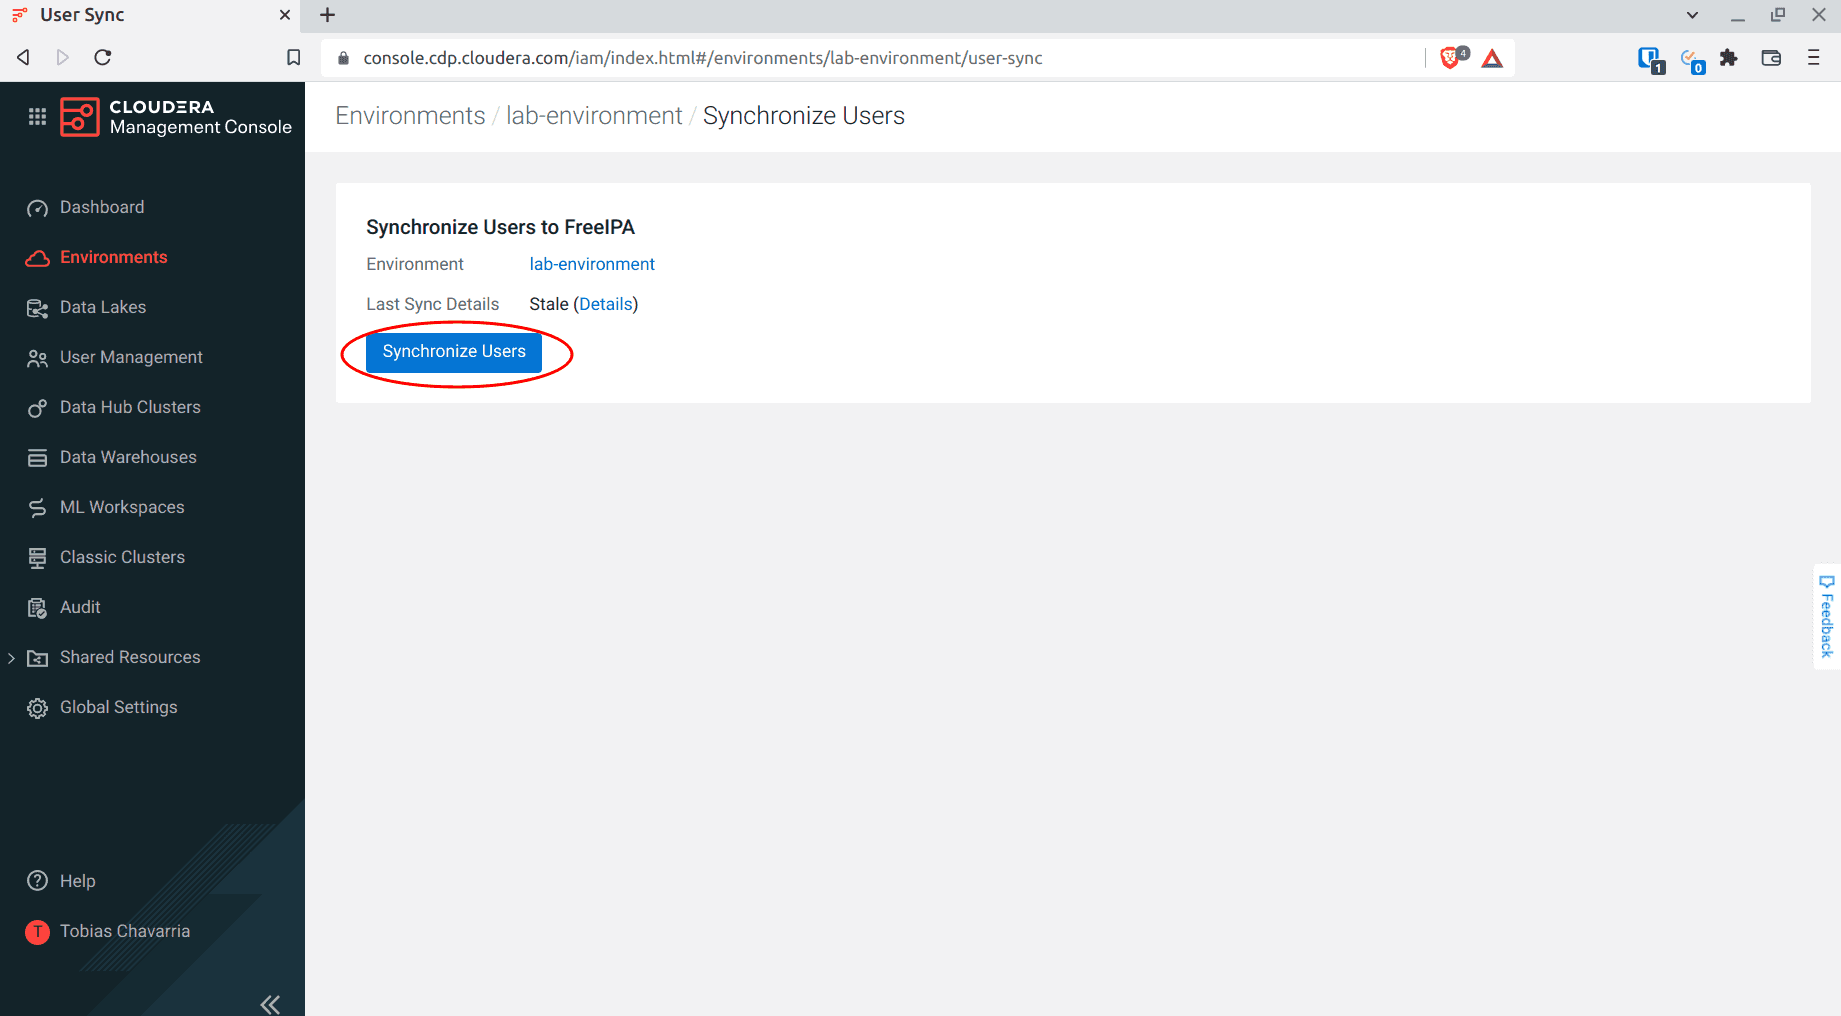
The last step is to synchronize the users with the environment, therefore click Synchronize Users

-
Click Synchronize Users


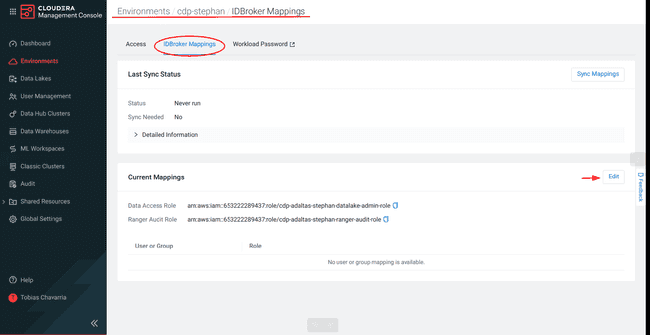
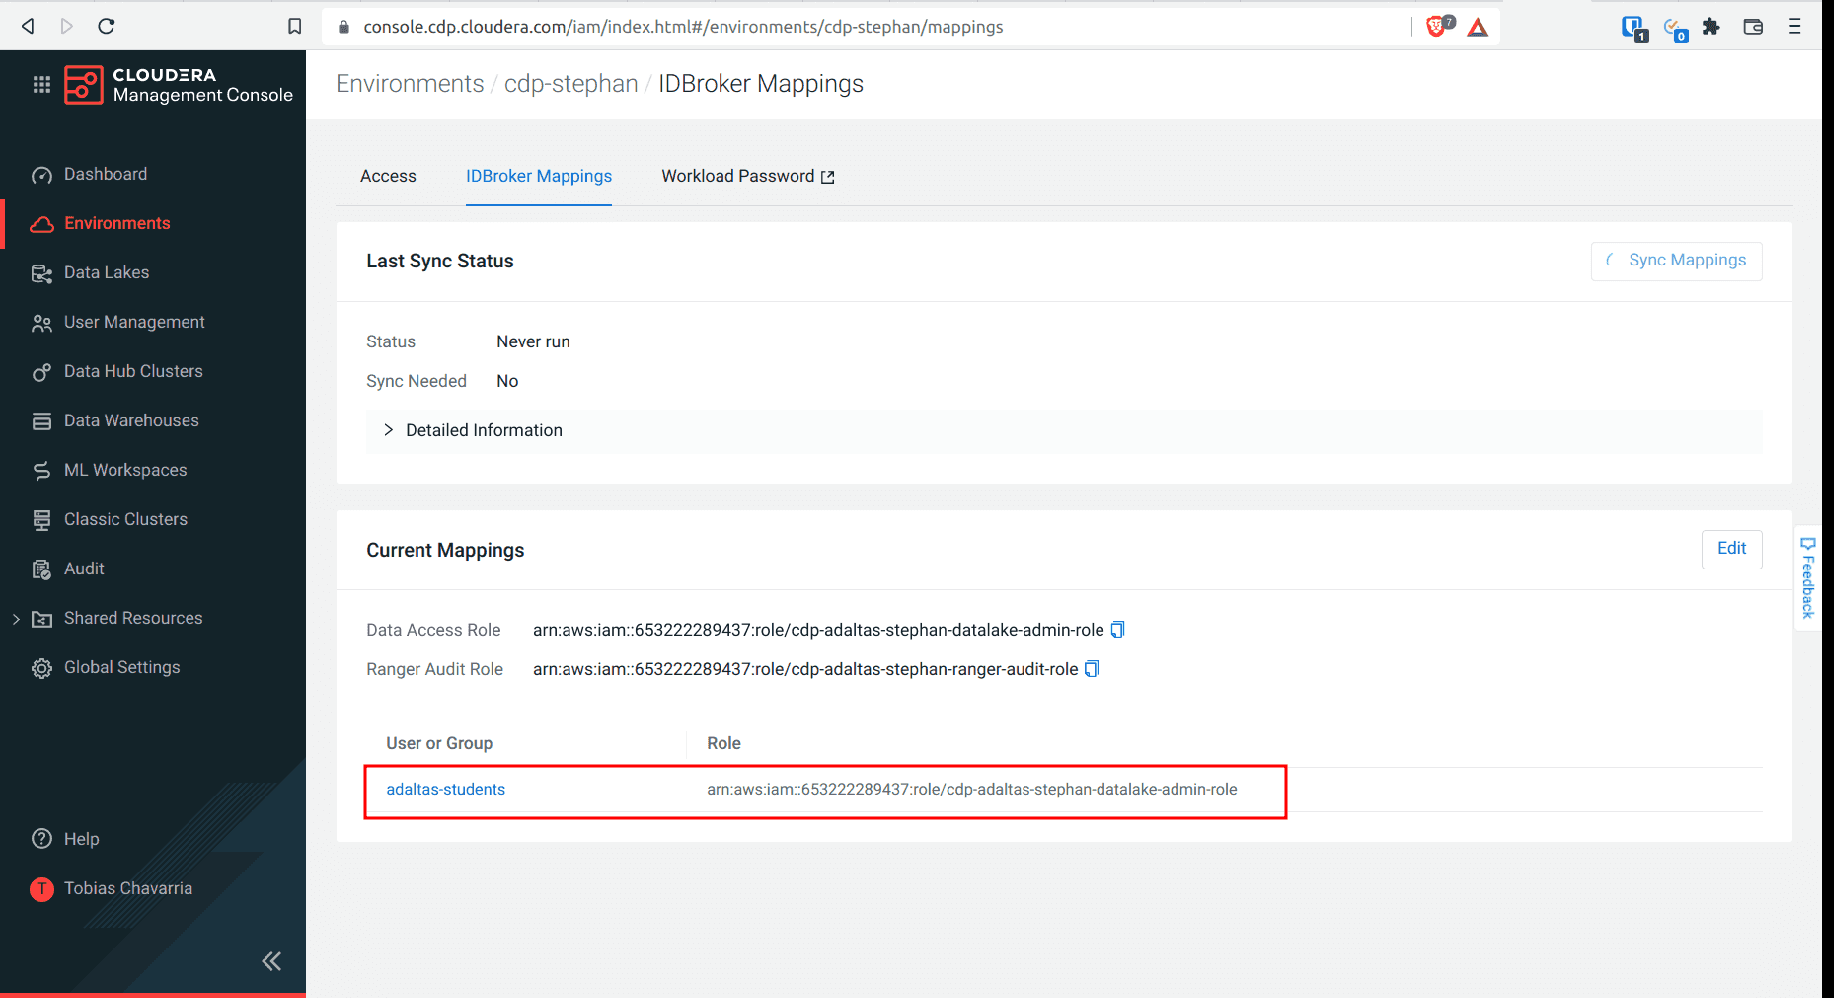
To set IDBrokers Mappings:
-
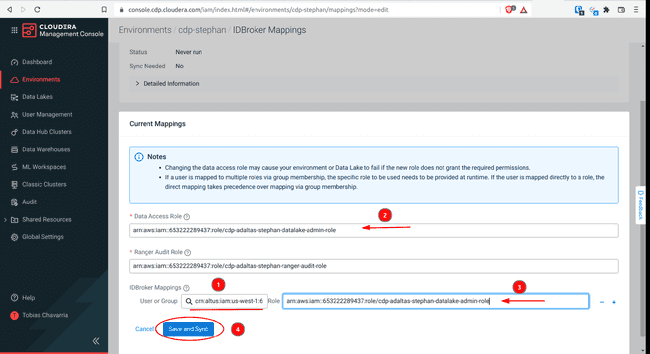
Select the IDBroker Mappings tab, click Edit
-
Add Data Access Role
- Select your group name in the search box
- Copy the Data Access Role above
- Paste it into the Role space
- Click Save and Sync
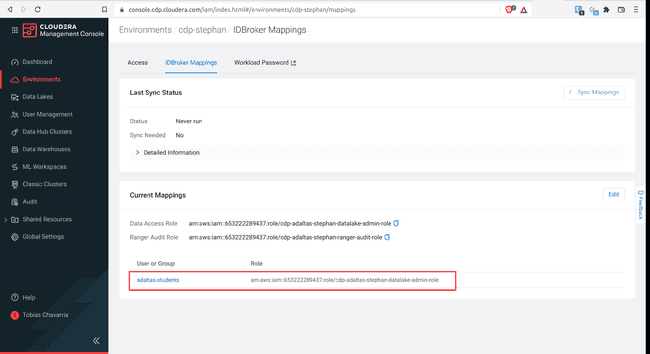
-
You should get the following

Configuring Roles from the Terminal
Deploying via the terminal is recommended for experienced users who want to launch their environment quickly. You need to have the CDP CLI and the AWS CLI installed on your system as described in the CDP part 1: introduction to end-to-end data lakehouse architecture with CDP.
Configuration via the terminal requires the following steps:
- Set Account Roles
- Set Resource Roles
- Set IDBroker mappings
- Synchronize users
Set Account Roles
To set the account roles, you need your group name and the CRN of the roles you want to assign. In order to do so, use the following commands:
# Set your group name
export CDP_GROUP_NAME=adaltas-students
# Array with the required Account Roles CRN
export ACCOUNT_ROLES=(PowerUser DFCatalogAdmin DFCatalogViewer)
# Get Account Roles CRN
get_crn_account_role () {
CDP_ACCOUNT_ROLE_NAME=$1
CDP_ACCOUNT_ROLE_CRN=$(cdp iam list-roles |jq --arg CDP_ACCOUNT_ROLE_NAME "$CDP_ACCOUNT_ROLE_NAME" '.roles[] | select(.crn | endswith($CDP_ACCOUNT_ROLE_NAME))| .crn')
echo $CDP_ACCOUNT_ROLE_CRN | tr -d '"'
}With all the required variables defined, you can set the roles.
# Assign Account Roles
for role_name in "${ACCOUNT_ROLES[@]}"; do \
cdp iam assign-group-role \
   --group-name ${CDP_GROUP_NAME} \
   --role $(get_crn_account_role ${role_name}); \
done
There is no immediate feedback if you successfully assign the roles. You can validate with this command:
cdp iam list-group-assigned-roles --group-name $CDP_GROUP_NAMESet Resource Roles
To set resource roles, you need the CRN of your CDP environment, your group of users, and the roles you want to assign. In order to do so, use the following commands:
# Set your environment name
export CDP_ENV_NAME=[your-environment-name]
# Get Group CRN
export CDP_GROUP_CRN=$(cdp iam list-groups |jq --arg CDP_GROUP_NAME "$CDP_GROUP_NAME" '.groups[] | select(.groupName==$CDP_GROUP_NAME).crn')
# Get Environment CRN
export CDP_ENV_CRN=$(cdp environments describe-environment --environment-name ${CDP_ENV_NAME} | jq -r .environment.crn)# Array with the required resource roles CRN
export RESOURCE_ROLES=(DWAdmin DWUser DFFlowAdmin DFFlowUser DEUser)
# Function: Get Resource Roles CRN
get_crn_resource_role () {
CDP_RESOURCE_ROLE_NAME=$1
CDP_RESOURCE_ROLE_CRN=$(cdp iam list-resource-roles |jq --arg CDP_RESOURCE_ROLE_NAME "$CDP_RESOURCE_ROLE_NAME" '.resourceRoles[] | select(.crn | endswith($CDP_RESOURCE_ROLE_NAME))| .crn')
echo $CDP_RESOURCE_ROLE_CRN | tr -d '"'
}With all the required variables defined, you can set the roles.
# Set Resource Roles
for role_name in "${RESOURCE_ROLES[@]}"; do \
cdp iam assign-group-resource-role \
   --group-name $CDP_GROUP_NAME \
   --resource-role-crn $(get_crn_resource_role ${role_name}) \
   --resource-crn $CDP_ENV_CRN; \
done
There is no immediate feedback if you successfully assign the roles. You can validate with this command:
cdp iam list-group-assigned-resource-roles --group-name $CDP_GROUP_NAMESet IDBroker mapping
To configure the IDBroker Mapping, you need information from your AWS CloudFormation stack. Retrieve this information using the following commands:
# Get AWS Stack required parameters
export AWS_ACCOUNT_ID=$(aws sts get-caller-identity | jq .Account)
export CDP_RESOURCE_PREFIX=$(aws cloudformation describe-stacks --stack-name aws-${USER}-env | jq '.Stacks[].Parameters[] | select(.ParameterKey=="prefix").ParameterValue')

export AWS_DATA_ADMIN_ROLE_ARN=arn:aws:iam::${AWS_ACCOUNT_ID}:role/${CDP_RESOURCE_PREFIX}-datalake-admin-role
export AWS_RANGER_AUDIT_ROLE_ARN=arn:aws:iam::${AWS_ACCOUNT_ID}:role/${CDP_RESOURCE_PREFIX}-ranger-audit-role
Now you can set the Data Access Role to your group on the IDBroker Mappings.
Note: The following command updates ALL the IDBroker Mappings configuration, which is why both Data Access and Ranger Audit roles are required.
# Update IDBroker Mappings roles
cdp environments set-id-broker-mappings \
  --environment-name $CDP_ENV_NAME \
  --data-access-role $AWS_DATA_ADMIN_ROLE_ARN \
  --ranger-audit-role $AWS_RANGER_AUDIT_ROLE_ARN \
  --mappings accessorCrn=$CDP_GROUP_CRN,role=$AWS_DATA_ADMIN_ROLE_ARN
Synchronize Users and IDBroker Mappings
With all the configuration done, it’s time to synchronize both users and IDBroker mappings with your environment.
# Synchronize users
cdp environments sync-all-users \
  --environment-name $CDP_ENV_NAME

# Synchronize IDBroker Mappings
cdp environments sync-id-broker-mappings \
  --environment-name $CDP_ENV_NAME
Configure Ranger policies
There is one more layer of permissions to be configured to enable users to complete the lab, Ranger policies.
These policies are at the Data Warehouse service level. As you will see in the next article, users need to create and query tables on the data warehouse.
All this configuration is done via the Cloudera web interface using the Ranger console.
As a reminder, before starting, you need the Power User account role on CDP to follow along.
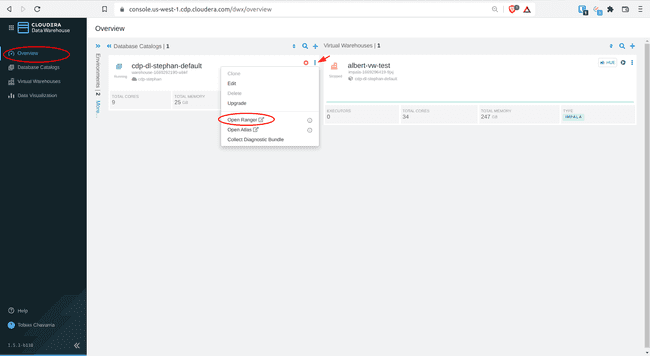
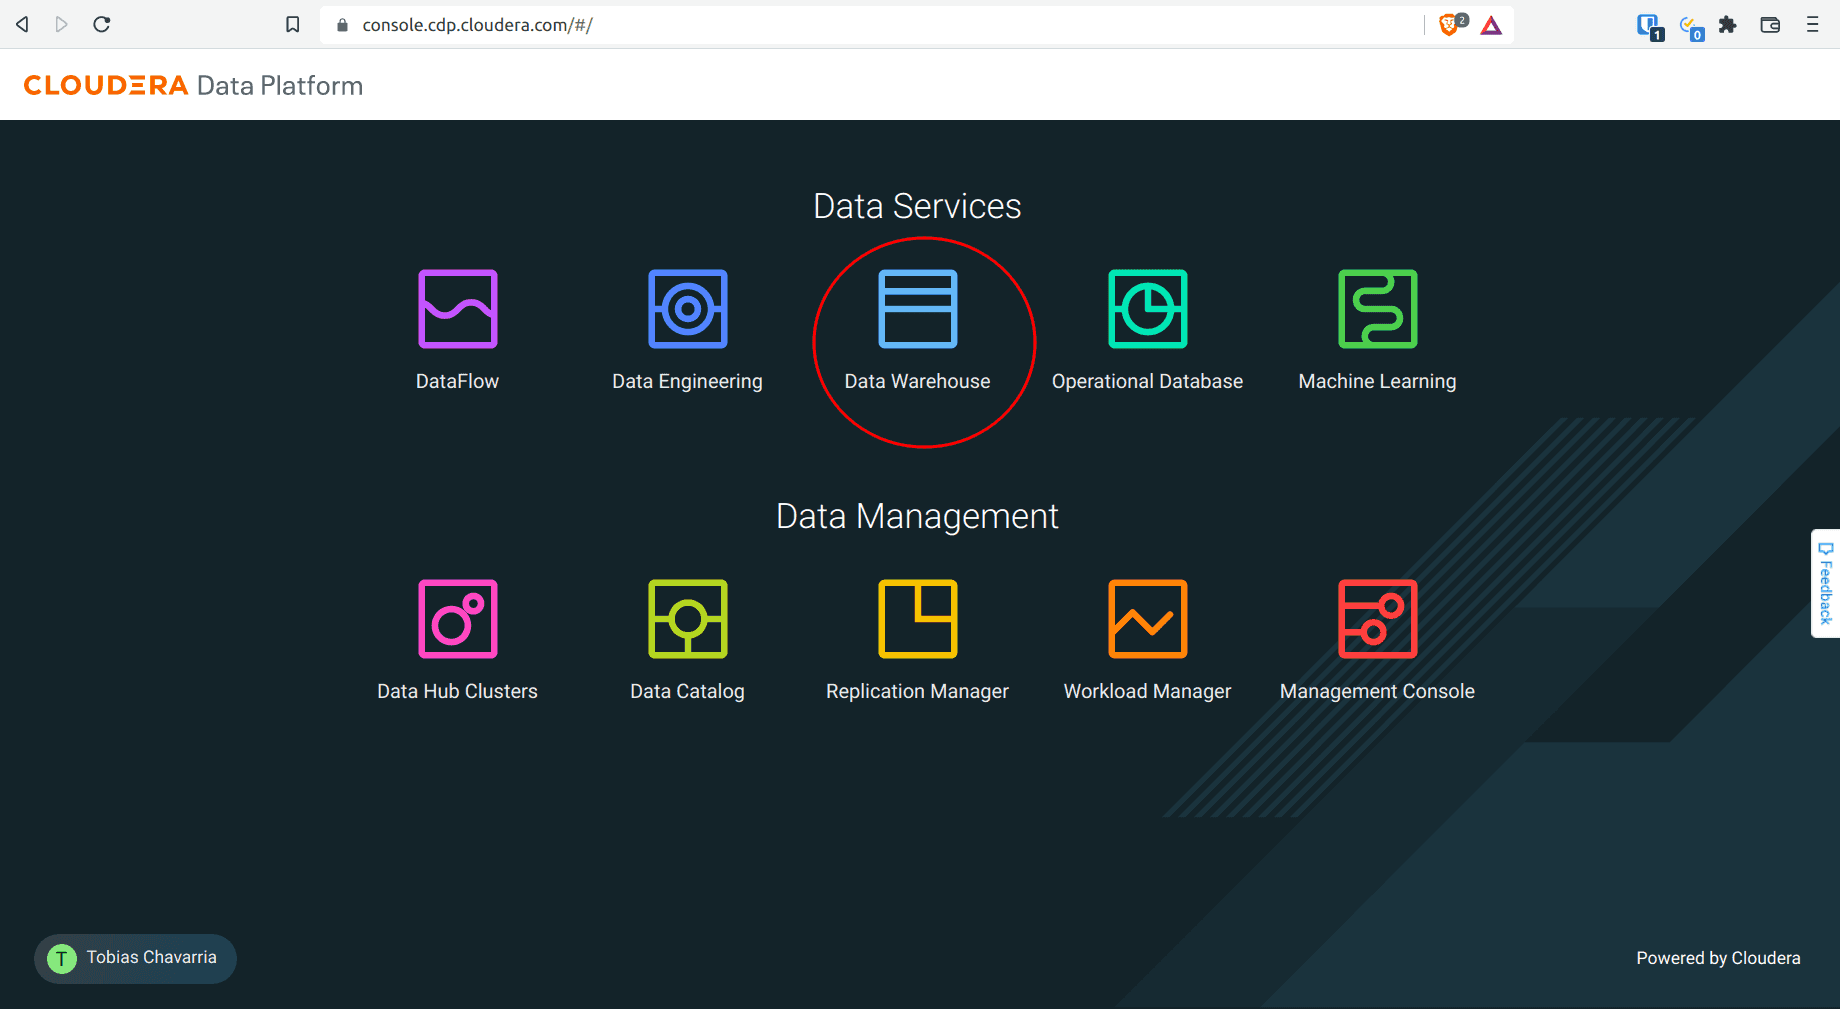
-
Navigate to Data Warehouse

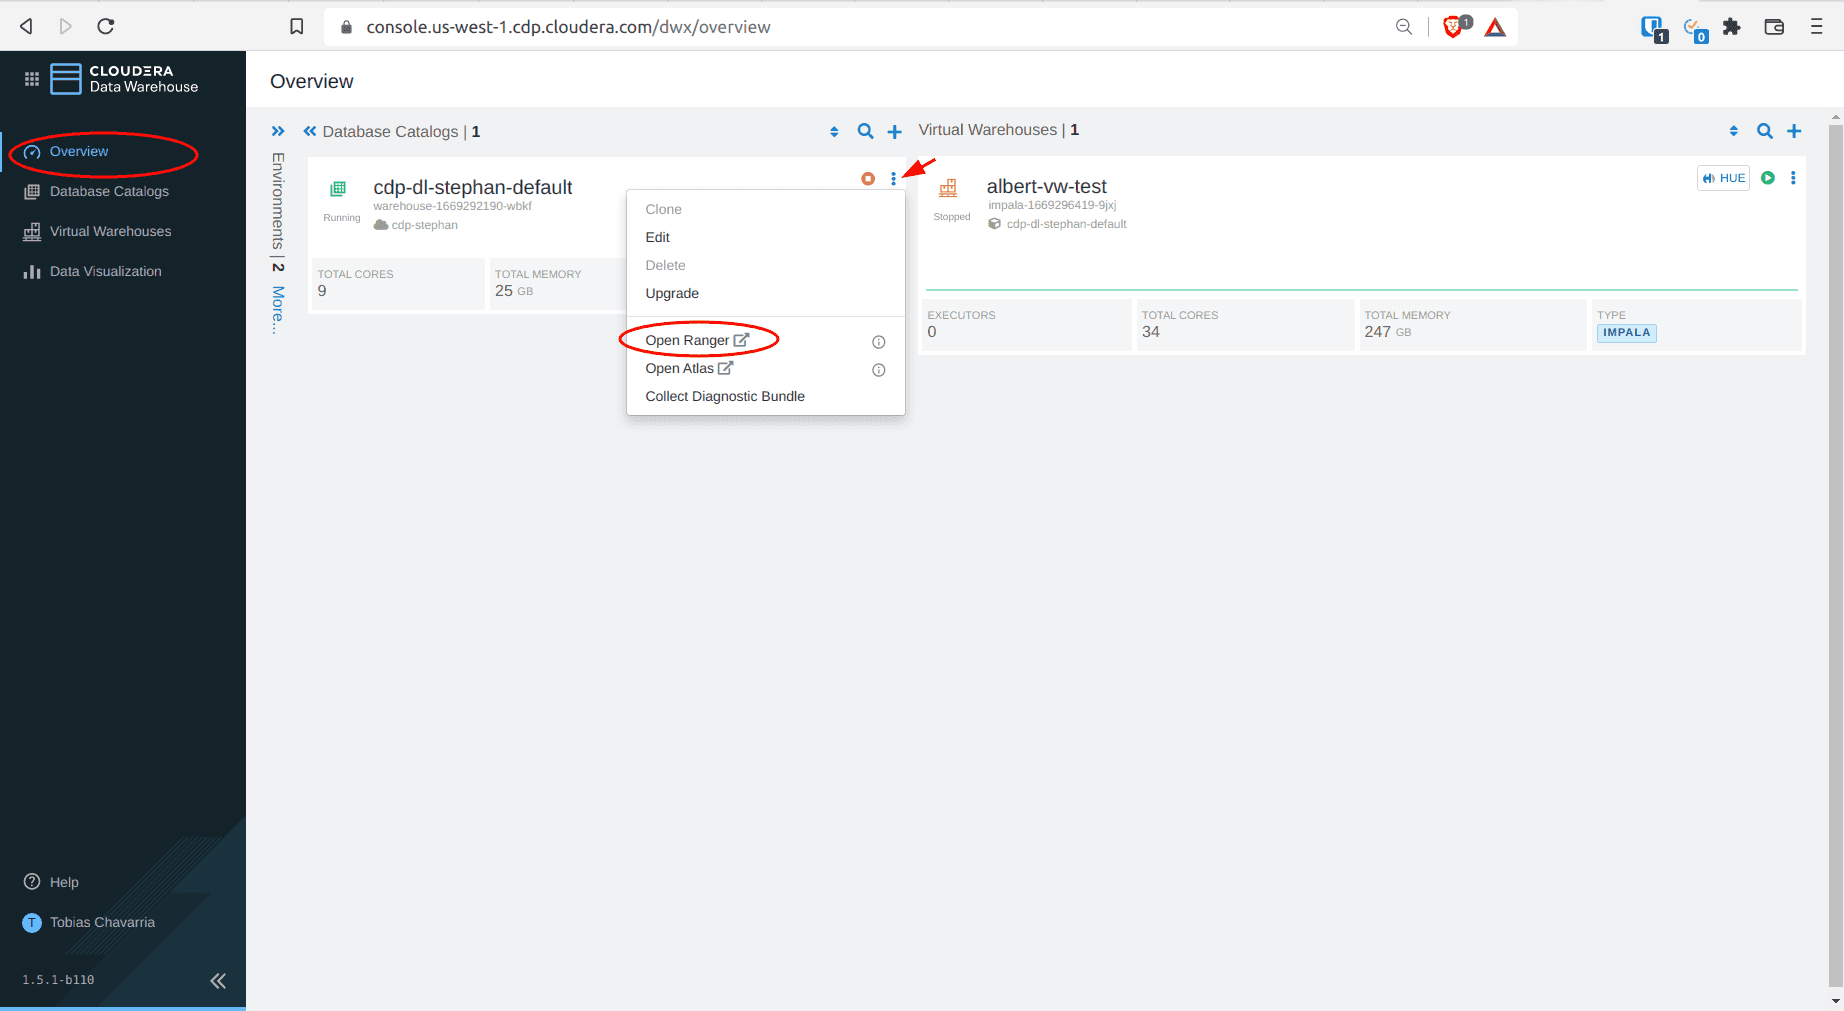
-
In Overview, find the Database Catalog title for your environment, click on the three vertical dots on the top right, and select Open Ranger
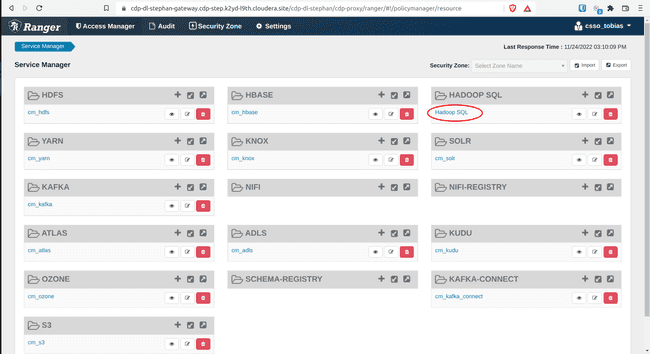
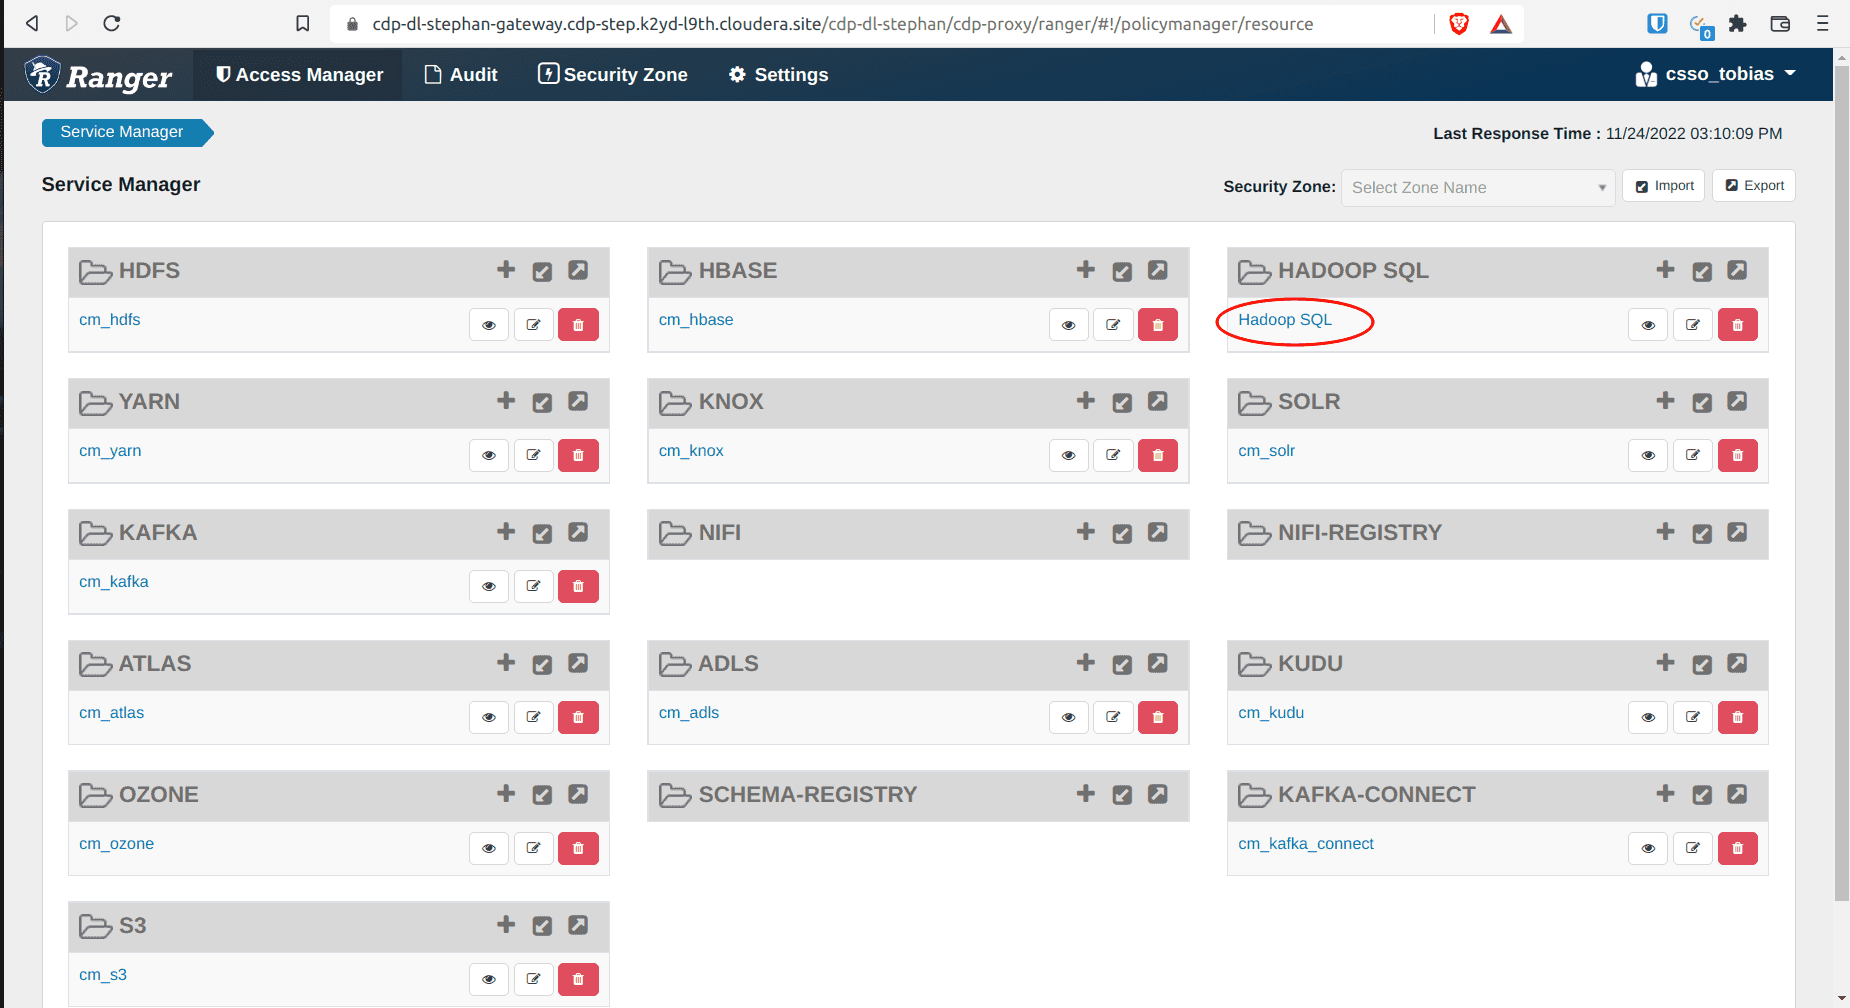
-
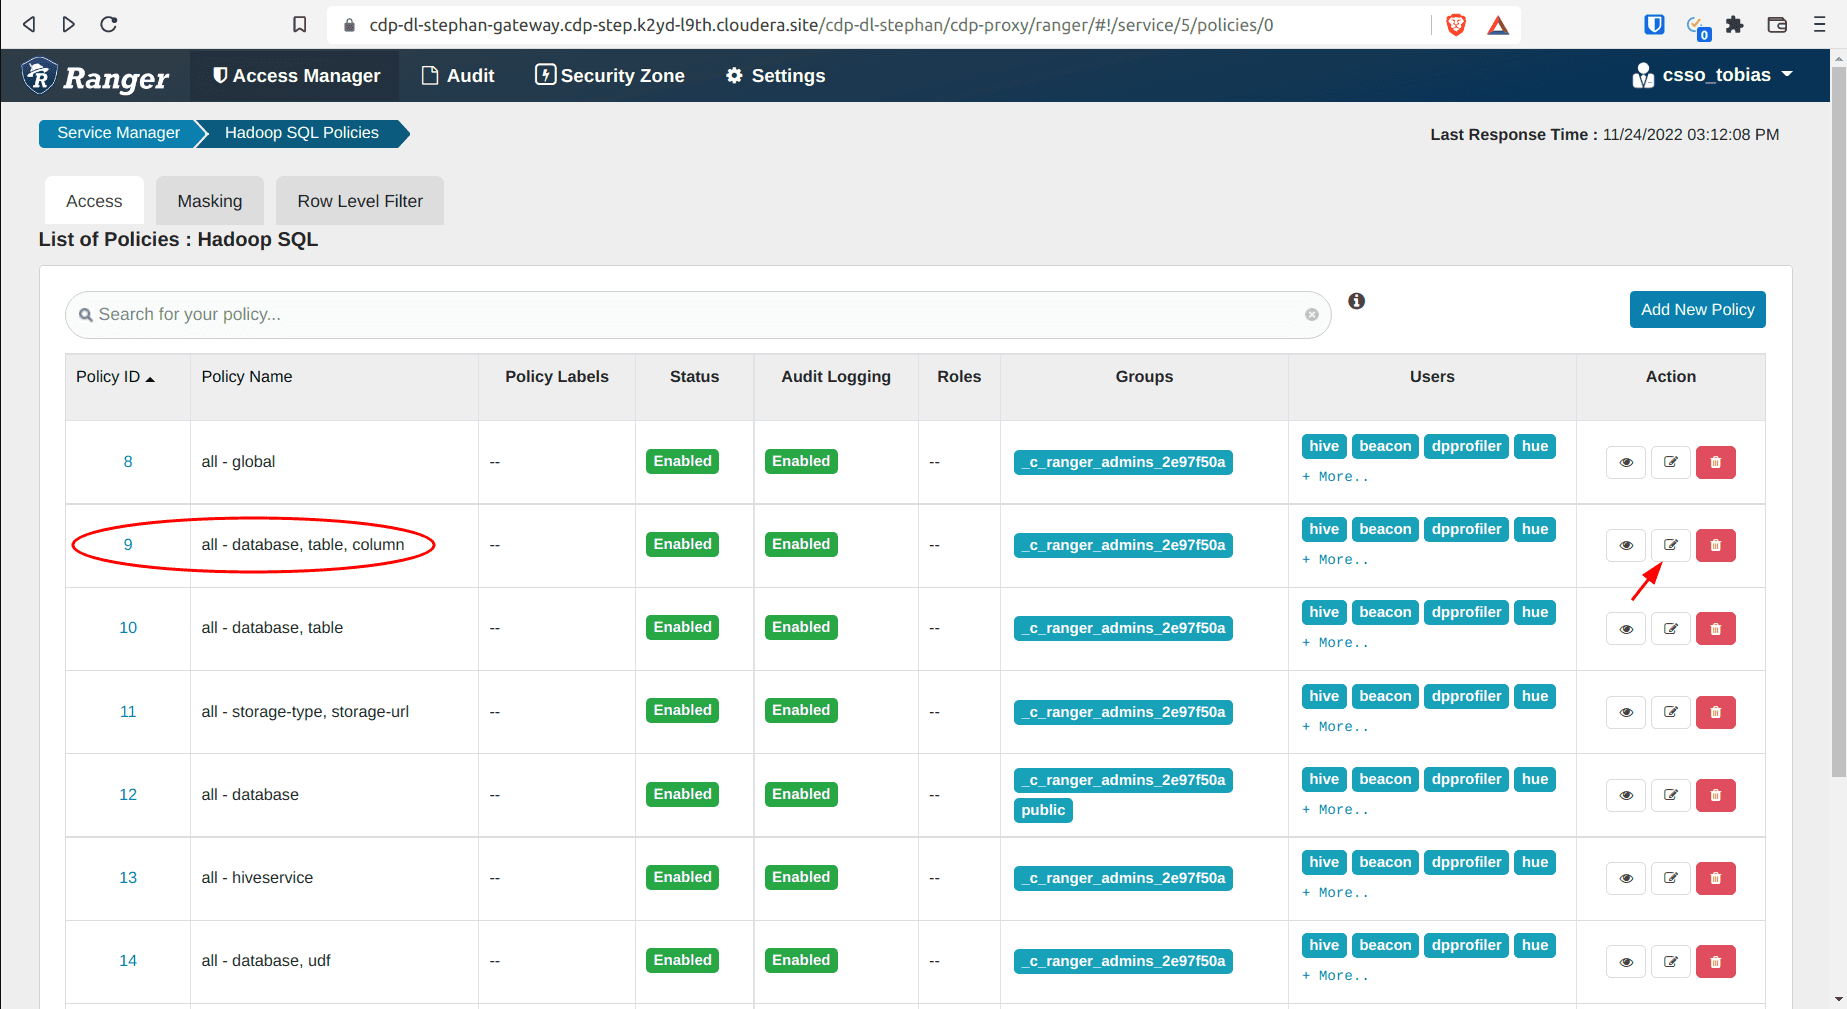
In the Ranger Service Manager, click Hadoop SQL
-
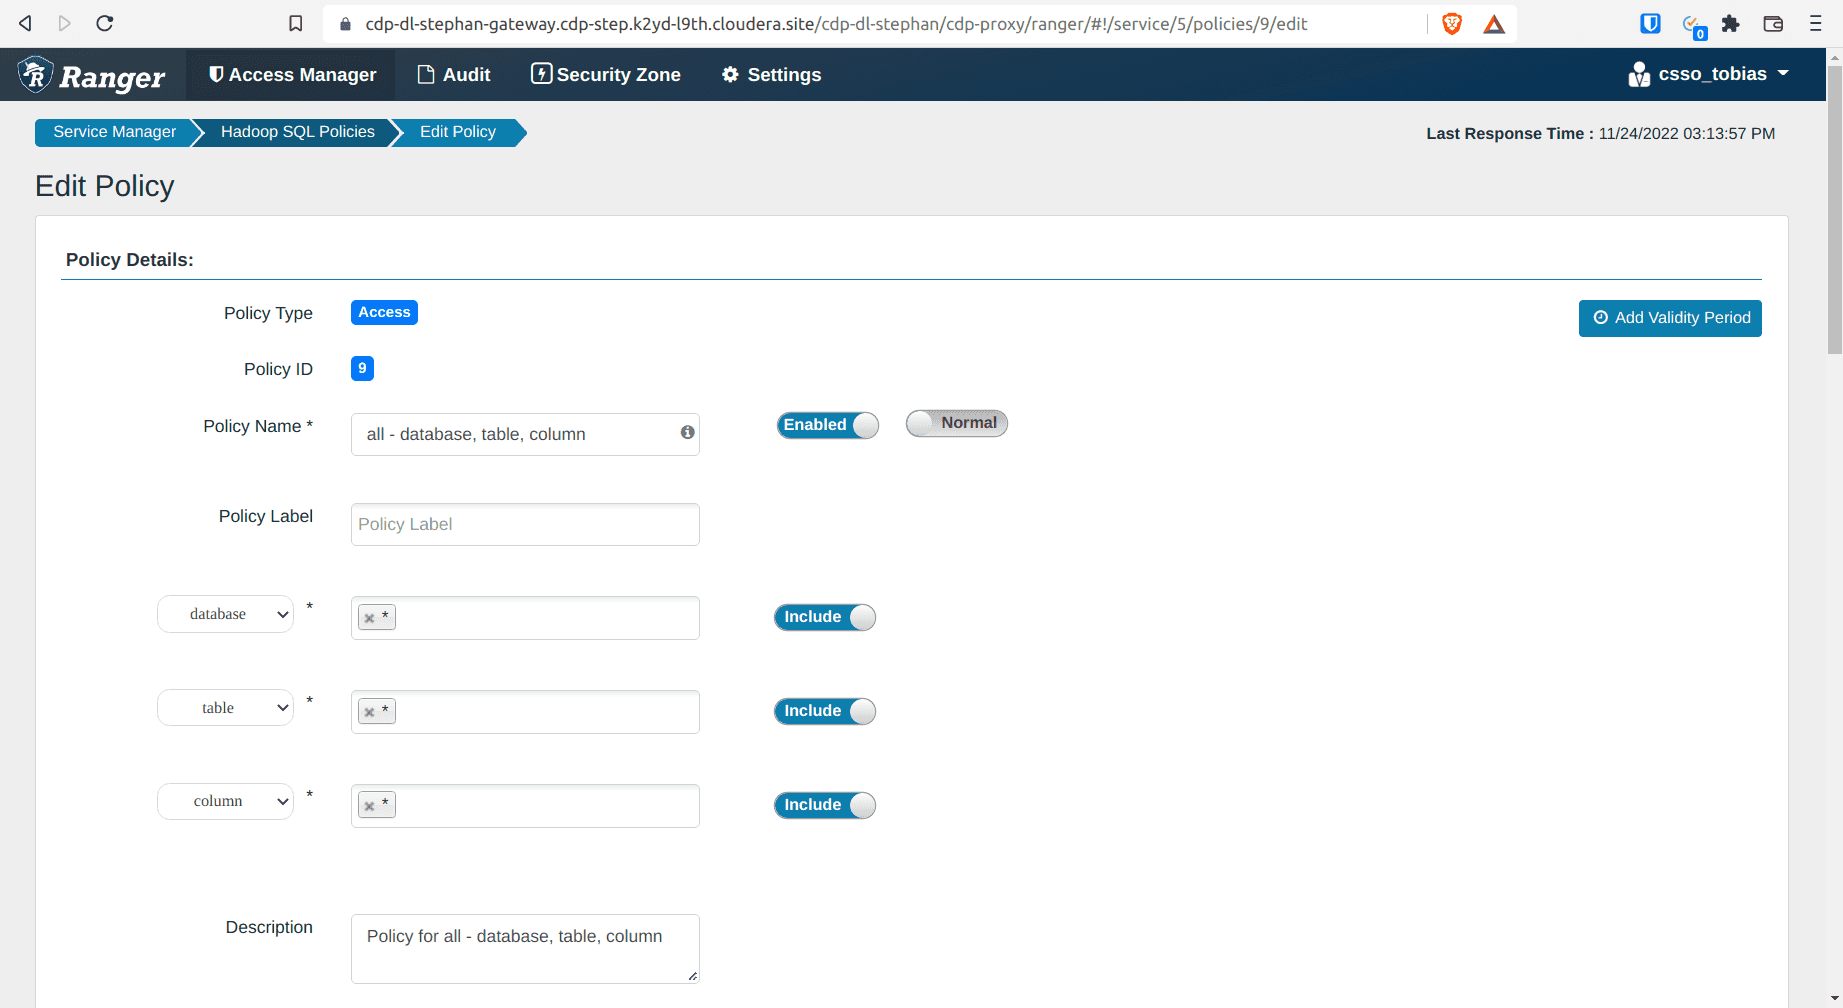
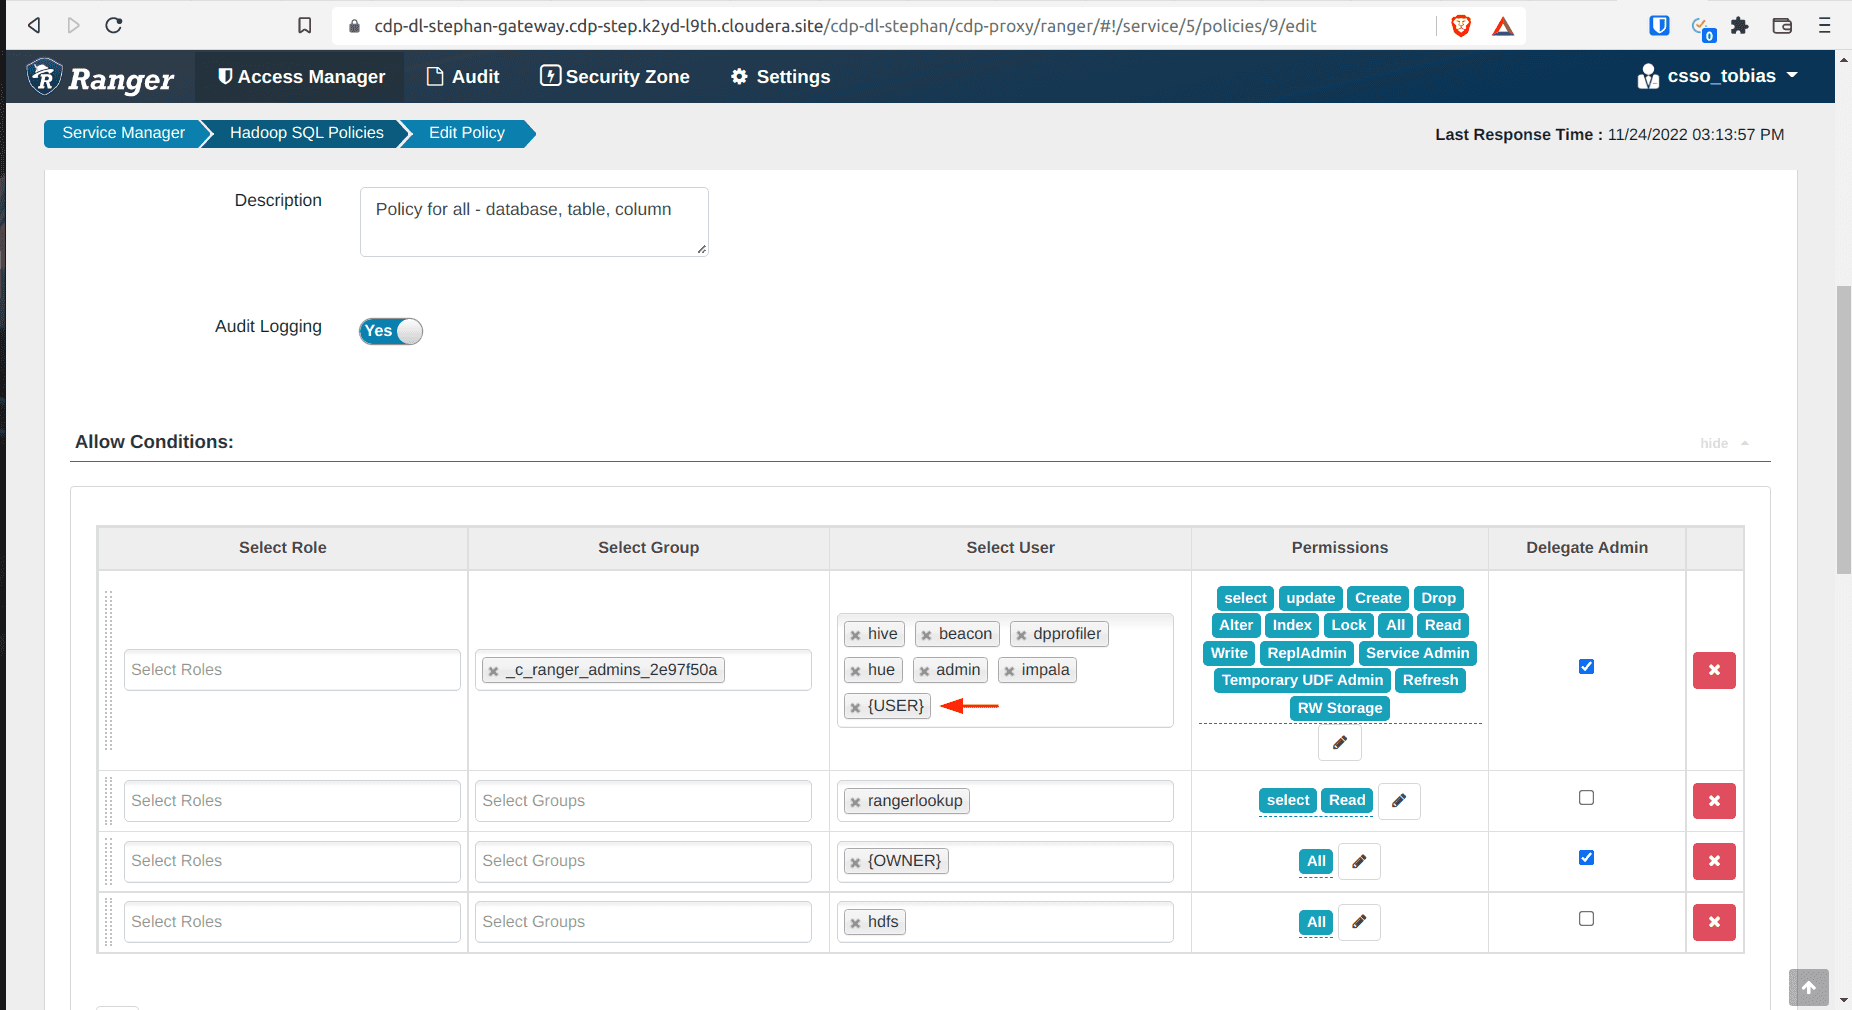
Open policy 9: all - database, table, columns
- Add
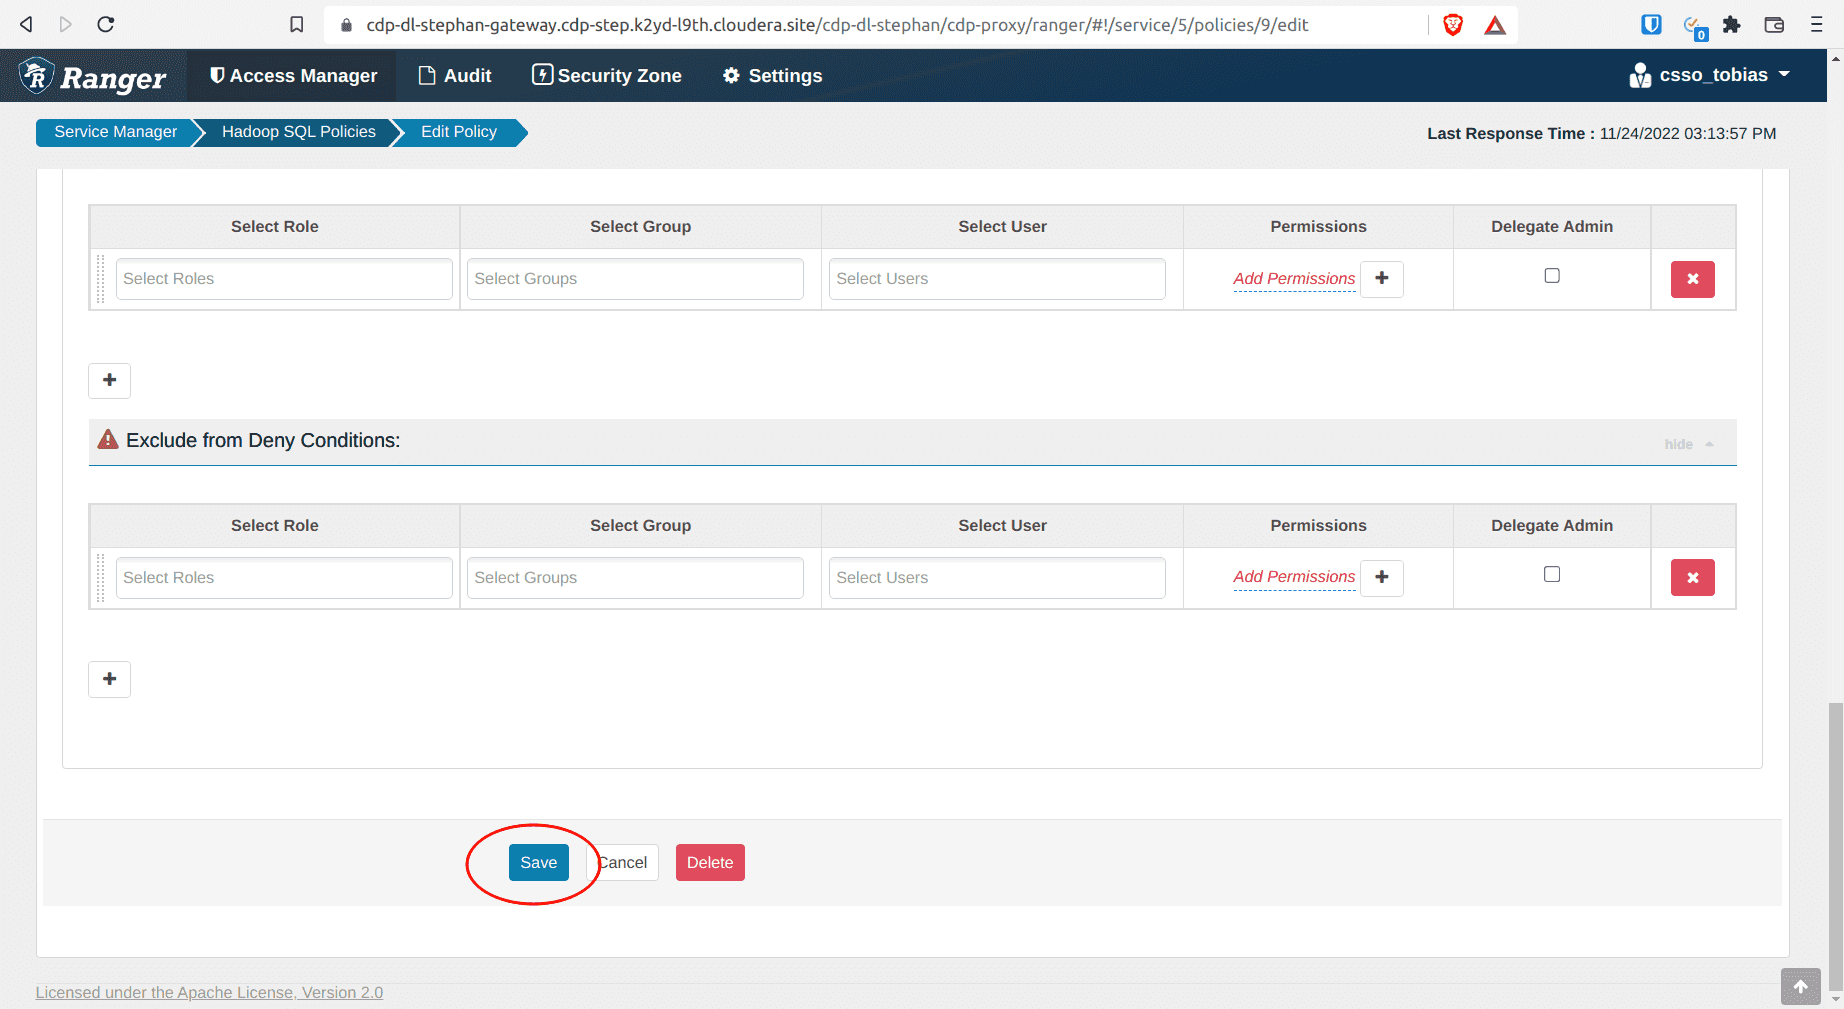
{USER}under Allow Conditions, Select Users - Click Save
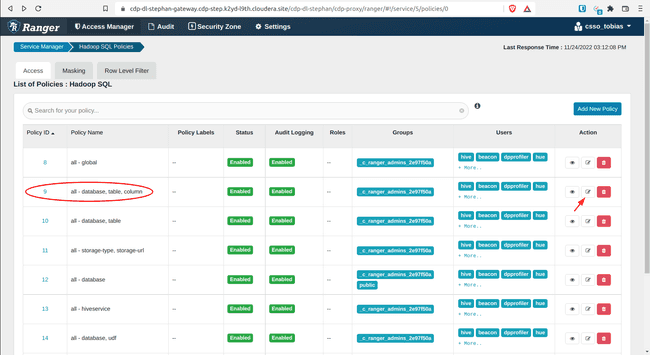


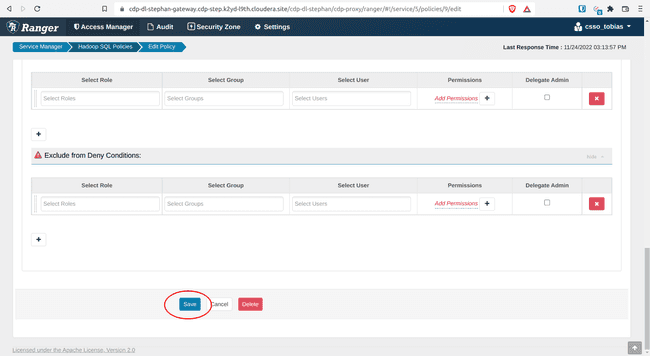
- Add
-
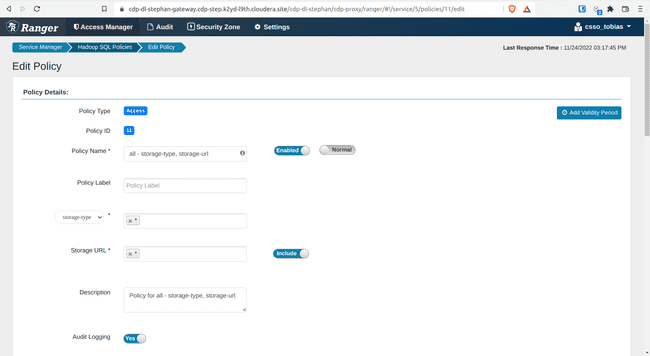
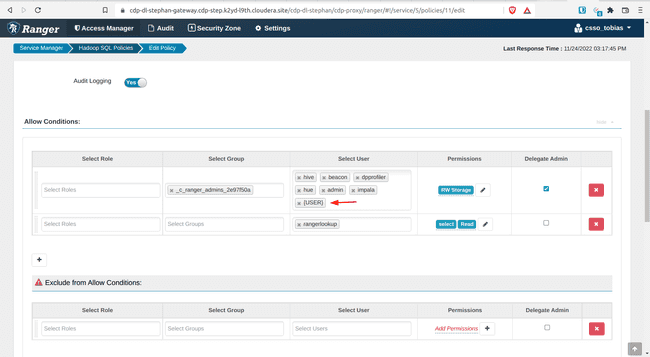
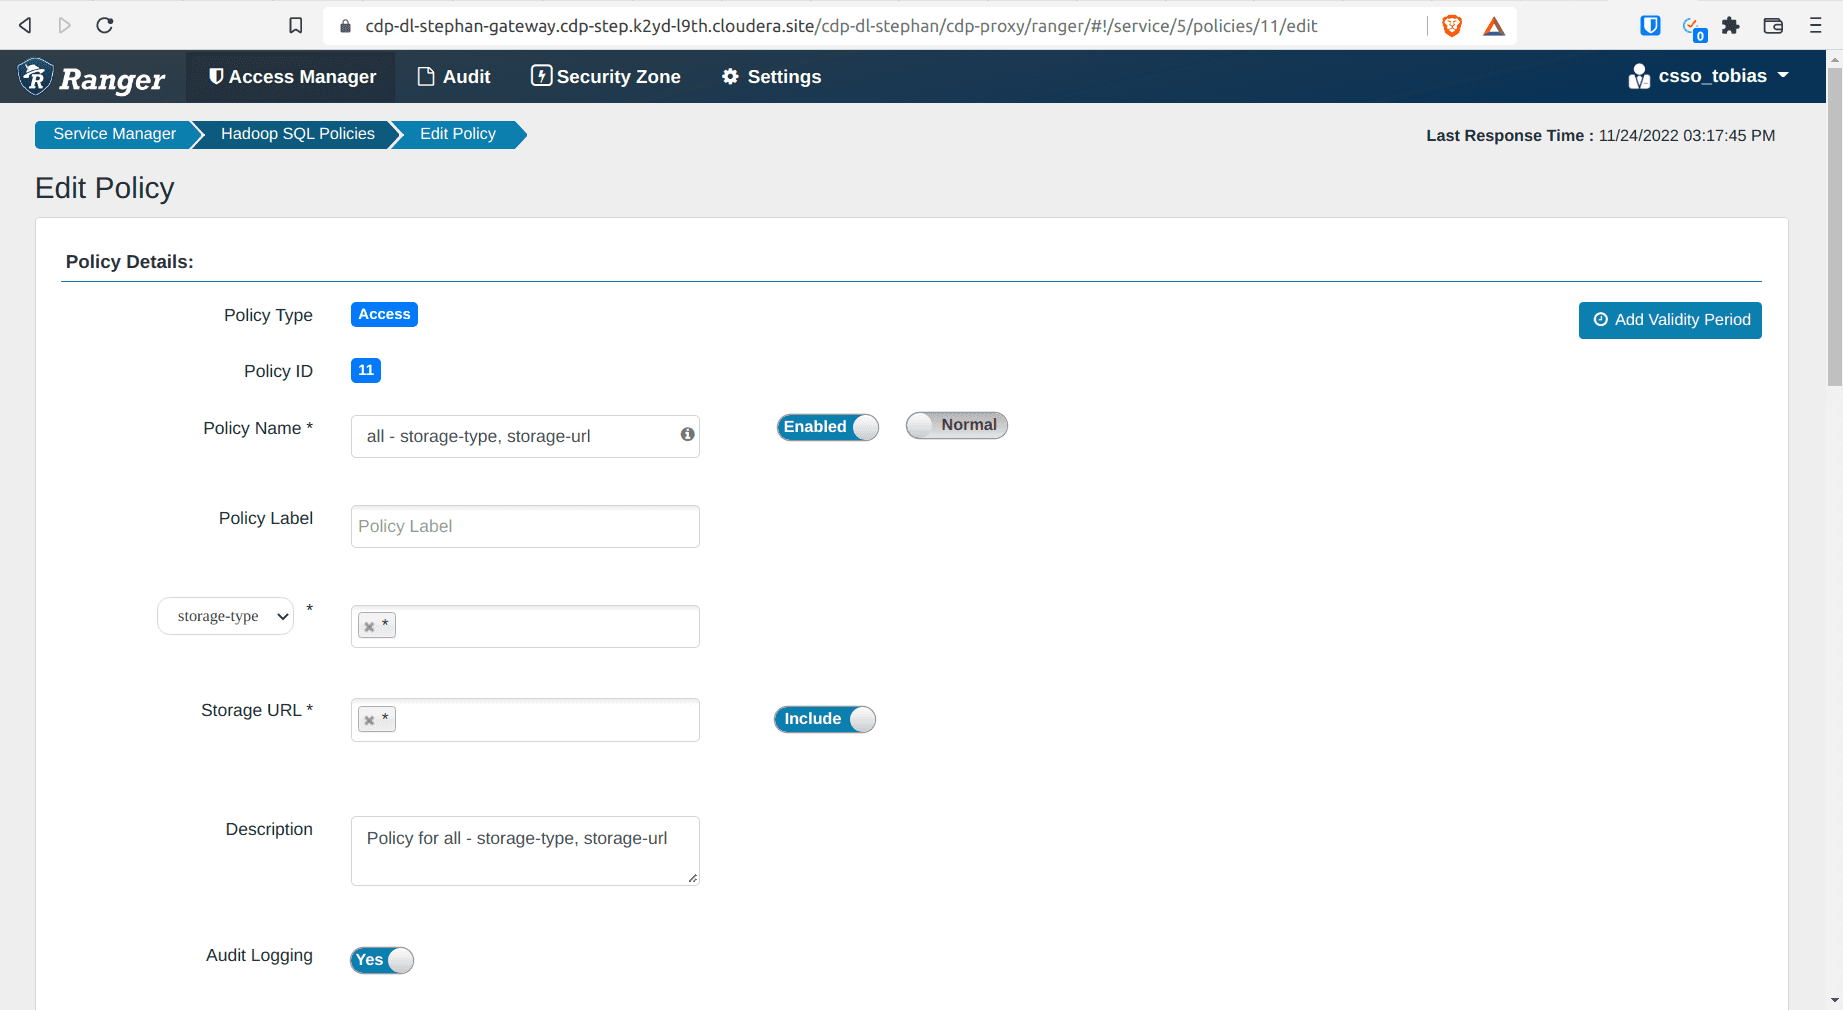
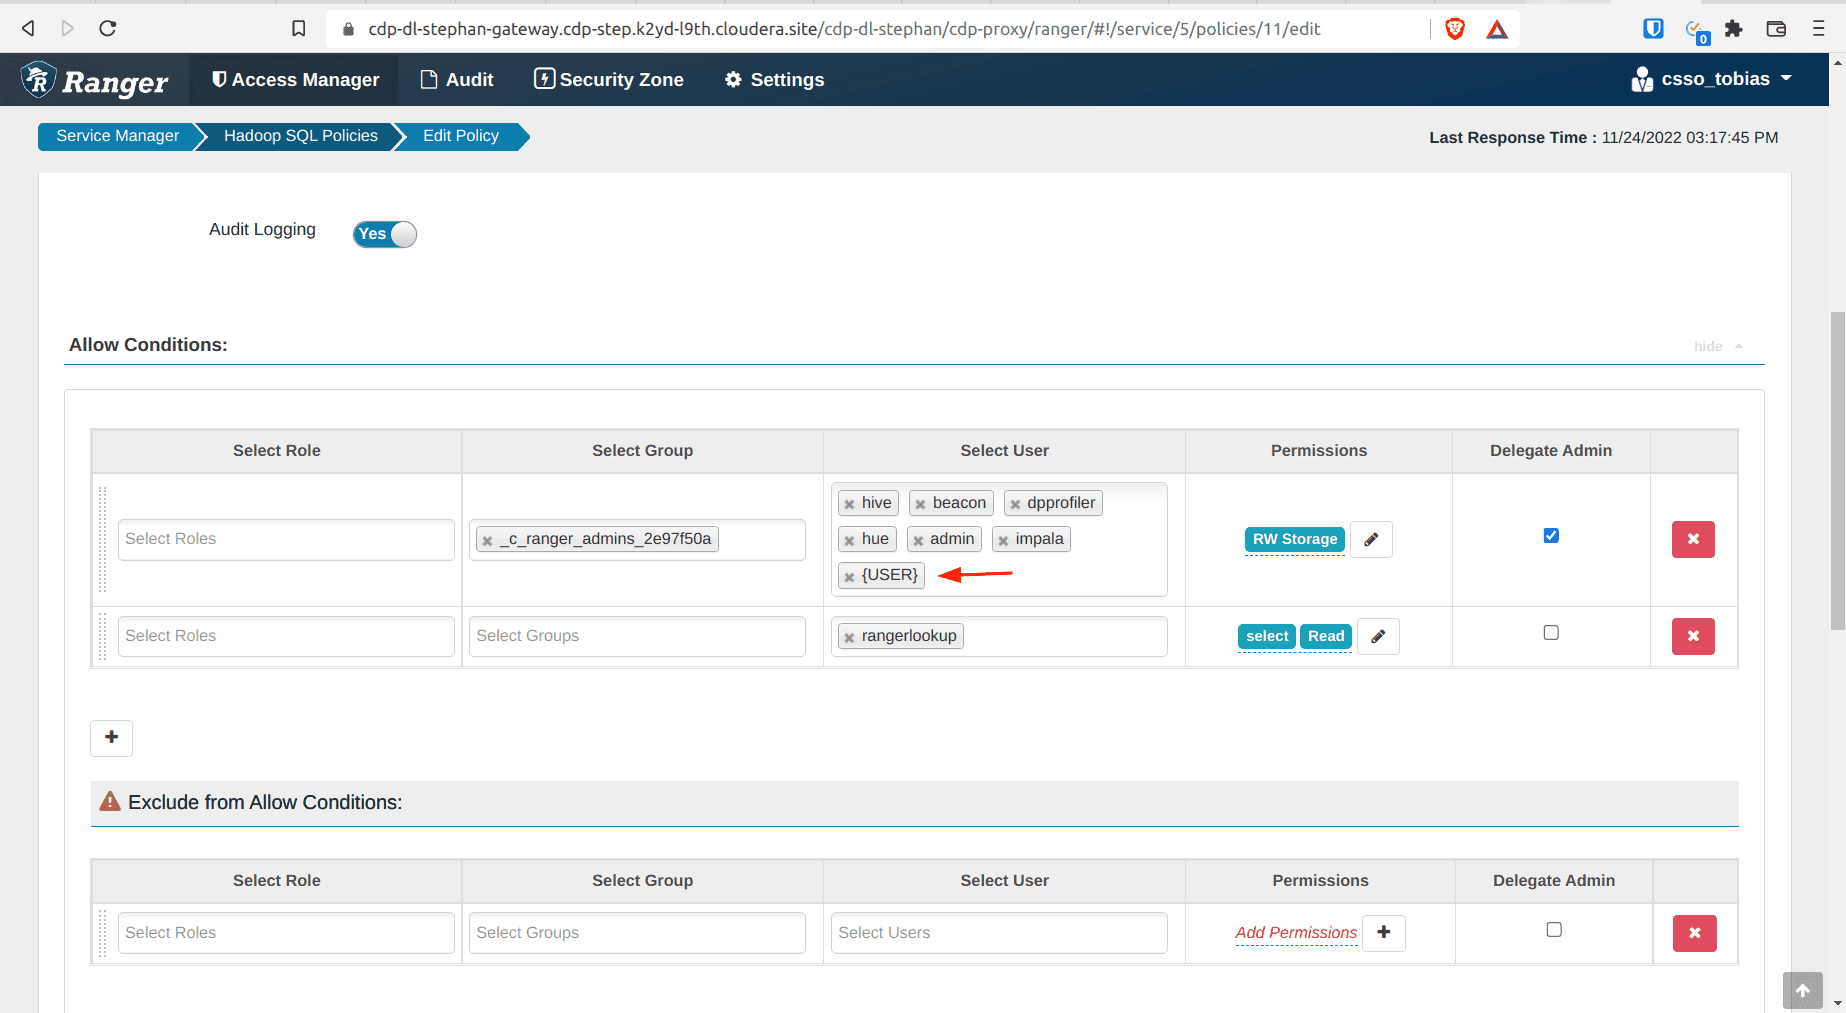
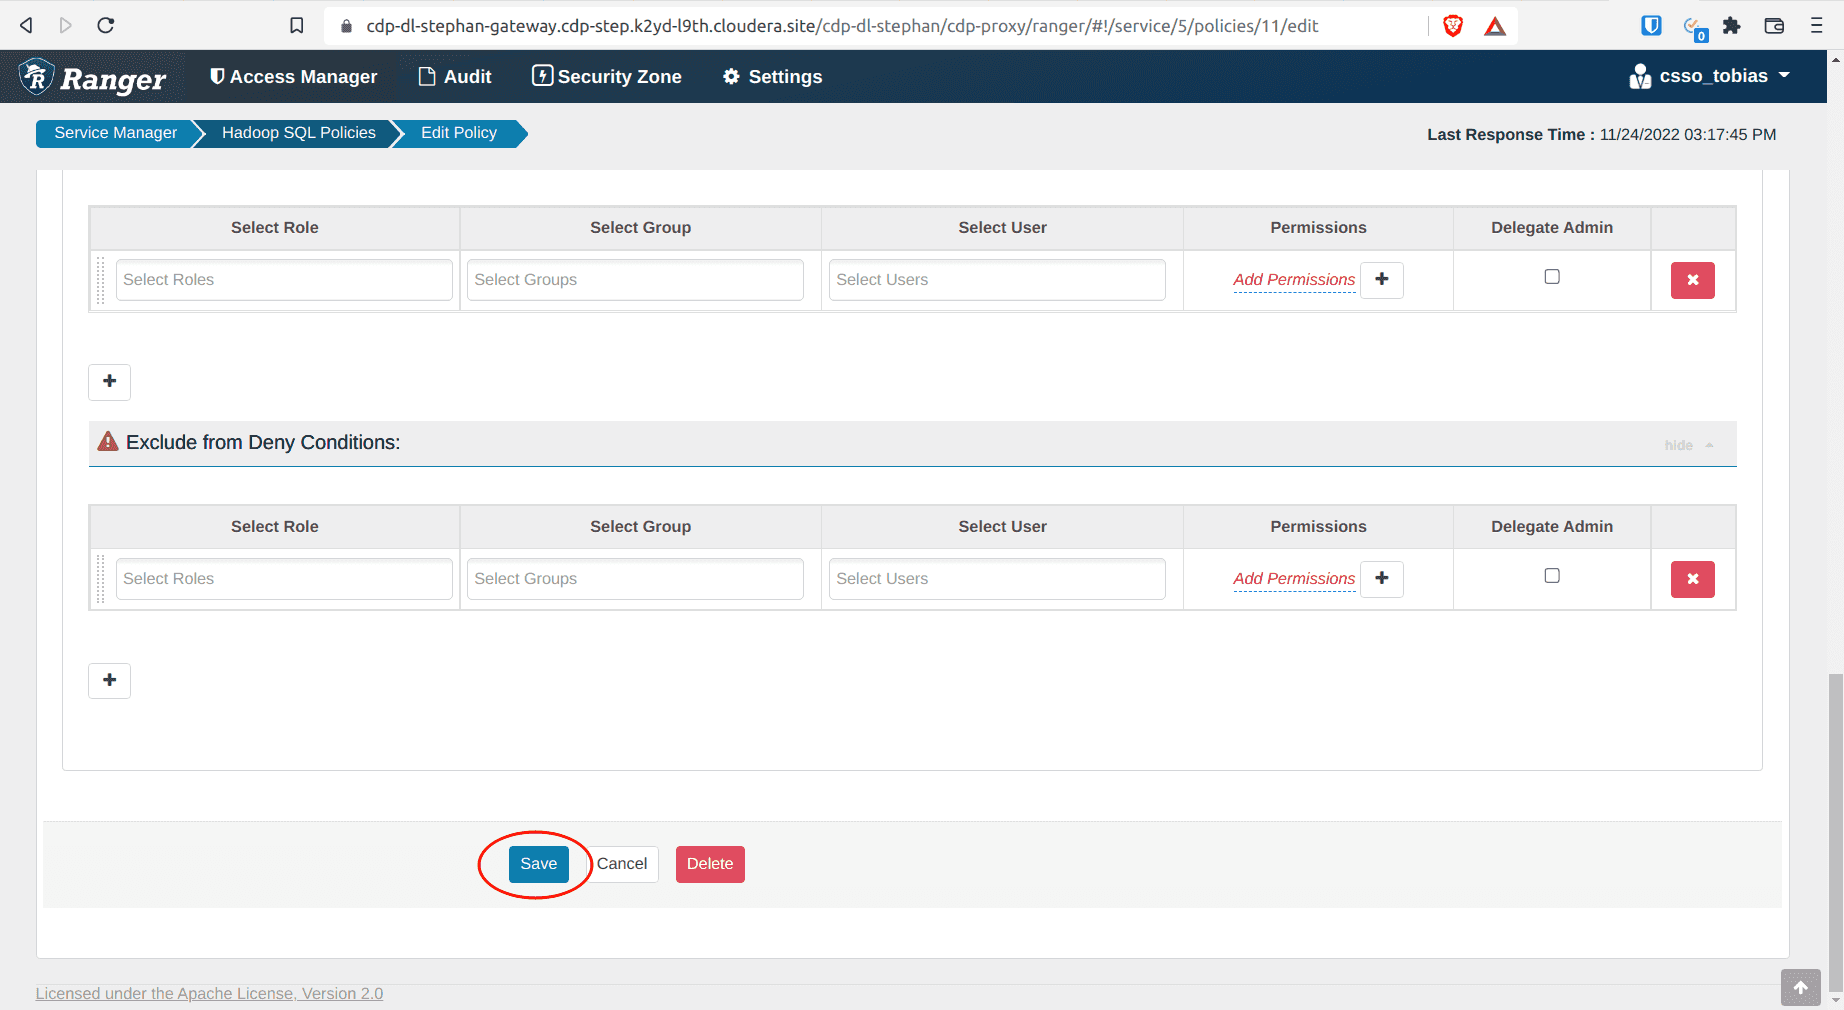
Open policy 11: all - storage-type, storage-url
- Add
{USER}under Allow Conditions, Select Users - Click Save
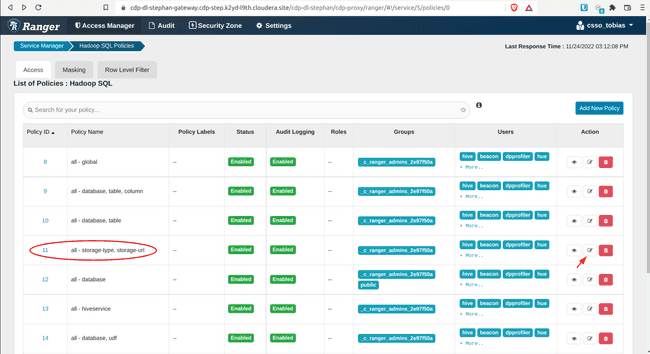
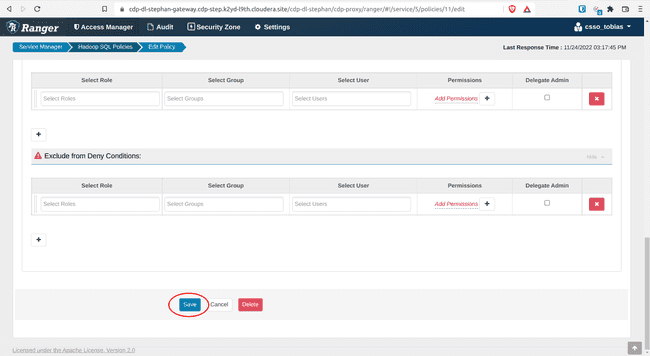
- Add

Next Steps: Hands-On Lab on a CDP Public Cloud Environment
Finally, both users and architecture are ready, so it’s time to let users experiment with all the managed services of your AWS-hosted CDP Public Cloud Environment with the hands-on lab-article that closes this series.
