


Snowflake, the Data Warehouse for the Cloud, introduction and tutorial

Apr 7, 2020
- Categories
- Business Intelligence
- Cloud Computing
- Tags
- Cloud
- Data Lake
- Data Science
- Data Warehouse
- Snowflake [more][less]
Never miss our publications about Open Source, big data and distributed systems, low frequency of one email every two months.
Snowflake is a SaaS-based data-warehousing platform that centralizes, in the cloud, the storage and processing of structured and semi-structured data. The increasing generation of data produced over the world requires modern infrastructure to handle the processing of data. The storage of structured and semi-structured data faces a large number of possible solutions, and picking one is not always easy. If you decided do use public cloud providers, are you going to use their in-house solutions or a third party software? What are your solutions to avoid vendor locking? What are your plans for data cloning and data replication? Does the job market offers the skillset you need to build your infrastructure?
Users can easily provision and scale virtual warehouses to execute processing on structured and semi-structured data. Among many features, Snowflake is ACID compliant, supports data sharing and cloning in seconds, allows scaling its infrastructure in an unsupervised approach, and shares connectors with more than 70 third-party partners. Storage-wise, Snowflake provisions object storage automatically on the cloud provider selectionned during the sign up process. Using a SQL database engine to allow interactions with its infrastructure, managing data in Snowflake requiers knowledge of SQL, which benefits from a low entry barrier.
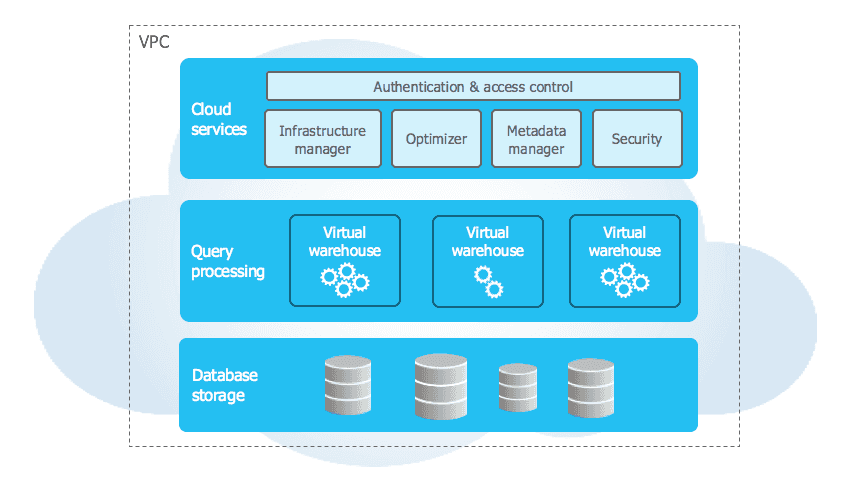
Snowflake has a hybrid architecture between shared-nothing and shared-disk models. On one hand, a central data repository is present for persistent data, accessible from all nodes of a cluster. On the other hand, Snowflake executes the submitted requests using Massively Parallel Processing (MPP) clusters, where each node of the cluster stores part of the global set of data. This type of architecture, patented by the company, links the advantages of both model to one solution.
Virtual warehouses can be resized at any given point in time (even when running queries), modified in a multi-cluster approach to support more users concurrently etc. Mastering the skills to adapt your infrastructure is easy, and also, part of this tutorial. So let’s take a look at what Snowflake has to offer: first through its architecture, then in an example of creating a workspace.
Snowflake, an architecture for the cloud
First and foremost, beware of the confusion between the “traditional” Data Warehouses and virtual warehouses: Snowflake is indeed a Data Warehouse solution, but virtual warehouses are also Snowflake processing engines to execute DML operations, load data and run queries.
Virtual warehouses consist of virtual machines, hosted on cloud providers infrastructures (AWS, GCP or Azure), to support the processing power required by Snowflake’s users. In short, the more speed you want for processing your queries and uploading your data, the bigger your virtual warehouses must be.
Regarding storage, Snowflake uses columnar storage with a micro-partitionning system, that contains from 50MB to 500MB of uncompressed data. Micro partitions are derived automatically, and Data Clustering is automatic and can be modified by the user to provide faster retrieving of queries. Storage and compute costs are directly outsourced to the cloud providers (AWS, Microsoft Azure or GCP) chosen during registration. This approach allows a centralisation of costs, enhancing clarity and transparency .
To allow these two layers (storage and processing) to communicate with each other, a third layer is necessary to coordinate the implementation of the platform: the cloud services layer. It is responsible, among other things, for:
- the security policy (authentication and ACL)
- the provisioning policy for virtual machines
- compiling and optimizing queries
- metadata management
Interact with Snowflake
In terms of use, it is possible to interact with Snowflake in different ways. A web interface is available to users, as well as a command line interface, named SnowSQL. In the tutorial, we will come back to how to install SnowSQL for different operating systems.
Platform Compatibility
It is possible to transfer data to Snowflake in several ways: via one’s system and terminal access or via object storage platforms in the cloud, such as S3 buckets, Google Cloud Storage or Azure Blob storage. More generally, there are also different connectors: JDBC, ODBC, Python, R, Spark, Kafka, Node.js, .Net, Databricks etc.
Supported formats are those adapted to Big Data processing: CSV, XML, JSON, AVRO, Parquet and ORC.
Snowflake by default compresses imported data into gzip. It is possible to change this configuration with snappy, brotli or bzip2 compression.
Tutorial and how to use Snowflake
Create an account
It is necessary to create an account in order to access the services of the platform. The previous link will take you to the official Snowflake website, and you will receive a trial offer with $400 credits. You will have the choice between a Standard, Premier, Enterprise, or Business Critical edition. In our tutorial, we used the Standard Edition. The other editions allow you to have more support with customer service, to enable warehouses in multi-cluster mode and other features.
Installing SnowSQL
The purpose of this guide is to use the SnowSQL command-line interface. You must, therefore, install it on your computer. Installing SnowSQL will allow you to interact with Snowflake’s services via a terminal.
For MacOS using Homebrew:
brew cask install snowflake-snowsqlFor Windows:
Download the latest version of SnowSQL (1.2.5 at the time of writing this article):
curl -O https://sfc-repo.snowflakecomputing.com/snowsql/bootstrap/1.2/windows_x86_64/snowsql-1.2.5-windows_x86_64.msiDouble click directly on the downloaded file to open it and start the installation.
For Linux:
Download the latest version of SnowSQL (1.2.5 at the time of writing this article):
curl -O https://sfc-repo.snowflakecomputing.com/snowsql/bootstrap/1.2/linux_x86_64/snowsql-1.2.5-linux_x86_64.bashGo to your Downloads folder and execute the following command:
bash snowsql-1.2.5-linux_x86_64.bashLogging in via SnowSQL
Using the login credentials received when creating your account, you can use the following command to log in to your account via a terminal:
snowsql -a [accountname] -u [username]Here, accountname will have the following form: accountID.accountregion. This information is sent when registering for Snowflake. Example: hu67890.eu-central-1 can be a valid account name.
It is essential to pay attention, when registering, to the choice of the cloud provider, and the associated region. Indeed, the warehouses provided by Snowflake for processing will be implemented in the same area as chosen for the region. For each new region, it is necessary to recreate the entire infrastructure. Data replication possibilities exist, but no configuration of an already existing infrastructure, especially warehouse and schema.
Login as account administrator
Once logged in, Snowflake must be informed that you wish to use a role with sufficient privileges to be able to create new users and assign them the permissions to interact with the platform.
Snowflake offers four types of default roles (we will see that it is possible to create more):
- PUBLIC: role given automatically to each user. If objects are assigned to this role, all users will be able to access them.
- SYSADMIN (System Administrator): role that gives the power to create warehouses, databases and other objects.
- SECURITYADMIN (Security Administrator): role that gives the right to create, modifier and manage the roles and users of the platform.
- ACCOUNTADMIN (Account Administrator): includes the roles of SYSADMIN and SECURITYADMIN.
Even if your account has the role of Account Administrator, it is necessary to indicate this when logging in to Snowflake. By default, the user is logged in with the permission of a system administrator, which does not give the right to authorize other users to create databases, warehouses etc.
So we will use the following command (which can be similar to a sudo su on Linux) to authenticate as an administrator of the account:
use role ACCOUNTADMIN;Create a warehouse
As said before, the warehouses (and especially their numbers and sizes) constitute the processing power of the platform.
In order to be able to better control costs and separate the use of resources, a good practice is to create a warehouse specifically for this new group of users.
The next SQL command creates a warehouse that will be used for processing the later queries.
create or replace warehouse "new_wh"
warehouse_size = XSMALL
AUTO_SUSPEND = 180
AUTO_RESUME = TRUE
initial_suspended = TRUE
comment = "warehouse available to new users";
Some explanations on the different arguments:
- warehouse_size: We specify the size of the warehouse. We find here a similarity with the provisioning of virtual machines on AWS, GCP or Microsoft Azure.
- AUTO_SUSPEND: The auto_suspend parameter corresponds to the maximum time at the end of which the warehouse will be automatically paused if it is not requested by a user. Here we specify that 180 seconds must elapse before the warehouse is put on standby.
- AUTO_RESUME: This parameter allows you to automate the resumption of the warehouse when a request is sent without having to restart it manually. The commissioning of a suspended warehouse usually takes less than 10 seconds.
Create a database
This command will create a database to allow future users to insert new tables and data.
create or replace database "new_db";Create a schema
The schema is the second storage architecture unit, after the database. It is in the schema that one can find for example the views, tables, and transition zones relative to the database on which the schema is linked. It is also necessary to create one for the new user group.
create or replace schema "new_sch";Create a role
The roles are an essential link in establishing Snowflake’s safety strategy. It is to a role that we will assign privileges, and, in a second step, to a user that we will assign a role.
create or replace role "new_role";Give permissions to users
From now on, it is a matter of giving privileges to the newly created role to allow it to interact with future generated objects. The following commands are used to give privileges for table modifications, database and warehouse usage, and schema modification.
grant all privileges on warehouse "new_wh" to role "new_role";
grant all privileges on database "new_db" to role "new_role";
grant all privileges on future tables in schema "new_db"."new_sch" to role "new_role";
grant all privileges on schema "new_db"."new_sch" to role "new_role";
Create a first user
The following command will respectively create a new user, assign him a password and a login, then assign him a warehouse, a database, a schema and a role by default.
create user "new1"
password = "new123"
LOGIN_NAME = "johndoe"
DEFAULT_WAREHOUSE = "new_wh"
DEFAULT_NAMESPACE = "new_db"."new_sch"
DEFAULT_ROLE = "new_role";
Give a role to a user
Now that the user has been created, it must be assigned the role that was previously established.
grant role "new_role" to user "new1";You can now log out of your session and tell your user that they can start working!
!exitMonitor resource usage
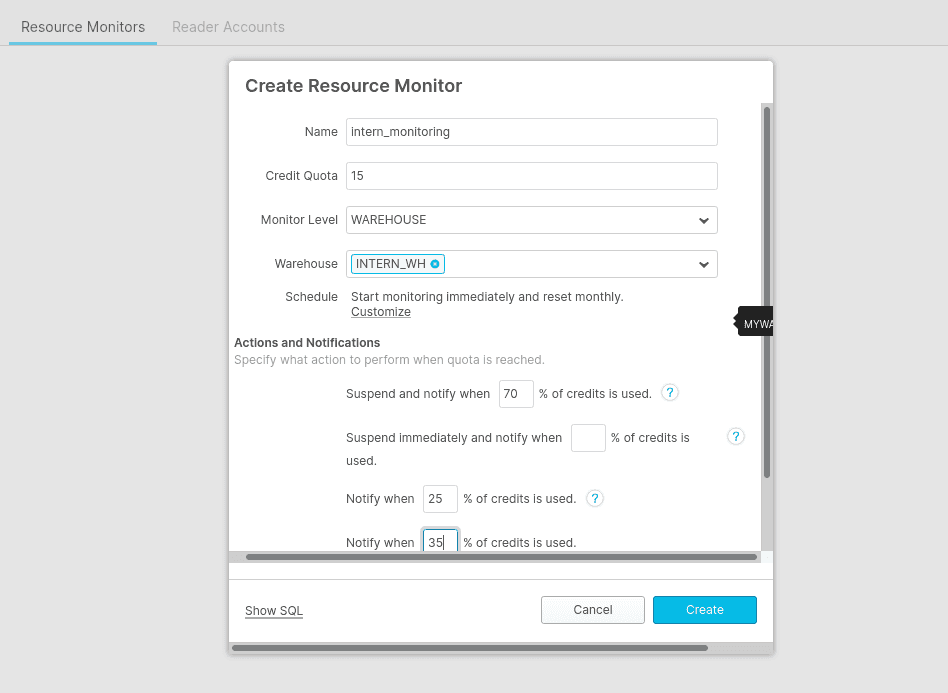
Manipulations are at your disposal to allow you to monitor the use of credits.
By connecting via the web interface to your Snowflake account as an account administrator, it is possible to set up a monitoring tool on a particular warehouse.
By going to the tab Account then Resource Monitors, the definition of a maximum credit quota can be set. Thus, it is possible to configure that after a certain amount, warehouses and queries are stopped. Here is a simple example you can configure:
Download files and make your first query
To start running new queries, your new users will need to log in, create a new table, and download data.
Logging in via SnowSQL
The new user must open a new terminal with the command line interface installed and log in. To do this, we take the example of the previously created user "johndoe".
snowsql -a [accountname] -u "johndoe"A password will be requested, which corresponds to the one entered when creating the user. In our case, the password is "new123".
Create a table
Snowflake supports many types of data structure present in the SQL language. It is necessary to fill in the future columns you wish to integrate and their types.
create or replace table "new_table"
("name" string, "age" integer);
For this use case, we will take as an example the file named new.csv, located in /home/bob/. It consists of two columns named "name" and "age" with random strings for the first one and random integers for the second one.
Downloading data
To load files to the intermediate storage area, execute the following command:
put file://[pathtoyourfile] @"new_db"."new_sch".%"new_table";In our example, the command will be:
put file:///home/bob/new.csv @"new_db"."new_sch".%"new_table";And to copy from the staging field to the table, the last command to perform is:
copy into "new_table" from @%"new_table"
file_format = (type = csv field_delimiter = ',');
The new employee can now execute SQL queries! He will just have to write the query directly via SnowSQL, and it will be executed by Snowflake.
Conclusion
In this article, we have therefore seen the configuration of a Snowflake workspace for a new group of users. The second article in this series will deal with the performance of Snowflake, how to configure it, and how to compare its execution.
Compared to its peers, we can identify 2 main areas where Snowflake stands out from its competitors:
- The scalability of its service:
- The existence of a data replication process in another AZ (“Availability Zone”) of a whole database, or to clone a database that already exists.
- A theoretical infinite number of competing users made possible thanks to a theoretically infinite number of parallel warehouses.
- The ability to change the power of the warehouses during query execution, and to multiply their number via multi-clustering.
- The ease of use:
- Simple installation and quick access: Access to Snowflake is made easy by its installation mode. It can either be accessed through a web interface, or by installing a command line interface that requires no other dependencies. Thus, the installation of a user on a blank computer is generally a few minutes.
- No infrastructure configuration required: by filling in an AWS, Azure or GCP account when registering, all storage will be done automatically by Snowflake on their platforms. No paths need to be filled in, no virtual machines need to be launched, Snowflake supports data loading via the chosen cloud provider. This centralization of responsibility allows a user with little data engineering expertise to work directly on freshly ingested data.
- Ease of understanding for data access: modification of security rules can be done either via the web interface or by using ANSI SQL logic directly in a worksheet on the site or via SnowSQL. This simplicity can therefore allow a person with average technical skills to configure the access, use and modification policy of a database by himself.
- Works as a data lake: Snowflake uses a schema-on-write logic and not a schema-on-read logic. This means that you can load data directly into Snowflake without filling in a schema beforehand. Thus, we are in an ELT (Extract-Load-Transform) cycle rather than an ETL cycle. This choice allows Snowflake to load a wide variety of data on which little metadata is available.
Platform news
In February 2020, Snowflake announced an 8th fundraising in the amount of $479 million with a valuation of $12.4 billion, led notably by Salesforce. One understands better the interest that some companies like IBM, Tibco or Tableau had to develop connectors between their products and those of the “French unicorn”.
