


Introducing Apache Airflow on AWS

May 5, 2020
Never miss our publications about Open Source, big data and distributed systems, low frequency of one email every two months.
Apache Airflow offers a potential solution to the growing challenge of managing an increasingly complex landscape of data management tools, scripts and analytics processes. It is an open-source solution designed to simplify the creation, orchestration and monitoring of the various steps in your data pipeline. The project came from the teams at AirBnb in 2014 to manage an ever-increasing number of workflows.
Airflow offers you the possibility of creating DAGs (Directed Acyclic Graph) using to the language Python, which facilitates the creation of sets of tasks that can be connected and depend on one another in order to achieve your goal of your workflows.
Installation
The installation of Airflow is done through pip.
# Airflow installation guide : https://airflow.apache.org/docs/stable/start.html
# airflow needs a home, ~/airflow is the default,
# but you can lay foundation somewhere else if you prefer
# (optional)
export AIRFLOW_HOME=~/airflow
# install from pypi using pip
pip install apache-airflow
# initialize the database
airflow initdb
# start the web server, default port is 8080
airflow webserver -p 8080
# start the scheduler
airflow scheduler
Once the Airflow webserver is running, go to the address localhost:8080 in your browser and activate the example DAG from the home page. Most of the configuration of Airflow is done in the airflow.cfg file. Among other things, you can configure:
- The connection to an LDAP directory
- The configuration of a smtp mail
- The configuration of the webserver
- The configuration of the different operators
There are six possible types of installation:
- Sequential_Executor: launches tasks one by one.
- Local_Executor: launches tasks in parallel locally.
- Celery_Executor: Celery is a types of executor prefers, in fact it makes it possible to distribute the processing in parallel over a large number of nodes.
- Dask_Executor: this type of executor allows airflow to launch these different tasks in a python cluster Dask.
- Kubernetes_Executor: this type of executor allows airflow to create or group tasks in Kubernetes pods. (Since version 1.10 of Airflow)
- Debug_Executor: the DebugExecutor is designed as a debugging tool and can be used from IDE.
For the purpose of this article, I relied on the airflow.cfg files, the Dockerfile as well as the docker-compose-LocalExecutor.yml which are available on the Mathieu ROISIL github. They provide a working environment for Airflow using Docker where can explore what Airflow has to offer. Please note that the containers detailed within this article were tested using Linux based Docker. Attempting to run them with Docker Desktop for Windows will likely require some customisation.
For our exploration, we’ll be using Airflow on the Amazon Big Data platform AWS EMR.
The objective of this article is to explore the technology by creating 4 DAGs:
- The first consists in showing in the logs the configuration of the AWSCLI of the Docker container;
- The second installs an AWSCLI client on a remote machine using
ssh; - The third configures the AWSCLI client with your aws credentials;
- The fourth launches a cluster of AWS EMR clients to execute a PySpark job.
Launching the containers:
# clone the project
git clone https://github.com/AarganC/docker-ariflow
# go to the folder
cd docker-airflow /
# Create images
docker build --rm -t adaltas/docker-airflow .
# run Apacha Airflow in Local_Executor
docker-compose -f docker-compose-LocalExecutor.yml up -d
# visit localhost: 8080 in the browser for access to UI
DAGs
DAGs are python files used to implement workflow logic and configuration (like often the DAG runs). They signal to their associated tasks when to run but are disconnected from the purpose or properties of these tasks.
Tasks take the form of an Airflow operator instance and contain code to be executed. There are different Airflow operator designed to perform different tasks such as the BashOperator and the PythonOperator.
First of all, we will start by implementing a very simple DAG which will allow us to display in our DAG logs our AWSCLI configuration.
from airflow import DAG
from airflow.operators.bash_operator import BashOperator
from datetime import datetime as dt
from datetime import timedelta

# Default _DAG_ parameters
default_args = {'owner': 'airflow', 'depends_past': False, 'start_date': dt(2020, 3, 23),
                'retries': 0}

# Create a DAG object that is scheduled to run every minute
dag = DAG('show_aws_config', default_args = default_args, schedule_interval = '30 07 * * * ')


# Create a task and associate it to the db
task = BashOperator(task_id = 'show',
                    bash_command = 'aws configure list',
                    dag = dag)
The default_args variable contains a dictionary of arguments necessary for the creation of a DAG and which are used as defaults if missing from associated tasks.
owner: the owner of the DAG.depends_past: interrupts a DAG if the preceding task has failed.start_date: the DAG will be inactive until after this date. If you define a start_date of more than two years ago, when activating the DAG it will compensate for missing days in the database. (Attention in LocalExecutor!)retries: the number of retries before failing the task (retries=0 is infinite retries)
Among other things, it’s also possible to configure the automatic sending of mails using the default_args dictionary.
It is also necessary to create an object of type DAG taking these three parameters:
- The name of the task;
- A dictionary of default parameters;
- The
schedule_intervalwhich will allow us to schedule the execution of our DAG. This schedule interval is a crontab string
Then we can see the creation of an object of type BashOperator: it will be the one and only task of our DAG show_aws_config.
BashOperator takes three keyword arguments:
task_idwhich is a unique identifier (of our choice) for the taskbash_commandis theBashcommand which will be executed by the taskdagwhich corresponds to our previously createddagobject.
You can find the result of the execution of tasks in your DAG directly in your DAG. To do so, click on your DAG -> then Tree View -> and you’ll find the execution tree of your DAG’s tasks.
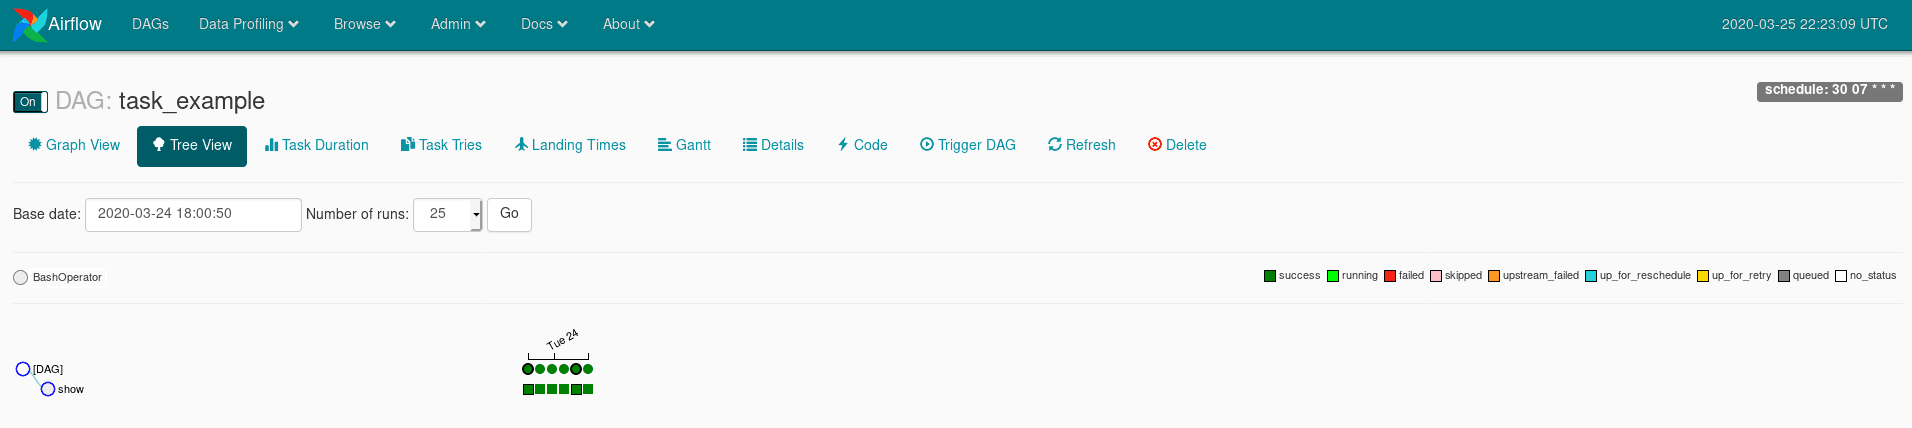
- each column is associated with an execution. A green square signifies a successful execution;
- each line is associated with a task (except the line
[DAG]); - if you click on the circle, you will be able to see the modification of the execution results of your DAG in its entirety;
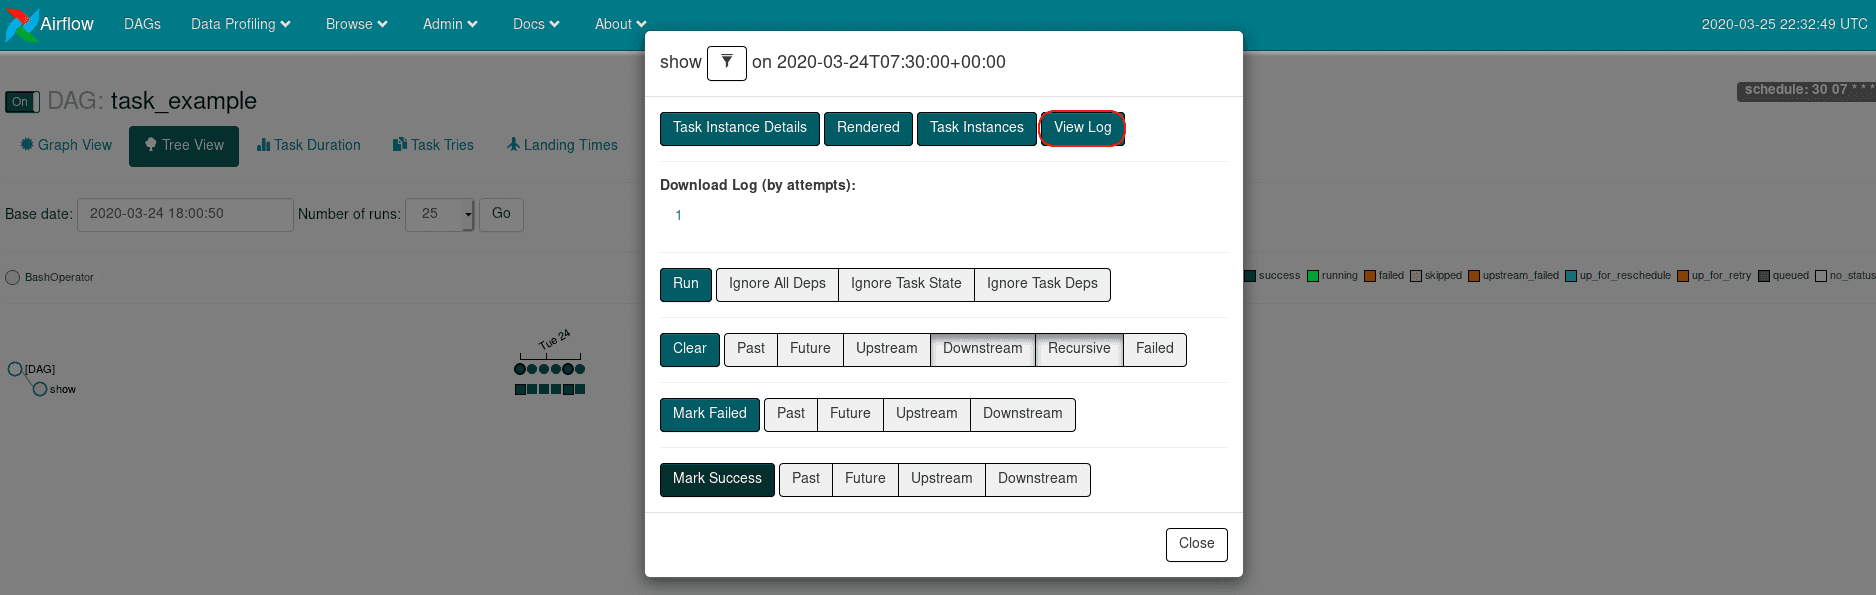
- if you click on one of the squares you will be able to obtain information on the execution of your tasks as well as their logs.
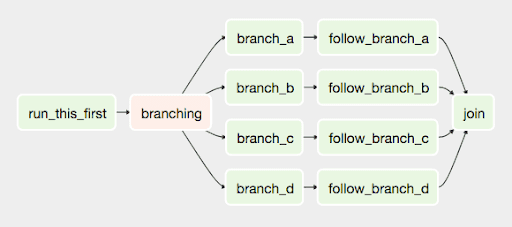
These DAGs can rely on a large number of tools making them extremely flexible.
Variables and Connections
You can define Airflow Variables programmatically or in Admin -> Variables, and they can be used within the scope of your DAGs and tasks.
Connections allow you to automate ssh, http, sft and other connections, and can be reused easily. The following example DAG illustrates how to install the AWSCLI client where you want it.
You must create the variable Airflow Variables directly from the user interface by going to the Admin tab then to Variables.
The following DAGs will require the use of Airflow variables. You can create them within the Airflow ui by either creating them individually or by uploading a json file containing a key value set. The git clone you made earlier has a variables.json file which includes all the variables required in the rest of this article. Just be sure to fill the missing values.
For this DAG, you will need to create the url_awscli and directory_dest variables which in my case correspond to:
- url_awscli = https://awscli.amazonaws.com/awscli-exe-linux-x86_64.zip
- directory_dest =
/opt/AWS-CLI
It also uses an Airflow SSH Connection to install the AWS-CLI on a remote device so you will need to create within the Airflow ui, with id = adaltas_ssh and the host being the IP of a remote computer where you want to install the AWS-CLI.
Tip: The value of any Airflow Variable you create using the ui will be masked if the variable name contains any of the following words:
- password
- secret
- passwd
- authorization
- api_key
- apikey
- access_token
from airflow import DAG
from airflow.models import Variable
from airflow.contrib.operators.ssh_operator import SSHOperator
from datetime import datetime as dt
from datetime import timedelta
from decimal import Decimal
import datetime
import time

# Default DAG parameters
default_args = {'owner': 'airflow', 'depends_past': False, 'start_date': dt(2020, 3, 23),
                'retries': 0}

dag = DAG('aws_configure', default_args=default_args, schedule_interval='30 07 * * *')

url_awscli = Variable.get("url_awscli")
directory_dest =Variable.get("directory_dest")

# Install aws CLI in ssh
cmd = """
mkdir -p {} \n
curl "{}"  -o "/tmp/awscli.zip" \n
unzip /tmp/awscli.zip -d {} \n
sudo {}aws/install \n
rm /tmp/awscli.zip \n
aws emr create-default-roles
""".format(directory_dest, url_awscli, directory_dest, directory_dest)

install_aws_cli = SSHOperator(
                  ssh_conn_id='adaltas_ssh',
                  task_id='install_aws_cli',
                  command=cmd,
                  dag=dag)
Params
Airflow also offers the management of parameters for tasks like here in the dictionary Params.
The following DAG prepares the environment by configuring the client AWSCLI and by creating the S3 buckets used in the rest of the article.
It will need the following variables Airflow:
- secret_access_key: {AWS Access Key ID}
- secret_key: {AWS Secret Access Key}
- region: eu-west-1
- output_format: json
- bucket_log: on behalf of a bucket that I created to store my cluster logs AWS EMR
- bucket_pyton: on behalf of a bucket that I created to store my python files
Tips: If you’re unfamiliar with Jinja, take a look at Jinja dictionary templates here.
from airflow import DAG
from airflow.models import Variable
from airflow.operators.bash_operator import BashOperator
from datetime import datetime as dt
from datetime import timedelta

# Default DAG parameters
default_args = {'owner': 'airflow', 'depends_past': False, 'start_date': dt(2020, 4, 20),
                'retries': 0, 'sla': timedelta(hours=1)}

dag = DAG('variable_example', default_args=default_args, schedule_interval='30 07 * * *')

cmd = """
# Set aws credential
aws configure set aws_access_key_id {{ params.secret_access_key }}
aws configure set aws_secret_access_key {{ params.secret_key }}
aws configure set region {{ params.region }}
aws configure set output_format {{ params.output_format }}

# Create bucketif not exist
if aws s3 ls "s3://{{ params.bucket_log }}" 2>&1 | grep -q 'NoSuchBucket'
then
    aws s3api create-bucket --bucket {{ params.bucket_log }} --region {{ params.region }}
fi
if aws s3 ls "s3://$bucket_pyton" 2>&1 | grep -q 'NoSuchBucket'
then
    aws s3api create-bucket --bucket {{ params.bucket_pyton }} --region {{ params.region }}
fi
if aws s3 ls "s3://{{ params.bucket_pyton }}" | grep -q 'sparky.py'
then
    aws s3 cp ../python/sparky.py s3://{{ params.bucket_pyton }}/
fi
"""
cmd = BashOperator(task_id='aws_configure',
                   bash_command=cmd,
                   params={"secret_access_key" : Variable.get("secret_access_key"), # AWS Access Key ID
                           "secret_key" : Variable.get("secret_key"), # AWS Secret Access Key
                           "region" : Variable.get("region"), # Default region name
                           "output_format" : Variable.get("output_format"), # Default output format
                           "bucket_log" : Variable.get("bucket_log"), # Bucket S3 for logs
                           "bucket_pyton" : Variable.get("bucket_pyton") # Bucket s3 for python
                           },
                   dag=dag)
Xcom
Xcom allows data to be passed between different tasks.
In this DAG the Xcom variables allow tasks to share:
- a json message containing among other things the id of the cluster created in the
start_emrtask - the id of the cleaned cluster in order to be able to add a step to this cluster
from airflow import DAG
from airflow.models import Variable
from airflow.operators.bash_operator import BashOperator
from airflow.operators.python_operator import PythonOperator
from datetime import datetime as dt
from datetime import timedelta
import time
import json

# Default DAG parameters
default_args = {'owner': 'airflow', 'depends_past': False, 'start_date':  dt(2020, 4, 20),
                'retries': 0}

dag = DAG('xcom_example', default_args=default_args, schedule_interval='30 07 * * *')

# Set these variables within the Airflow ui
driver_cores = Variable.get("driver_cores")
driver_memory = Variable.get("driver_memory")
executor_memory = Variable.get("executor_memory")
executor_cores = Variable.get("executor_cores")
bucket_pyton = Variable.get("bucket_pyton")

start_emr = """
cluster_id=`aws emr create-cluster \
--release-label emr-5.14.0 \
--instance-groups InstanceGroupType=MASTER,InstanceCount=1,InstanceType=m4.large InstanceGroupType=CORE,InstanceCount=1,InstanceType=m4.large \
--use-default-roles \
--applications Name=Spark \
--log-uri s3://aws-emr-airflow \
--auto-terminate`
echo $cluster_id
"""

def parse_emr_id(**kwargs):
    ti = kwargs['ti']
    json_str = ti.xcom_pull(key="return_value", task_ids="start_emr")
    cluster_id = json.loads(json_str)['ClusterId']
    ti.xcom_push(key="emr_cluster_id", value=cluster_id)

add_step='bc=' + str(bucket_pyton) + ' dc=' + str(driver_cores) + ' dm=' + \
str(driver_memory) + ' em=' + str(executor_memory) + ' ec=' + str(executor_cores) + '''
cluster_id="{{ ti.xcom_pull(key="emr_cluster_id", task_ids="clean_emr_id") }}"
echo $cluster_id
aws emr add-steps --cluster-id $cluster_id --steps Type=spark,Name=pyspark_job,\
Jar="command-runner.jar",\
Args=[\
--deploy-mode,client,\
s3://$bc/sparky.py\
],ActionOnFailure=TERMINATE_CLUSTER
'''

start_emr = BashOperator(task_id='start_emr',
                         bash_command=start_emr,
                         provide_context=True,
                         xcom_push=True,
                         dag=dag)

clean_emr_id = PythonOperator(task_id='clean_emr_id',
                              python_callable=parse_emr_id,
                              provide_context=True,
                              dag=dag)

add_step = BashOperator(task_id='add_step',
                        bash_command=add_step,
                        provide_context=True,
                        dag=dag)

add_step.set_upstream(clean_emr_id)
clean_emr_id.set_upstream(start_emr)
Airflow Cli
There are a large number of core Airflow Operators available to use in your DAGs. They allow you to use a service such as hive or the like transparently. Indeed, it’s possible to configure many of them directly in the file airflow.cfg.
An Airflow bash client is also available, which can be very useful to modify Variables, Connections, users, etc., all of which can be scheduled and executed using Airflow. It can be very useful for creating catch-up scripts or automating certain Airflow processes.
Conclusion
I use this technology in production environments. It brings with it many advantages while still being flexible. We can think of Airflow as a distributed crontab or, for those who know, as an alternative to Oozie with an accessible language like Python and a pleasant interface.
Throughout this article we have used Airflow in a DevOps context, but this represents only a tiny part of the possibilities offered.
Please note, in case of intensive use, it is easier to set up Airflow on a server dedicated to your production environments, complete with copies in Docker containers in order to be able to more easily develop and not impact production. However problems related to Connections or even Variables are still common so be vigilant and make sure your test suites cover this.
