


Automate a Spark routine workflow from GitLab to GCP

Jun 16, 2020
Never miss our publications about Open Source, big data and distributed systems, low frequency of one email every two months.
A workflow consists in automating a succession of tasks to be carried out without human intervention. It is an important and widespread concept which particularly apply to operational environments. The customer I work with is using the Google Cloud Platform (GCP) platform and its supported products and services complemented with our own tools. Among others, our stack is composed of GitLab CI for the automation part, Terraform for the creation of GCP resources, and three GCP products which are Cloud Composer (Apache Airflow) to schedule our Spark application, Cloud Dataproc to run our Spark cluster and Google Kubernetes Engine (GKE) to host the cluster.
I found interesting to develop and share a project involving those solutions and how to operate them in an operational environment. The article is structured as follow:
- GitLab and GCP projects creation.
- Resources deployment in the GCP project with Terraform.
- CI/CD pipeline development to perform different actions related to the GCP project.
- Spark application development.
- DAG workflows development.
- Remark section.
This project and the code supporting this article can be used as a template and be adjusted to support other use cases. It will help you to discover the tools listed above. However it is not production-ready. As you will see through the article, multiples code blocks start with the comment line #TODO. It indicates a replacement is needed to match your context and values. Remove the TODOs comments from the code once they have been treated to avoid mistakes. Also, the last article’s section enumerates multiples remarks to improve the security.
Every GCP resources used in the article were created using the $300 free trial account offered by GCP to new customers.
GitLab and GCP project creation
For the sake of clarity, two private GitLab repositories will be created to manage:
- The Terraform deployment resource files and the Airflow workflow configurations and supporting Python scripts.
- The SBT project containing the Spark application.
Next, a new GCP project will be created. The operation is followed by a list of specific actions to perform manually in order to instantiate the GKE cluster and to connect it with the GitLab repositories.
Concerning GitLab, it is assumed that the reader has a GitLab account on the public instance or on a private instance. A basic knowledge of git commands (i.e. clone, commit, push, etc) is also required. If you don’t know anything about git and GitLab, follow these tutorials first.
GitLab projects
We will create two new private repositories. I named mine tf_gcp_gitlab_project and spark_gcp_gitlab_project.

After you created the repositories, clone them locally to the desired path.
git clone https://gitlab.domain.com/ferdinand/spark_gcp_gitlab_project
git clone https://gitlab.domain.com/ferdinand/tf_gcp_gitlab_project
ls -l
drwxr-xr-x     4 ferdi  ferdi     128 May 29 09:26 spark_gcp_gitlab_project
drwxr-xr-x     7 ferdi  ferdi     224 May 29 12:15 tf_gcp_gitlab_project
A CI pipeline is created for each repositories. They are triggered every time someone push to the repositories. On trigger, actions are executed, taking into consideration the modifications shipped by the latest commits.
GCP project
As mentioned above, every resources instantiated in the article can be created with a free trial account. If you don’t have one, create a new account on GCP. The signup process will ask you to verify a few information before activation. It shouldn’t take more than 15 minutes to complete.
Once everything is set up on your side, create a new project by clicking My First Project in the top bar.

On the new page, click NEW PROJECT in the top right. Give it a name, remember the project ID generated right under, spark-workflow-automation-k8s in my case, and click CREATE. It should take a few minutes for the project to be available. Once it’s done, select your project. The project name should be next to the 3 dots icon in the top bar like below:

We are now ready. In the navigation bar, search for IAM & Admin to access this page. At the left, select Service Accounts and create a new service account:
- Give it the name
terraform-admin-saand click CONTINUE - Select the role Project > Owner
- Click on CREATE KEY and choose JSON
- Rename the file into
token.jsonand move it at the root of yourtf_gcp_gitlab_projectlocal folder - Click on DONE
Do not lose the key as you cannot download it again, only revoke the key’s access or create a new one. The token is like a secured password. It allows anyone having it to be authenticated as the service account just created. Never share or publish this key on a public repository or any repository at all. Finally, remember the email ID of the service account, in my case:
terraform-admin-sa@spark-workflow-automation-k8s.iam.gserviceaccount.comTwo more things before the next section. First, create a GCS bucket to store the Terraform state of our GCP project architecture. Second, install the Google Cloud SDK (gcloud) on your local machine.
For the bucket creation, search for Storage in the search bar to access the GCS UI and click on CREATE BUCKET:
- Give it a name, I wrote
gitlab-project-state-tf - Select
Regionfor the location type and select a location near you - Leave the default options for the rest
This bucket is checked by Terraform each time it performs an action involving our resources. It is a good practice to store this state in a dedicated remote folder instead of locally.
For the gcloud SDK installation, please refer to those instructions regarding your environment. Once you installed it, run which gcloud in a terminal and remember its path, it will be important when we will connect our Gitlab environment with our GCP project.
In my case it is installed in the /opt folder:
which gcloud
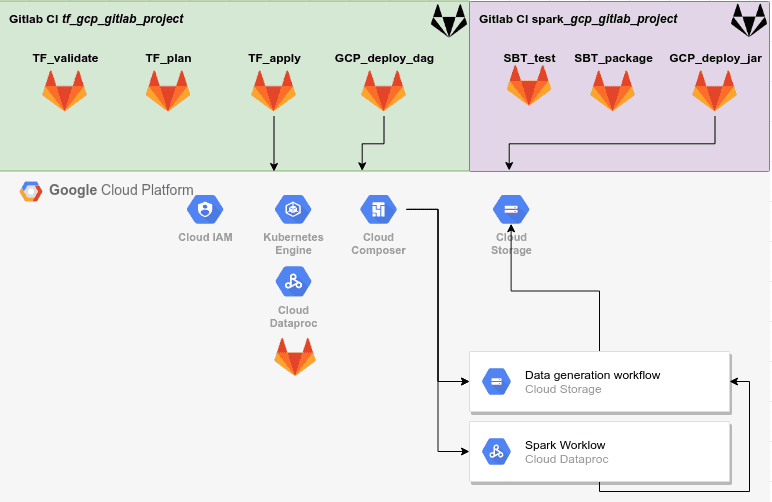
/opt/google-cloud-sdk/bin/gcloudOur project diagram is the following:
In case of trouble, the source code of the two projects are available here (without any personal value):
tf_gcp_gitlab_project: https://gitlab.com/ferdi7/gcp_gitlab_project_tf.spark_gcp_gitlab_project: https://gitlab.com/ferdi7/gcp_gitlab_project_spark.
Resource deployment with Terraform
Terraform is a Infrastructure as Code (IaC) tool whose purpose is to maintain your infrastructure up to date so you don’t have to do it yourself. It is a tool used to build complex architectures in a straightforward manner and will be used here to deploy resources in the newly created GCP project. In the use case of the article, the following will be built:
- a Kubernetes cluster which will host:
- GitLab Runners that will execute the CI script of the project
- A Dataproc cluster to process our Spark jobs
- a Composer cluster used to execute a DAG that will trigger a Spark job on a Dataproc cluster
Install terraform if you don’t have it by following these instructions regarding your environment. After the installation complete, run terraform -v in your shell to verify everything works. Notice on the following screenshot that the resources were deployed using the Terraform v0.12.24 version.

The files created in this section have to be stored in the master branch of your tf_gcp_gitlab_project project. Create a spark_git_k8s.tf file and fill it with:
# TODO: replace the values having <> with your own values
# It concerns the project_id, the region, the bucket for backend and other buckets

# GCP Variables
variable "project_id" {
  description = "Google Project ID."
  type        = string
  default     = "<spark-workflow-automation-k8s>"
}
variable "region" {
  description = "Google Cloud region"
  type        = string
  default     = "<europe-west1>"
}
variable "credentials" {
  description = "Google Cloud credentials"
  type        = string
  default     = "token.json"
}

# Terraform backend
terraform {
  backend "gcs" {
    credentials = "token.json"
    bucket      = "gitlab-project-state-tf"
  }
}

# Specify the GCP Providers
provider "google" {
  project     = var.project_id
  region      = var.region
  credentials = file("./${var.credentials}")
}
provider "google-beta" {
  project     = var.project_id
  region      = var.region
  credentials = file("./${var.credentials}")
}

# API Enable
resource "google_project_service" "composer_api" {
  project                    = var.project_id
  service                    = "composer.googleapis.com"
  disable_dependent_services = true
}
resource "google_project_service" "compute_api" {
  project                    = var.project_id
  service                    = "compute.googleapis.com"
  disable_dependent_services = true
}
resource "google_project_service" "dataproc_api" {
  project                    = var.project_id
  service                    = "dataproc.googleapis.com"
  disable_dependent_services = true
}
resource "google_project_service" "kubernetes_api" {
  project                    = var.project_id
  service                    = "container.googleapis.com"
  disable_dependent_services = true
}

# GCP Resources
resource "google_storage_bucket" "input_bucket" {
  name     = "input-data-workflow-automation-project"
  location = var.region
  project  = var.project_id
}
resource "google_storage_bucket" "output_bucket" {
  name     = "output-data-workflow-automation-project"
  location = var.region
  project  = var.project_id
}
resource "google_storage_bucket" "archive_bucket" {
  name     = "archives-data-workflow-automation-project"
  location = var.region
  project  = var.project_id
}
resource "google_storage_bucket" "dataproc_bucket" {
  name     = "dataproc-bucket-k8s-metadata"
  location = var.region
  project  = var.project_id
}
resource "google_container_cluster" "spark_gitlab_gke_cluster" {
  provider           = google-beta
  depends_on         = [google_project_service.kubernetes_api]
  name               = "gke-spark-k8s-dataproc"
  location           = "europe-west1"
  node_locations     = ["europe-west1-b", "europe-west1-c"]
  initial_node_count = 2
  master_auth {
    username = ""
    password = ""
    client_certificate_config {
      issue_client_certificate = false
    }
  }
  node_config {
    machine_type = "n1-standard-2"
    oauth_scopes = [
      "https://www.googleapis.com/auth/logging.write",
      "https://www.googleapis.com/auth/monitoring",
      "https://www.googleapis.com/auth/cloud-platform",
    ]
    workload_metadata_config {
      node_metadata = "EXPOSE"
    }
    preemptible = true
    metadata = {
      disable-legacy-endpoints = "true"
    }
  }
  timeouts {
    create = "30m"
    update = "40m"
  }
}
The previous code defines:
- Several project variables: GCP project ID, a default region, credentials, …
- The different APIs to enable since they will be used in the project
- The
googleandgoogle-beta(since Dataproc on GKE is in beta) providers - The Kubernetes cluster of 4
n1-standard-2nodes giving 8 CPUs and 30 GBs of RAM spread across 2 zones - Multiple bucket repositories that will be used throughout the article. Names have to be modified with your values
The Kubernetes cluster will host the GitLab Runners of the project. Doing that allows us to safely run code via CI pipelines with our private resource and not use the shared runners provided by GitLab.
At the root of your tf_gcp_gitlab_project project folder, run:
terraform init
terraform plan
terraform apply     # Write 'yes' when asked
Those commands are executed manually the first time but will run through CI stages very soon; their purposes are:
terraform init: download the providers specified in the.tffiles and initialize the backend setup if anyterraform plan: prepare a plan tree to determine which operations to apply to match the given configurationterraform apply: create the resources in the GCP project.
Create now a file named helm.tf to install Helm on the Kubernetes cluster and deploy operators using Helm charts:
provider "helm" {
  kubernetes {
    config_path = "./config_runner"
  }
}

resource "helm_release" "runner" {
  chart      = "gitlab-runner"
  name       = "gitlab-runner"
  values     = [file("values-runner.yaml")]
  repository = "https://charts.gitlab.io"
}
resource "helm_release" "runner_spark" {
  chart      = "gitlab-runner"
  name       = "gitlab-runner-spark"
  values     = [file("values-spark.yaml")]
  repository = "https://charts.gitlab.io"
}
This helm.tf file requires in order to work the presence of three files at the root project folder: values-runner.yaml, values-spark.yaml and config_runner.
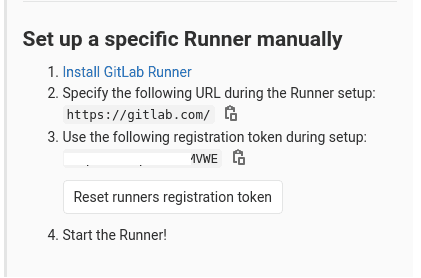
To get the specific variables needed in values-runner.yaml, go to your GitLab project web page. In the left panel, select Settings > CI/CD > Runners:
- Click on Disable shared Runners for this project
- Obtain the provided URL and token in the Set up a specific Runner manually section (cf next image)
Create values-runner.yaml with:
# TODO: replace the values having <> with your own values
gitlabUrl: <https://gitlab.com/>
runnerRegistrationToken: <XxXxXxXxXxXxXMVWE>
concurrent: 20
rbac:
  create: true
  clusterAdminRole: true
  clusterWideAccess: true
runners:
  image: ubuntu:18.04
  privileged: false
  poll_timeout: 1080
  builds:
    memoryRequests: 1000Mi
Use this same template for the file values-spark.yaml but adapt the first two lines:
- The first line
gitlabUrlshould be the same since the projects are hosted at the same place, - Replace the value of
runnerRegistrationTokenwith thespark_gcp_gitlab_project’s token value.
For the config_runner file, you need to have the Google Cloud SDK installed on your local machine. If it is the case, open a terminal to run the following:
#TODO: Replace the <> values

# You can also use Cloud Shell in the GCP UI and copy the config_runner content
# into your local Gitlab project folder

GCP_PROJECT_ID=<spark-workflow-automation-k8s>
TF_GITLAB_REPO=<~/workflow_automation_project/tf_gcp_gitlab_project>
gcloud auth activate-service-account --key-file=$TF_GITLAB_REPO/token.json
gcloud config set project $GCP_PROJECT_ID
gcloud container clusters get-credentials gke-spark-k8s-dataproc --region europe-west1 --project $GCP_PROJECT_ID
mv ~/.kube/config $TF_GITLAB_REPO/config_runner
The previous terraform apply shall have succeeded now, the Kubernetes cluster is up and running. The terraform commands needs to be performed locally one last time since this run will connect the GKE cluster to the GitLab project. Therefore, do the steps again to add the new resources:
terraform init		# Needed since a new provider has been declared
terraform plan
terraform apply     # Write 'yes' when asked
After the last command succeeds, check the Runners section of your GitLab project web page visited earlier to assert the presence of a new Runner. It should have a green dot similar to the following capture.
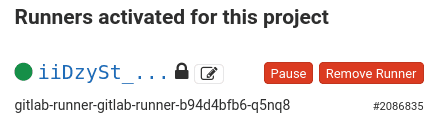
The project is now ready to process CI pipelines in a private environment.
GitLab CI pipeline
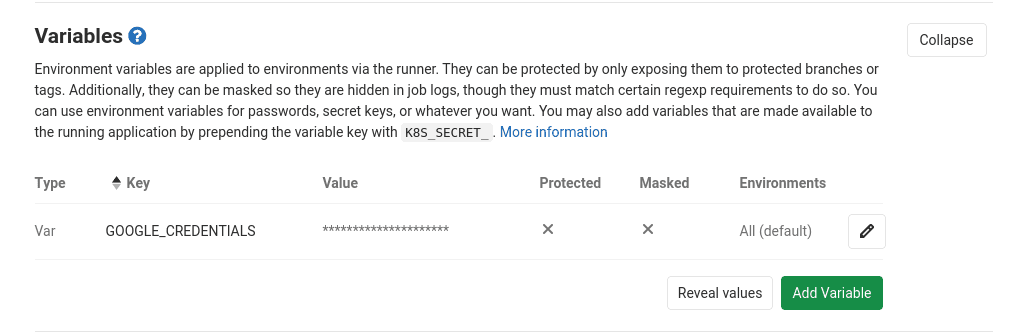
In order for the Runner to connect to GCP and create new resources, we need to create an environment variable in our GitLab projects to store the Google credential JSON key downloaded earlier. Do what follows for both GitLab projects.
- Browse to Settings > CI/CD > Variables > Add Variable:
- Key:
GOOGLE_CREDENTIALS - Value: copy-paste the content of the
token.jsonfile (cf screenshot below)
- Key:
Let’s return to our local tf_gcp_gitlab_project repository in order to build its CI pipeline.
A .gitlab-ci.yml file is needed at the root folder of the project to define the actions performed through the CI pipeline. The GitLab CI documentation is clear and helpful when it comes to add more complexity to the CI pipeline. By default, the CI pipeline is executed each time a user pushes something on a branch having a .gitlab-ci.yml file.
The content of the .gitlab-ci.yml file must look like:
# - Modify the TF_VAR_terraform_sa value with your own.
# - Modify the GCLOUD_PATH to be the same as what you have locally (in my case it is "/opt" )

variables:
  TF_VAR_terraform_sa: '<terraform-admin-sa@spark-workflow-automation-k8s.iam.gserviceaccount.com>'
  GCLOUD_PATH: '/opt'

image:
  name: hashicorp/terraform:0.12.24
  entrypoint:
    - '/usr/bin/env'
    - 'PATH=/usr/local/sbin:/usr/local/bin:/usr/sbin:/usr/bin:/sbin:/bin'

.before_tf: &before_tf
  - cd $CI_PROJECT_DIR
  - terraform --version
  - echo $GOOGLE_CREDENTIALS > token.json
  - terraform init

.install_gcloud: &install_gcloud
  - apk add --update python2 curl which bash
  - curl -sSL https://sdk.cloud.google.com | bash
  - mkdir -p $GCLOUD_PATH/google-cloud-sdk
  - cp -r /root/google-cloud-sdk $GCLOUD_PATH/

stages:
  - validate
  - plan
  - apply

validate:
  stage: validate
  before_script: *before_tf
  script:
    - terraform validate

plan:
  stage: plan
  before_script:
    - *before_tf
    - *install_gcloud
    - mkdir -p ~/.kube
    - cp config_runner ~/.kube/config
  script:
    - terraform plan -input=false -out "planfile"
  artifacts:
    paths:
      - $CI_PROJECT_DIR/planfile

apply:
  stage: apply
  before_script:
    - *before_tf
    - *install_gcloud
  script:
    - terraform apply -input=false "planfile"
  dependencies:
    - plan
  when: manual
The code defines a CI pipeline of 3 stages as well as actions to run before such as before_tf.
validate: validates Terraform code.plan: makes a plantree of the resources added by new commits.apply: deploys the new resources (has to be triggered manually due towhen: manual).
The list of actions performed in install_gcloud is mandatory for the plan and apply stages to succeed. Without it, one of the stages might fail with the following output:
Error: Kubernetes cluster unreachable: Get https://Xx.xX.XxX.xXx/version?timeout=32s: error executing access token command "/opt/google-cloud-sdk/bin/gcloud config config-helper --format=json": err=fork/exec /opt/google-cloud-sdk/bin/gcloud: no such file or directory output= stderr=GitLab Artifacts are used to pass information between the stages of a CI pipeline, they can also be downloaded by an authorized user from the GitLab project web page. As you can see, a planfile file containing the plan of resources that has to be built is passed from the plan to the apply stage in order to deploy the new resources. This last stage requires a manual trigger unlike the two previous that was triggered automatically. Doing so ensures that a human validates the changes applied to the environment.
Specific IAM settings and the Composer cluster will be configured and deployed using the new CI pipeline to test it.
Concerning the IAM settings: create a new file named iam.tf and write the following inside:
variable "dataproc_sa" {
  type = string
}

resource "google_project_iam_member" "dataproc_admin_gke_iam" {
  role       = "roles/container.admin"
  project    = var.project_id
  member     = var.dataproc_sa
}
resource "google_project_iam_member" "dataproc_admin_dataproc_iam" {
  role       = "roles/dataproc.admin"
  project    = var.project_id
  member     = var.dataproc_sa
}
resource "google_project_iam_member" "dataproc_admin_storage_iam" {
  role       = "roles/storage.admin"
  project    = var.project_id
  member     = var.dataproc_sa
}
This file uses a variable that is not declared yet. One of the possible ways to declare variables in Terraform is via environment variables starting with TF_VAR_. Terraform considers those when building a plan.
Browse to the IAM & Admin console page of the GCP project to discover the default Dataproc service account (SA). For that, select the IAM section in the left panel. There, find the Dataproc default SA and copy the address. This SA was created after we enabled the Dataproc API. It exists after our first terraform apply succeeded.

Navigate now to the Variables page of the GitLab repository visited earlier to add a new variable (replace the value with your own service account ID):
- Key:
TF_VAR_dataproc_sa - Value:
serviceAccount:service-29729887XxXx@dataproc-accounts.iam.gserviceaccount.com
Don’t forget to add the prefix serviceAccount:.
Concerning the Composer cluster, create the file composer.tf with the content:
variable "terraform_sa" {
  type = string
}

resource "google_composer_environment" "composer_cluster_project" {
  name = "composer-cluster-spark-workflow-project"
  region = "europe-west2"
  project = var.project_id
  config {
    node_count = 4

    node_config {
      zone = "europe-west2-b"
      machine_type = "n1-standard-1"
      network    = google_compute_network.network.id
      subnetwork = google_compute_subnetwork.subnetwork.id
      service_account = var.terraform_sa
    }
  }
  depends_on = [google_compute_subnetwork.subnetwork]
}

resource "google_compute_network" "network" {
  name                    = "composer-network-project"
  auto_create_subnetworks = false
  project = var.project_id
}

resource "google_compute_subnetwork" "subnetwork" {
  project = var.project_id
  name          = "composer-subnetwork-project"
  ip_cidr_range = "10.2.0.0/16"
  region        = "europe-west2"
  network       = google_compute_network.network.id
}
This file defines a 4 nodes cluster of n1-standard-1 instance as well as a network and a subnetwork. The Composer cluster depends on the subnetwork to be created. Hence, Terraform will deploy the resources following a certain order.
Our first CI pipeline is ready to proceed the new code.
It is mandatory to create a .gitignore file. Its purpose is to never include files containing a given pattern in a commit. In our case, we want to exclude our local configuration files and our secured token.
echo ".idea/\n.terraform/\ntoken.json" > .gitignoreSince everything is set up, let’s commit and push the new files. This push will trigger the CI pipeline of the project.
On the left panel of your GitLab project web page, browse to CI/CD > Pipelines. A running pipeline should have appeared. After the first two jobs succeed, click on the plan and its output should be similar to the following:

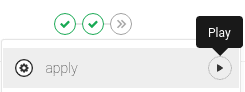
If the plan job confirm that it plans to deploy a Composer cluster, a network, a subnetwork and three IAM bindings, go back to the Pipelines default page and click on the grey >> button, then press Play.
A Composer cluster takes some time before it gets deployed, mine was deployed after 14 minutes. While keeping an eye open on the output of the Runner doing the apply CI stage, let’s hand on to the application’s development and scheduling parts.

Application development and scheduling
A prerequisite for the following is to have SBT installed. Follow these instructions regarding your local environment.
Throughout this section we’ll develop a basic Spark application with Scala and SBT. It will ingest files from a GCS bucket, transform a date column from European (DD-MM-YYYY) to ISO-8601 (YYYY-MM-DD) format and write the output in a new GCS bucket. Then we’ll create several Airflow DAGs to schedule the application and generate dummy data.
The Spark application will be hosted in the spark_gcp_gitlab_project GitLab repository. The DAG files will be hosted in the tf_gcp_gitlab_project project for the sake of brevity. A good practice consists in not mixing too many different code language in the same repository.
Let’s also create a .gitignore file in this project in order to exclude from commits the JAR and all the other files stored in the target folder. Run the following at the root of spark_gcp_gitlab_project:
echo ".idea/\ntarget/" > .gitignoreApplication development with SBT
From the spark_gcp_gitlab_project root folder on your local machine, open a new shell and run sbt new scala/scala-seed.g8 to initialize an SBT project based on a template. A name will be asked, use date_converter. This action will generate a Scala project in the date_converter folder.
An SBT project relies on a build.sbt file to define packages and properties to use. Overwrite the content of this file stored inside the date_converter folder with:
name := "date_converter"
version := "0.1.0-SNAPSHOT"
organization := "com.adaltas"
organizationName := "adaltas"

scalaVersion := "2.12.10"

libraryDependencies += "org.apache.spark" %% "spark-core" % "2.4.3"
libraryDependencies += "org.apache.spark" %% "spark-sql" % "2.4.3"

libraryDependencies += "org.scalatest" %% "scalatest" % "3.1.1" % "test"

libraryDependencies += "org.apache.logging.log4j" % "log4j-core" % "2.12.0"
Next, create a new package named adaltas under date_converter/src/main/scala/ and create a new Scala object which name is DateConverterApplication.scala with the following content:
package adaltas

import java.text.SimpleDateFormat
import java.time.format.DateTimeFormatter

import org.apache.log4j.Logger
import org.apache.spark.SparkConf
import org.apache.spark.sql.functions.{col, to_date}
import org.apache.spark.sql.{Column, DataFrame, SparkSession}


object DateApplication {
  val spark: SparkSession = SparkSession.builder
    .config(new SparkConf().setAppName("date-data-ingestion"))
    .getOrCreate()

  val format = new SimpleDateFormat("dd-MM-yyyy")

  def main(args: Array[String]): Unit = {

    val logger: Logger = Logger.getLogger(getClass.getName)

    val inputBucket = args(0)
    val outputBucket = args(1)

    val gcsData = spark.read
      .option("inferSchema", "true")
      .option("delimiter", ",")
      .csv(s"gs://$inputBucket/")

    val transformedDate =
      dateTransform(gcsData, col("_c0"))

    logger.info(transformedDate.show())
    logger.info(transformedDate.schema)

    transformedDate.write.csv(
      s"gs://$outputBucket/output-${DateTimeFormatter.ofPattern("yyyy-MM-dd-HH-mm").format(java.time.LocalDateTime.now)}"
    )

    spark.stop()
  }

  def dateTransform(source: DataFrame,
                    column: Column,
                    fmt: String = "dd-MM-yyyy"): DataFrame = {
    source.select(to_date(e = column, fmt = fmt).as("transformed_date"))
  }
}
Our Spark application needs two arguments corresponding to the input bucket and the output bucket paths to work.
The application does the following:
- It reads all the files having the suffix
.csvin a specific GCS bucket. - A transformation is performed on a column to parse it from String to Date.
- Finally, the output result is written into a GCS bucket.
Let’s also add a unit test to validate the behavior of our dateTransform method. As we did for the date_converter/src/main/scala/adaltas folder, create a Scala package adaltas at date_converter/src/test/scala with a new Scala class DateApplicationSpec.scala inside:
package adaltas

import org.apache.spark.SparkConf
import org.apache.spark.sql.functions.col
import org.apache.spark.sql.{DataFrame, Row, SparkSession}
import org.scalatest.flatspec.AnyFlatSpec
import org.scalatest.matchers.should.Matchers

class DateApplicationSpec extends AnyFlatSpec with Matchers {

  val spark: SparkSession = SparkSession.builder
    .config(new SparkConf().setAppName("date-data-ingestion-test"))
    .master("local[*]")
    .getOrCreate()

  val randomDates = Seq("21-12-1999", "12-12-1990", "17-01-2001", "12-07-1870")

  import spark.implicits._

  val sourceTest: DataFrame =
    spark.sparkContext.parallelize(randomDates).toDF("date")

  val resultTest: DataFrame =
    DateApplication.dateTransform(source = sourceTest, col("date"))

  val goodResult: DataFrame = spark.sparkContext
    .parallelize(Seq("1999-12-21", "1990-12-12", "2001-01-17", "1870-07-12"))
    .toDF("transformed_date")

  resultTest
    .selectExpr("cast(transformed_date as string) as transformed_date")
    .collect should contain theSameElementsAs goodResult.collect
}
This basic Scala test asserts the good behavior of the method dateTransform. The result values of the transformation are casted as strings to compare with what the attended result would be.
Now that the Spark application is ready, let’s build this project CI pipeline used to:
- Perform the tests of our the Spark application with
sbt test - Package it via
sbt package - Deploy the resulting JAR file into a GCS bucket
We want this to happen each time a modification is made and pushed to the master branch. To do that, two stages will be added. Create the .gitlab-ci.yml to look like this:
#TODO: Replace the JAR_BUCKET_NAME value with your value.

variables:
  JAR_BUCKET_NAME: 'gs://dataproc-bucket-k8s-metadata/'

stages:
  - sbt_test
  - sbt_package
  - deploy_jar

sbt_test:
  stage: sbt_test
  image: mozilla/sbt
  script:
    - cd $CI_PROJECT_DIR/date_converter/
    - sbt test

sbt_package:
  stage: sbt_package
  image: mozilla/sbt
  script:
    - cd $CI_PROJECT_DIR/date_converter/
    - sbt package
  artifacts:
    paths:
      - $CI_PROJECT_DIR/date_converter/target/scala-2.12/date_converter_2.12-0.1.0-SNAPSHOT.jar

deploy_jar:
  stage: deploy_jar
  image: google/cloud-sdk:alpine
  before_script:
    - echo $GOOGLE_CREDENTIALS > token.json
    - gcloud auth activate-service-account --key-file=token.json
  script:
    - gsutil cp $CI_PROJECT_DIR/date_converter/target/scala-2.12/date_converter_2.12-0.1.0-SNAPSHOT.jar $JAR_BUCKET_NAME
Commit and push the changes to spark_gcp_gitlab_project. The CI pipeline of this project will start automatically. Verify through the GitLab CI web interface that everything works properly. It should look like the following:

Let’s move on to the scheduling part since we want the application to run periodically.
Application scheduling with Cloud Composer
Cloud Composer is a GCP-managed product built on Apache Airflow and deployed on top of a GKE cluster. It is used to orchestrate workflows and works with Direct Acyclic Graph (DAG) objects where users can develop complex tasks to perform via Operators. A DAG can be configured to run periodically, but it cannot run in a loop due to its structure. If you are familiar with the Hadoop ecosystem, Airflow is similar to Oozie but is using Python instead of XML. Airflow can leverage the multiple libraries of Python to increase a DAG structure’s complexity.
In this section we’ll build the two DAGs hosted in the GitLab repository tf_gcp_gitclab_project:
dataproc_k8s.py: defines the Spark workflow tasksdata_generator.py: generate fake data the Spark application will ingest
Let’s create a composer folder at the root of the tf_gcp_gitclab_project repository. There, create a new file dataproc_k8s.py with the following content:
from datetime import timedelta, datetime

import os

from airflow import DAG
from airflow.operators.bash_operator import BashOperator

GCP_PROJECT = os.environ["GCP_PROJECT_ID"]
DATAPROC_BUCKET = os.environ['DATAPROC_BUCKET']
INPUT_BUCKET = os.environ['INPUT_BUCKET']
OUTPUT_BUCKET = os.environ['OUTPUT_BUCKET']
ARCHIVE_BUCKET = os.environ['ARCHIVE_BUCKET']
DATAPROC_REGION = os.environ['DATAPROC_REGION']
GKE_CLUSTER_NAME = os.environ['GKE_NAME_CLUSTER']

IMAGE_VERSION = '1.4.27-beta'
DATAPROC_CLUSTER_NAME = '-'.join(['spark-k8s', datetime.now().strftime('%y%m%d%H%m')])
JOB_NAME = '-'.join(['date-job', datetime.now().strftime('%y%m%d%H%m')])
JAR_BUCKET = f'gs://{DATAPROC_BUCKET}/date_converter_2.12-0.1.0-SNAPSHOT.jar'
MAIN_CLASS = 'adaltas.DateApplication'

dataproc_create_job = f'''
    gcloud beta dataproc clusters create '{DATAPROC_CLUSTER_NAME}' --gke-cluster='{GKE_CLUSTER_NAME}'\
     --region='{DATAPROC_REGION}' --image-version='{IMAGE_VERSION}' --bucket='{DATAPROC_BUCKET}' --num-workers=2
    '''

dataproc_launch_job = f'''
    gcloud dataproc jobs submit spark --cluster '{DATAPROC_CLUSTER_NAME}' --region '{DATAPROC_REGION}' \
     --class {MAIN_CLASS} --jars {JAR_BUCKET} -- {INPUT_BUCKET} {OUTPUT_BUCKET}
    '''

default_args = {
    'depends_on_past': False,
    'retries': 1,
    'retry_delay': timedelta(minutes=1)}

with DAG(
        dag_id='dataproc_k8s_dag',
        max_active_runs=2,
        schedule_interval=timedelta(minutes=10),
        start_date=datetime(2000, 5, 4),
        default_args=default_args,
        catchup=False
) as dag:

    init_cluster = BashOperator(
        task_id='create_dataproc_cluster',
        bash_command=dataproc_create_job,
    )

    cluster_ready = BashOperator(
        task_id='verify_dataproc_cluster',
        bash_command=
        f'''
        flag=1;
        while [ $flag -eq '1' ];
        do
            echo 'working';
            gcloud dataproc clusters describe {DATAPROC_CLUSTER_NAME} \
             --region {DATAPROC_REGION} | grep 'state: RUNNING' | wc -l | grep 1 > /dev/null;
            flag=$?;
            sleep 1;
        done
        '''
    )

    run_job = BashOperator(
        task_id='run_job',
        bash_command=dataproc_launch_job
    )

    delete_cluster = BashOperator(
        task_id='delete_dataproc_cluster',
        bash_command=f'gcloud dataproc clusters delete {DATAPROC_CLUSTER_NAME} --region={DATAPROC_REGION}',
    )

    archive_data = BashOperator(
        task_id='archive_ingested_input_data',
        bash_command=f'gsutil mv -r gs://{INPUT_BUCKET}/* gs://{ARCHIVE_BUCKET}/'
    )

    init_cluster >> cluster_ready >> run_job >> delete_cluster >> archive_data
We used the gcloud command to generate the resources and submit the job since Dataproc on GKE has recently been published in open beta. At the time of this writing, the DataprocClusterCreateOperator doesn’t support options involving GKE clusters yet since Composer doesn’t use the last version of Airflow.
As a workaround, I created five tasks with the following in mind:
- Create a Dataproc cluster on top of the GKE cluster previously created,
- Verify that this cluster is up and running,
- Submit the Spark job to the Dataproc cluster,
- Delete the cluster once the job is done,
- Archive the ingested data (so that the upcoming batches don’t ingest the same data twice).
We archive the ingested data to not store the same data twice. Notice also that the DAG is using environment variables to fill specific values (cf os.environ['XxX']).
Those values as well as a new stage will be defined by updating the .gitlab-ci.yml of the tf_gcp_gitclab_project project. We will do that right after the creation of the second DAG.
Data generation
The goal here is to generate fake files containing a significant amount of random dates - let’s fix it to 10000 lines per file. Those files will flow in the GCS bucket every six minutes. In the meantime, the Spark batch application job will be scheduled to be triggered every ten minutes.
For the data generation, create a new DAG named data_generator.py inside the composer folder:
from datetime import timedelta, datetime

from airflow.operators.python_operator import PythonOperator, PythonVirtualenvOperator
from airflow import DAG


def data_generator():
    import sys, csv, random, os
    from google.cloud import storage
    from datetime import timedelta, datetime

    if __name__ == '__main__':

        input_bucket = os.environ['INPUT_BUCKET']

        filename1 = "-".join(["date-data", f"{datetime.now().strftime('%y%m%d%H%M%S')}.csv"])

        date_list1 = []

        for i in range(0, 9999):
            date_list1.append(f"{random.randint(10,31)}-0{random.randint(1,9)}-{random.randint(1990,2200)}")

        with open(filename1, 'w', newline='') as myfile1:
            wr = csv.writer(myfile1)
            wr.writerows([r] for r in date_list1)

        client = storage.Client()
        bucket = client.get_bucket(input_bucket)
        blob = bucket.blob(filename1)
        blob.upload_from_filename(filename=filename1)


default_args = {
    'depends_on_past': False,
    'retries': 1,
    'retry_delay': timedelta(minutes=1)}

with DAG(
        dag_id='generate_input_data_to_gcs',
        schedule_interval=timedelta(minutes=6),
        start_date=datetime(2000, 5, 4),
        default_args=default_args,
        catchup=False
) as dag:

    generate_data_one = PythonVirtualenvOperator(
        task_id='generate_data_to_gcs_one',
        python_callable=data_generator,
        requirements=['google-cloud-storage==1.28.1',
                      'DateTime==4.3'
                      ],
        dag=dag,
        system_site_packages=False,
    )

    generate_data_two = PythonVirtualenvOperator(
        task_id='generate_data_to_gcs_two',
        python_callable=data_generator,
        requirements=['google-cloud-storage==1.28.1',
                      'DateTime==4.3'
                      ],
        dag=dag,
        system_site_packages=False,
    )

    generate_data_three = PythonVirtualenvOperator(
        task_id='generate_data_to_gcs_three',
        python_callable=data_generator,
        requirements=['google-cloud-storage==1.28.1',
                      'DateTime==4.3'
                      ],
        dag=dag,
        system_site_packages=False,
    )

    generate_data_one >> generate_data_two >> generate_data_three
Three stages will create a file of 10000 lines containing dates in the EU format and upload it into the Composer DAG bucket.
We also need to code a deploy_dag stage to upload the DAG files into Composer. Append the following as the last stage inside the .gitlab-ci.yml file of the tf_gcp_gitlab_project project, don’t forget to refer to deploy_dag
as a stage:
# The new stages part looks like this:
# stages:
#  - validate
#  - plan
#  - apply
#  - deploy_dag

deploy_dag:
  stage: deploy_dag
  image: google/cloud-sdk:alpine
  variables:
    COMPOSER_CLUSTER: 'composer-cluster-spark-workflow-project'
    COMPOSER_REGION: 'europe-west2'
    GCP_PROJECT_ID: 'spark-workflow-automation-k8s'
    DATAPROC_BUCKET: 'dataproc-bucket-k8s-metadata'
    INPUT_BUCKET: 'input-data-workflow-automation-project'
    OUTPUT_BUCKET: 'output-data-workflow-automation-project'
    ARCHIVE_BUCKET: 'archives-data-workflow-automation-project'
    DATAPROC_REGION: 'europe-west1'
    GKE_NAME_CLUSTER: 'gke-spark-k8s-dataproc'
  before_script:
    - echo $GOOGLE_CREDENTIALS > token.json
    - gcloud auth activate-service-account --key-file=token.json
  script:
    - cd $CI_PROJECT_DIR/composer
    - gcloud composer environments update $COMPOSER_CLUSTER --location=$COMPOSER_REGION --update-env-variables=COMPOSER_CLUSTER=$COMPOSER_CLUSTER,COMPOSER_REGION=$COMPOSER_REGION,GCP_PROJECT_ID=$GCP_PROJECT_ID,DATAPROC_BUCKET=$DATAPROC_BUCKET,INPUT_BUCKET=$INPUT_BUCKET,OUTPUT_BUCKET=$OUTPUT_BUCKET,ARCHIVE_BUCKET=$ARCHIVE_BUCKET,DATAPROC_REGION=$DATAPROC_REGION,GKE_NAME_CLUSTER=$GKE_NAME_CLUSTER
    - gcloud composer environments storage dags import --environment=$COMPOSER_CLUSTER --location=$COMPOSER_REGION --source dataproc_k8s.py
    - gcloud composer environments storage dags import --environment=$COMPOSER_CLUSTER --location=$COMPOSER_REGION --source data_generator.py
  when: manual
The deploy_dag stage is manual and will:
- Set specific Composer variables used by the DAGs, you have to adapt those with your own values.
- Upload the DAGs to the Composer DAG bucket.
Commit and push the new and modified resources. Once done, browse to the CI/CD Pipeline page of tf_gcp_gitlab_project and trigger deploy_dag after plan has succeeded. There is no need to trigger the apply stage since no new resources were added inside our .tf files.

Once deploy_dag succeeds, go to the Composer console by searching Composer in the navigation bar and click on the Airflow button next to the Composer cluster. It will open the Airflow UI on a new page.

It takes approximately a minute before the DAG starts to appear in the Airflow console of the GCP project. Refresh the page after a minute. Two new DAGs should have appeared. They will be triggered automatically.

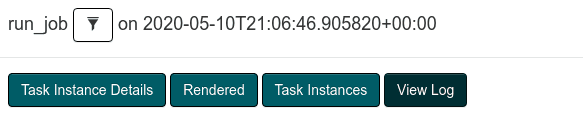
To see the progression of a DAG, click on its name then select Graph View. From there you can refresh the page as well as check specific running or past task log output. To do that, click on a specific job then View Log.

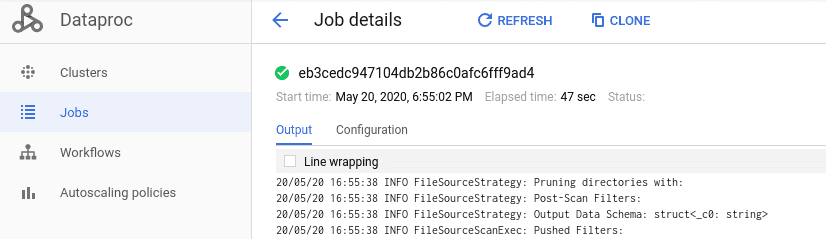
These logs can also be retrieved inside the Dataproc console through the Jobs window.
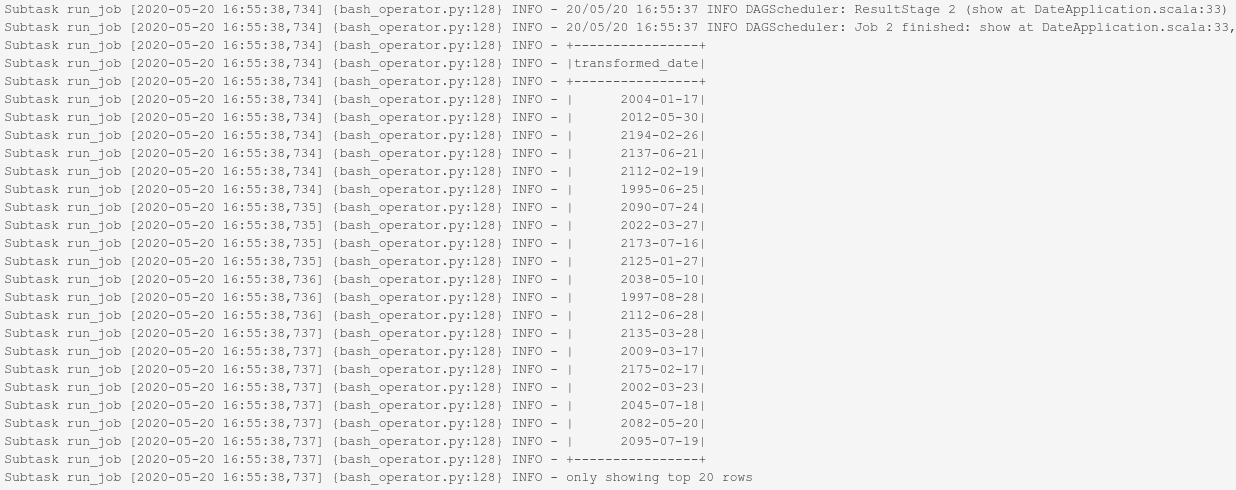
Once the application is succeeded, check the GCS bucket where the data output is stored. In our case, we have:
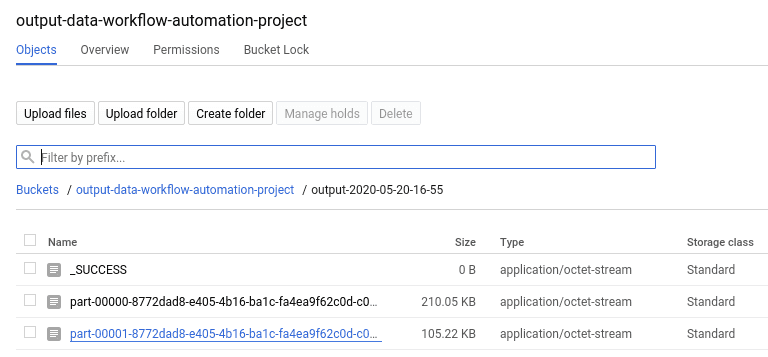
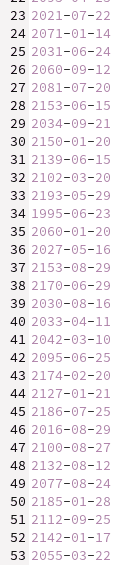
Since the job used 2 executors (with the option --num-workers=2), there are two result files in the blob created by the final write action of the Spark Application. A sample of the first one is:
This is it. The DAGs are scheduled to run on a regular interval unless you decide to stop them. They will generate data and execute the Spark application. You can let the scheduled jobs running for a while but when you are satisfied with the result, do not forget to delete all the resources from the GCP project.
There are several ways to do that:
- Add a manual
destroyCI stage with specificterraformcommands. - Run the same commands locally.
Let’s do it locally. Open a shell at the root of the tf_gcp_gitlab_project project folder and run:
# For the plan command, no need to provide the values, just press Enter.

terraform init
terraform plan -destroy -out "destroyfile" -input=false
terraform apply "destroyfile"
It will start the destruction of all the resources from the project. The last command can sometimes fail because the GCP APIs are often disabled before the resources are removed. Even if the command fails, browse to your GCP project default page to verify that no Compute Engine is running or if a bucket / a network still exists. Regarding the GCP API parameters given in Terraform via disable_dependent_services = true, the resources are supposed to be removed after the API is disabled, but we never know.
Another solution consists in deleting the entire GCP project directly from the GCP console.
General Notes
The output result of our Spark application is not used elsewhere after being transformed and stored in GCS. There are limitations in quotas when deploying resources via a free trial account that prevent any other resources involving Compute Engine resources to be deployed.
GitLab is a powerful and democratized tool used in an operational environment to host project content and also run a defined pipeline that can be used to integrate new features added to a project each time there are pushed. A concrete example of this was performed earlier in the article. The CI pipeline have to be more secured in order to run in an operational environment.
For the sake of simplicity, two projects were created but it would have been better to create another one for the Python DAG files. A GitLab repository should not always host multiple types of different code script files: shell scripts, python scripts, a Scala project or terraform scripts should be stored in separate GitLab repositories. Isolating the code scripts brings more simplicity when it comes to managing growing projects. Also, it is always recommended to use the merge requests principle when it comes to adding new features to the master branch safely in a production environment.
In our special case, a GitLab group could have been created to host the projects. It allows a user to declare GitLab Runners as Group Runners which manage the execution of the group’s projects CI pipeline. The compute resources of Runners shall be increased to run the stages faster and their concurrency should be lowered to not overload their workload. Lastly, A Docker image could have been developed to have a light image with all the dependencies needed (gcloud, terraform, sbt, etc).
It was not simple to deploy the Helm chart via Terraform, the config_runner process performed earlier might be improved and be part of a CI stage since the generated ~/.kube/config file and the a token it contains to connect to the GKE cluster can expire over time.
Dataproc on Kubernetes has been released in open beta recently. It was interesting to build something involving this new feature. I went through multiples issues while developing this project. For example, I had difficulties to deploy
the GKE cluster using a service account having the same rights as the one we gave with the iam.tf file.
Once you have read the documention relative to Spark on Kubernetes, here are my main points about it:
- For those coming from YARN,
kubelethas to be seen as theNodeManagerequivalent. - The Spark Driver of each application is a custom controller:
- It does its work of driver but also talks to the API.
- Spark Executors runs inside containers that are running inside pods, those executors talks to the Spark driver as it would using another cluster manager like YARN or Mesos.
- The Spark Core components (i.e configuration, new/remove executors actions, …) talks to the Kubernetes Scheduler Backend.
- Spark on containers brings deployment flexibility, simple dependency management and simple administration:
- It is easy to isolate packages with a package manager like
condainstalled directly on the Kubernetes cluster. It leads to easy updates of environments. In comparison, packages have to exist on all nodes using YARN. - A Dockerfile can be created per Spark application to isolate the tasks and its dependencies.
- Compute resources management is more optimal since idle nodes can be used to perform other tasks.
- Kubernetes has its own layer of security which can be translated directly to IAM.
- When it comes to migrate a workflow from a provider to another, Kubernetes is the cluster manager where the lift-and-shift is the less “painful”. When a company migrates, the transition is easy since it’s only Kubernetes deployment files compared to YARN based projects where each cloud provider has its own service-managed version of it with specifics settings.
- It is easy to isolate packages with a package manager like
The possibility of running Spark on Kubernetes pods is promising. Apache Spark understood this demand and will continue to propose new features through their releases, the incoming Spark 3 and the next ones.
Concerning the Cloud Composer cluster, its compute resources should be increased in an operational environment. The DAGs written in the article are good starting points to learn how an Operator works. We used gcloud commands as a workaround since the concerned Operators do not support yet actions involving Dataproc on GKE. Some Composer variables were declared via the CI pipeline, but it might be possible to declare them directly in the Terraform code.
Conclusion
Building this project was fun and helped me to get more familiar with some of the tools involved in the article. I hope you discovered new things during this article. The architecture was built following a certain order to respect the project’s construction.
After the projects’ creation, we instantiated a GKE cluster and connected it to the GitLab repository to start making use of the CI. A Spark application was developed using SBT and scheduled to run periodically on a Dataproc cluster running on the GKE cluster (in addition to the GitLab CI Runners) thanks to a Composer cluster.
You can find the source code of the two projects are available here:
tf_gcp_gitlab_project: https://gitlab.com/ferdi7/gcp_gitlab_project_tfspark_gcp_gitlab_project: https://gitlab.com/ferdi7/gcp_gitlab_project_spark
