


Kubernetes: debugging with ephemeral containers

Feb 7, 2023
- Categories
- Containers Orchestration
- Tech Radar
- Tags
- Debug
- Kubernetes [more][less]
Never miss our publications about Open Source, big data and distributed systems, low frequency of one email every two months.
Anyone who has ever had to manipulate Kubernetes has found himself confronted with the resolution of pod errors. The methods provided for this purpose are efficient, and allow to overcome the most frequent errors. However, in some situations, these methods are limited: debugging then becomes delicate. During the Kubecon 2022 in Valencia, presented by the Cloud Native Computing Foundation, I could attend to Aaron Alpar’s presentation about a new way to debug pods in Kubernetes available in beta in its version 1.23: kubectl debug.
First, we’ll see the classic methods for debugging pods. Then, we’ll develop the notion of namespace. Finally, we’ll define what ephemeral containers are.
How to debug a pod?
Until now, after consulting the logs of a pod with kubectl log <pod>, two solutions were available to debug more deeply: exec and copy.
The first one is in the form of:
kubectl exec         \
  -it                \ #opens a command prompt
  -n <namespace_pod> \
  <pod>              \
  -c <container>     \ #allows you to specify a particular container
  -- /bin/sh           #runs a shell at the prompt
This command opens a command prompt in the target container. The extent of the user’s rights to issue commands will then depend on the Kubernetes role with which the prompt was started. If your privileges are elevated, you’ll be able to do just about anything in your container… as long as it knows how to do it. Indeed, containers are designed to be lightweight: they each contain only their application and its dependencies. The tools that are essential for an efficient error resolution will be unusable because they are not present. Listing files in a directory with ls, searching for a particular file with find or changing access rights on a file with chmod: all these actions will usually be possible because they are native to the container runtime system. On the other hand, a more advanced analysis of active network ports with netstat, or connection tests with curl will most of the time not be feasible.
The second command is in the following form:
kubectl debug                  \
  -it                          \ #opens a command prompt
  -n <namespace_pod>           \
  <pod>                        \
  --copy-to=<pod_name>         \ #name of new pod
  --container <container_name> \ #to choose a container name other than debugger-  xxxxx
  --image=busybox              \ #image containing many debugging tools
  --share-processes            \ #allows this new container to see the processes of other   containers in the same pod
  -- /bin/sh                     #runs a shell in the prompt
This command creates a new pod and restarts our application in a new container of its own. A command prompt to our new container then opens. Here, being able to select the image of our choice provides our new container with relevant tools for error resolution. However, this method has two major drawbacks:
- creating a new pod requires restarting the application
- if it is a pod with replicates (for deployments and statefulset), this method can be dangerous because new replicates can be created involuntarily.
Linux namespaces
What is a container? The idea that we have of a container is sometimes not quite aligned with reality. A container is a kind of sandbox whose isolation depends on a key feature of the Linux kernel: namespaces.
A namespace groups together all the processes that have a common view of a shared resource (for example, all the processes in a container). Namespaces control the isolation of the container and its processes, and delimit its resources: they are what prevent it from seeing outside itself to the rest of the system. There is a namespace for each characteristic of an environment:
mnt: isolates mount pointspid: isolates the process IDsnet: isolates the network interfaceipc: isolates inter-process communicationsuts: isolates host and domain namesuser: isolates user identification and privilegescgroup: isolates process membership to a control group
The pid namespace, for example, allows the container to have its own process IDs, since it has no knowledge of the host machine’s PIDs. Similarly, the uts namespace allows the container to have its own host name, independent of the host machine. A container can belong to several types of namespaces: it can for example have its own mount points and network interface. In addition, these namespaces can be copied from one container to another.
Namespaces are used by any process running on a machine. The /proc/ folder contains all the namespace-related files for a process and the namespaces currently used by that process. Namespaces used by containers have a parent-child relationship with those of the machine: a parent namespace is aware of its children, while the reverse is not true. This can be checked with the nsenter command, which allows you to run a command in a namespace (i.e., run from a shell in a parent namespace):
nsenter
--target <pid> \ # Allows you to select a namespace through a process using it
--all \ # Enclose all namespaces used by the specified process
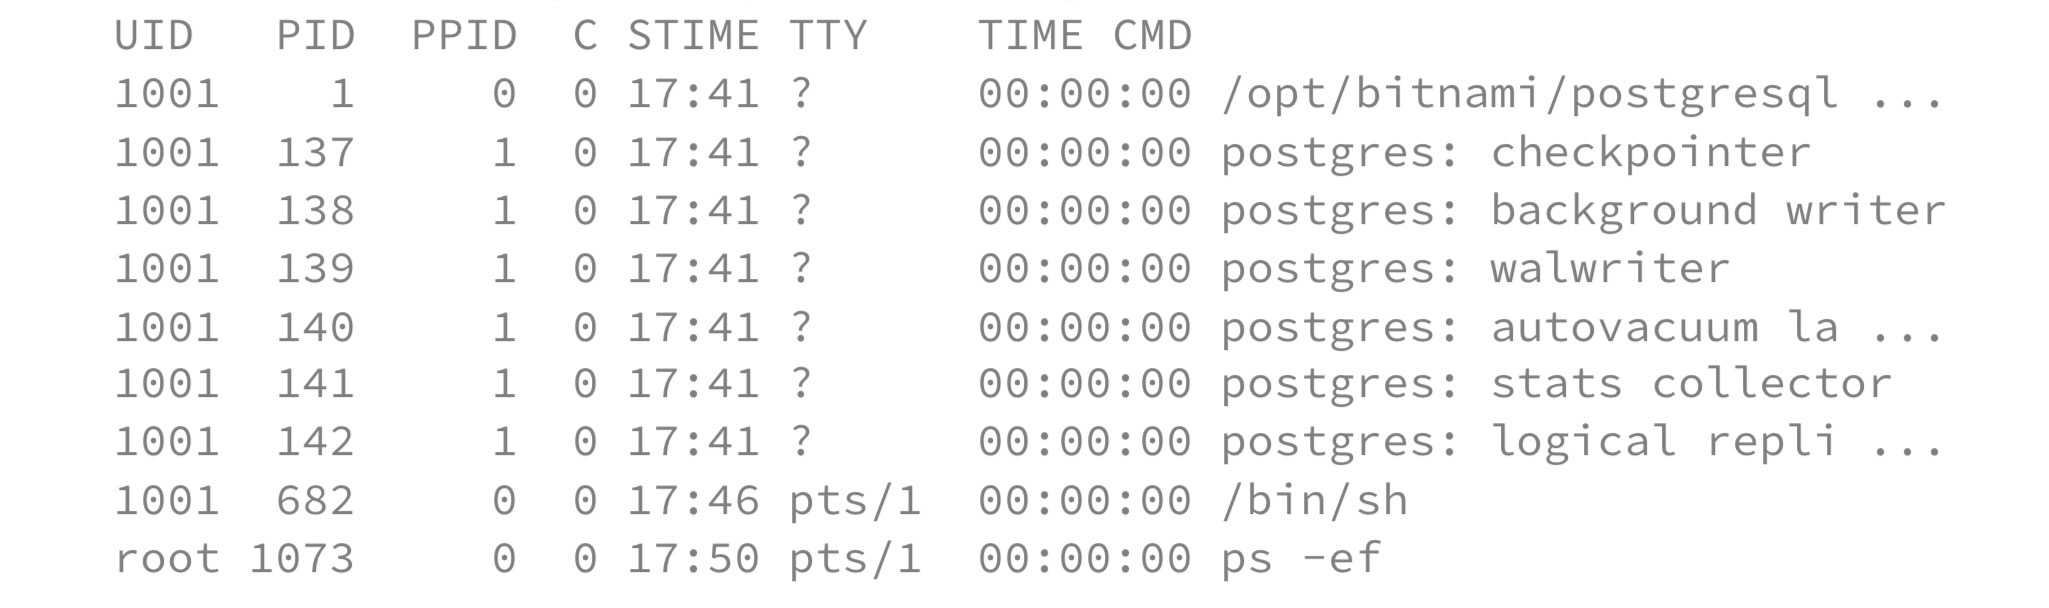
/bin/ps -ef # Displays all processes in detailThis command displays all the processes belonging to the namespaces used by the specified process. By specifying the PID of a container (i.e. a process using a child namespace), we get the list of processes running in this container, from the point of view of the host machine. Below is an example of this command to a pod with a PostgreSQL container, running from its host node:
nsenter --target $(pgrep -o postgres) --all /bin/ps -ef
If we then perform the same action but this time with kubectl exec, we get the list of processes running in this container, this time from the point of view of the container itself. Below is an example from inside the same PostgreSQL pod:
kubectl exec -it -n pg pg-postgresql -- ps -ef
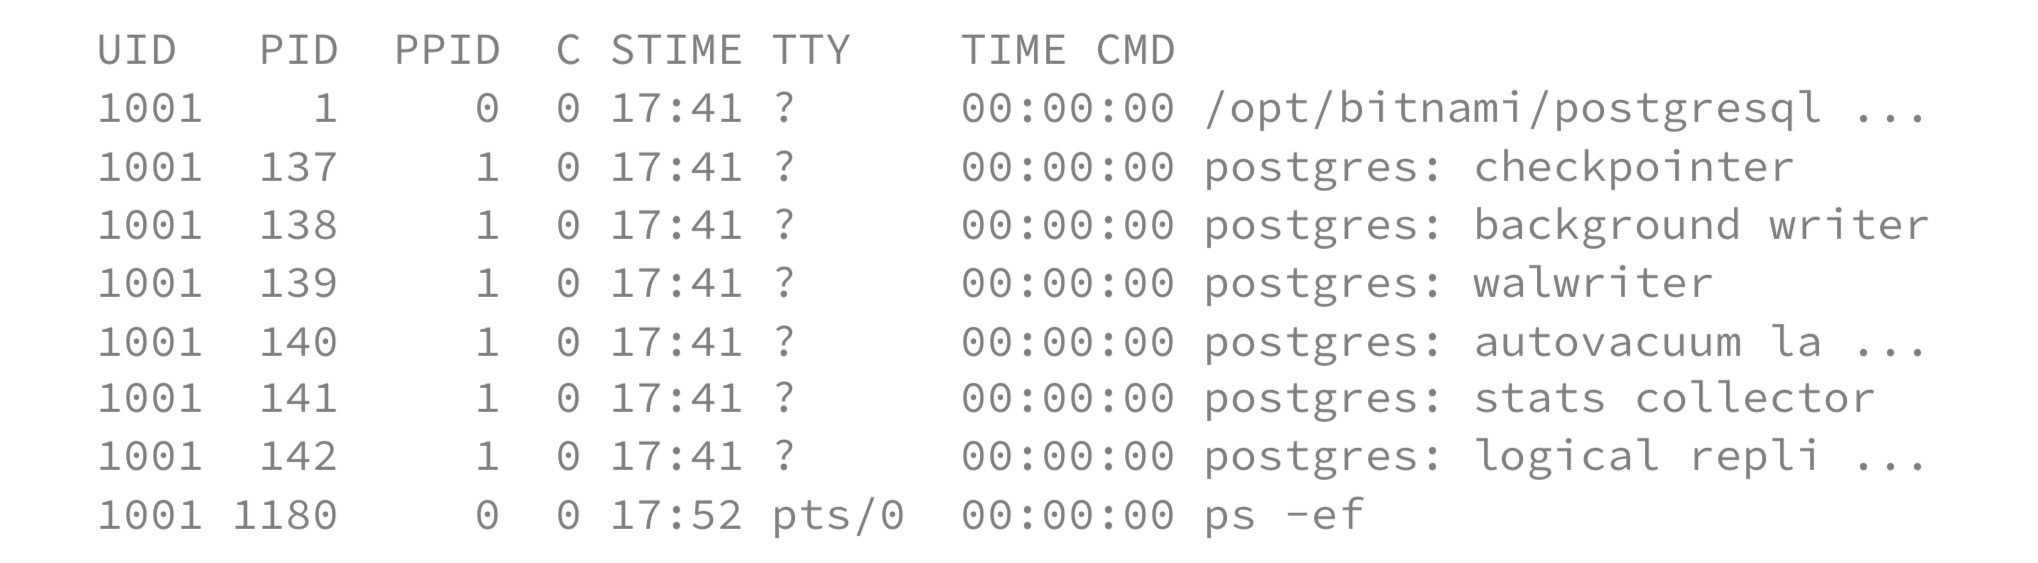
We notice that the two lists are identical: the host machine is therefore aware of its child namespaces, so we say that the namespaces are shared.
Ephemeral containers
An ephemeral container is a new container located in the same pod as the target container. Since they are in the same pod, they share resources, which is ideal for tricky situations such as debugging an instantly falling container.
The command to create an ephemeral container is as follows:
kubectl debug \
-it \ # Opens a command prompt
-n <namespace_pod> \
<pod> \
--image busybox \ # Image containing many debugging tools
--target <container> \ # Allows you to share the PIDs of a specific container in the same pod
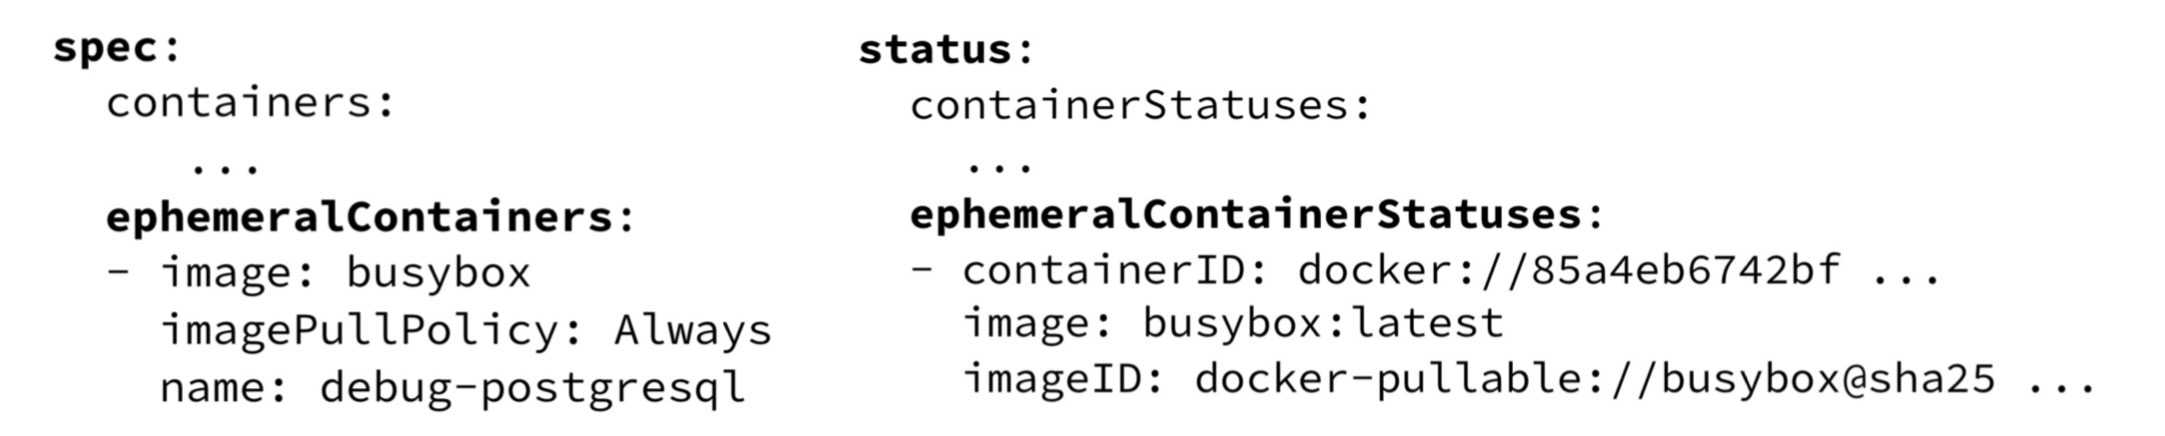
-- /bin/sh # Runs a shell in the promptOnce created, the ephemeral container appears in the specs: two new entries are then present in “containers” and in “status”.
It is then possible to list the active ephemeral containers with the following command:
kubectl get pod -n <namespace> <pod> -o json
  | jq '{"ephemeralContainers": [(.spec.ephemeralContainers[].name)], "ephemeralContainersStatuses": [(.status.ephemeralContainersStatuses[].name]}'
When creating an ephemeral container in this way, we notice that two namespaces are different from the original container: cgroup and mnt. This means that the resources related to all the other namespaces are shared by the original container and its ephemeral version. These new containers allow to combine the integrity of the resources handled with an exec command and the tools available to the user with a copy command. Indeed, the container generated with this last command would only have different namespaces than the original one.
The mnt namespace cannot be shared because some critical mount points should not be shared. However, if some mount points identical to the original container are needed in your ephemeral container, it is still possible to mount them manually.
Conclusion
This new feature brought to Kubernetes standardizes a powerful and complete pod error resolution method, while addressing new tricky cases. Moreover, it facilitates the democratization of so-called “distroless” containers, lighter containers that do not offer any debugging tools, and therefore faster to deploy. The tools would then become totally independent of production, in line with native cloud thinking.
