


Keycloak deployment in EC2

By Stephan BAUM
Mar 14, 2023
- Categories
- Cloud Computing
- Data Engineering
- Infrastructure
- Tags
- Security
- EC2
- Authentication
- AWS
- Docker
- Keycloak
- SSL/TLS
- SSO [more][less]
Never miss our publications about Open Source, big data and distributed systems, low frequency of one email every two months.
Why use Keycloak
Keycloak is an open-source identity provider (IdP) using single sign-on (SSO). An IdP is a tool to create, maintain, and manage identity information for principals and to provide authentication services for applications in a distributed network. Keycloak allows you to create multiple security policy domains called realms to manage objects such as users, applications, roles, and groups. It also enables you to register multiple users for the same application. Keycloak is either configured through a user interface called Admin Console or CLI commands.
A non-exhaustive list of use-cases includes:
- Integration in a Kubernetes Cluster for authentication
- Set up Keycloak for enabling login with social networks
- Set up Keycloak as identity broker for another IdP
This article explains how to set up Keycloak in an AWS EC2 instance and make the identity provider publicly available through the internet.
1 Set up the EC2 instance
The main goal of the article is to know how to set up Keycloak in an AWS EC2 instance and not how to launch an EC2 instance on AWS. However, three different methods to configure and launch the EC2 instance are described in this article to adapt to the readers’ comfort and to specifically show which resources are required. If you are only interested in setting up the resources as fast as possible and want the scripts for idempotent reproduction, we recommend you skip parts 1.1 and 1.2 and go directly to part 1.3.
1.1 Use the Web Interface
1.1.1 Create the EC2 instance the first time
Launching the EC2 instance through the web interface is the user-friendliest solution.
You can also follow the official documentation on how to create an AWS EC2 instance. However, the following points provide the instance configuration steps.
-
Log into your AWS account.
-
Go to the region which suits you best, normally the closest to you.
-
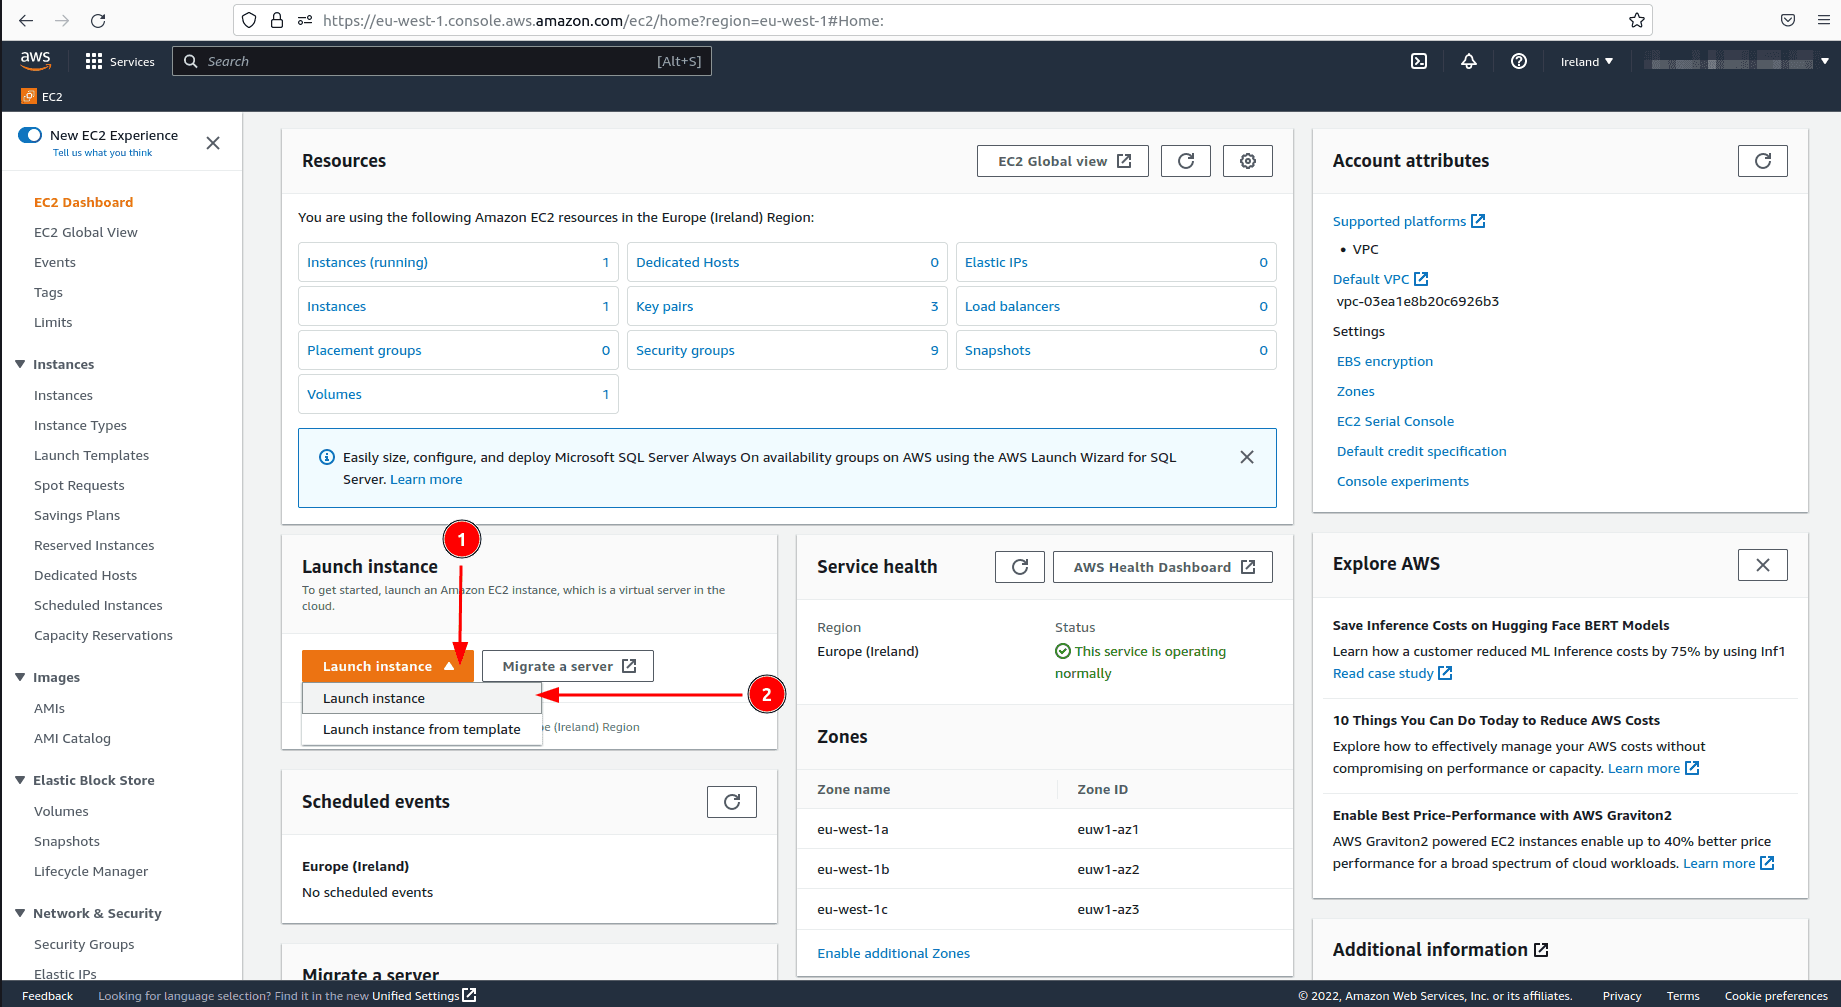
In the upper task bar type EC2 and go to this service.
-
Click on
Launch Instance. -
Choose
Launch Instanceagain.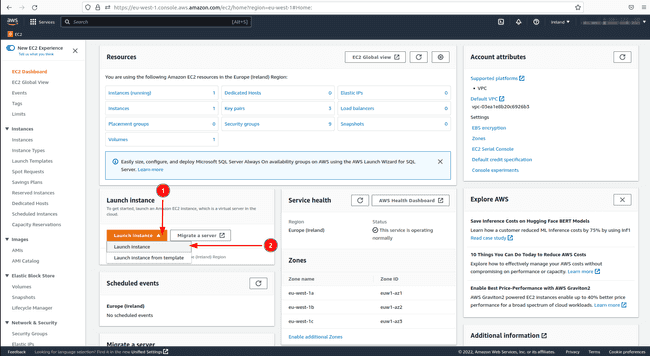
Keycloak in a Docker container does not require a lot of resources. Therefore, we choose a T2 micro instance with the minimum disk space. Installing Docker on an Amazon Linux AMI is very easy and we therefore use it.
-
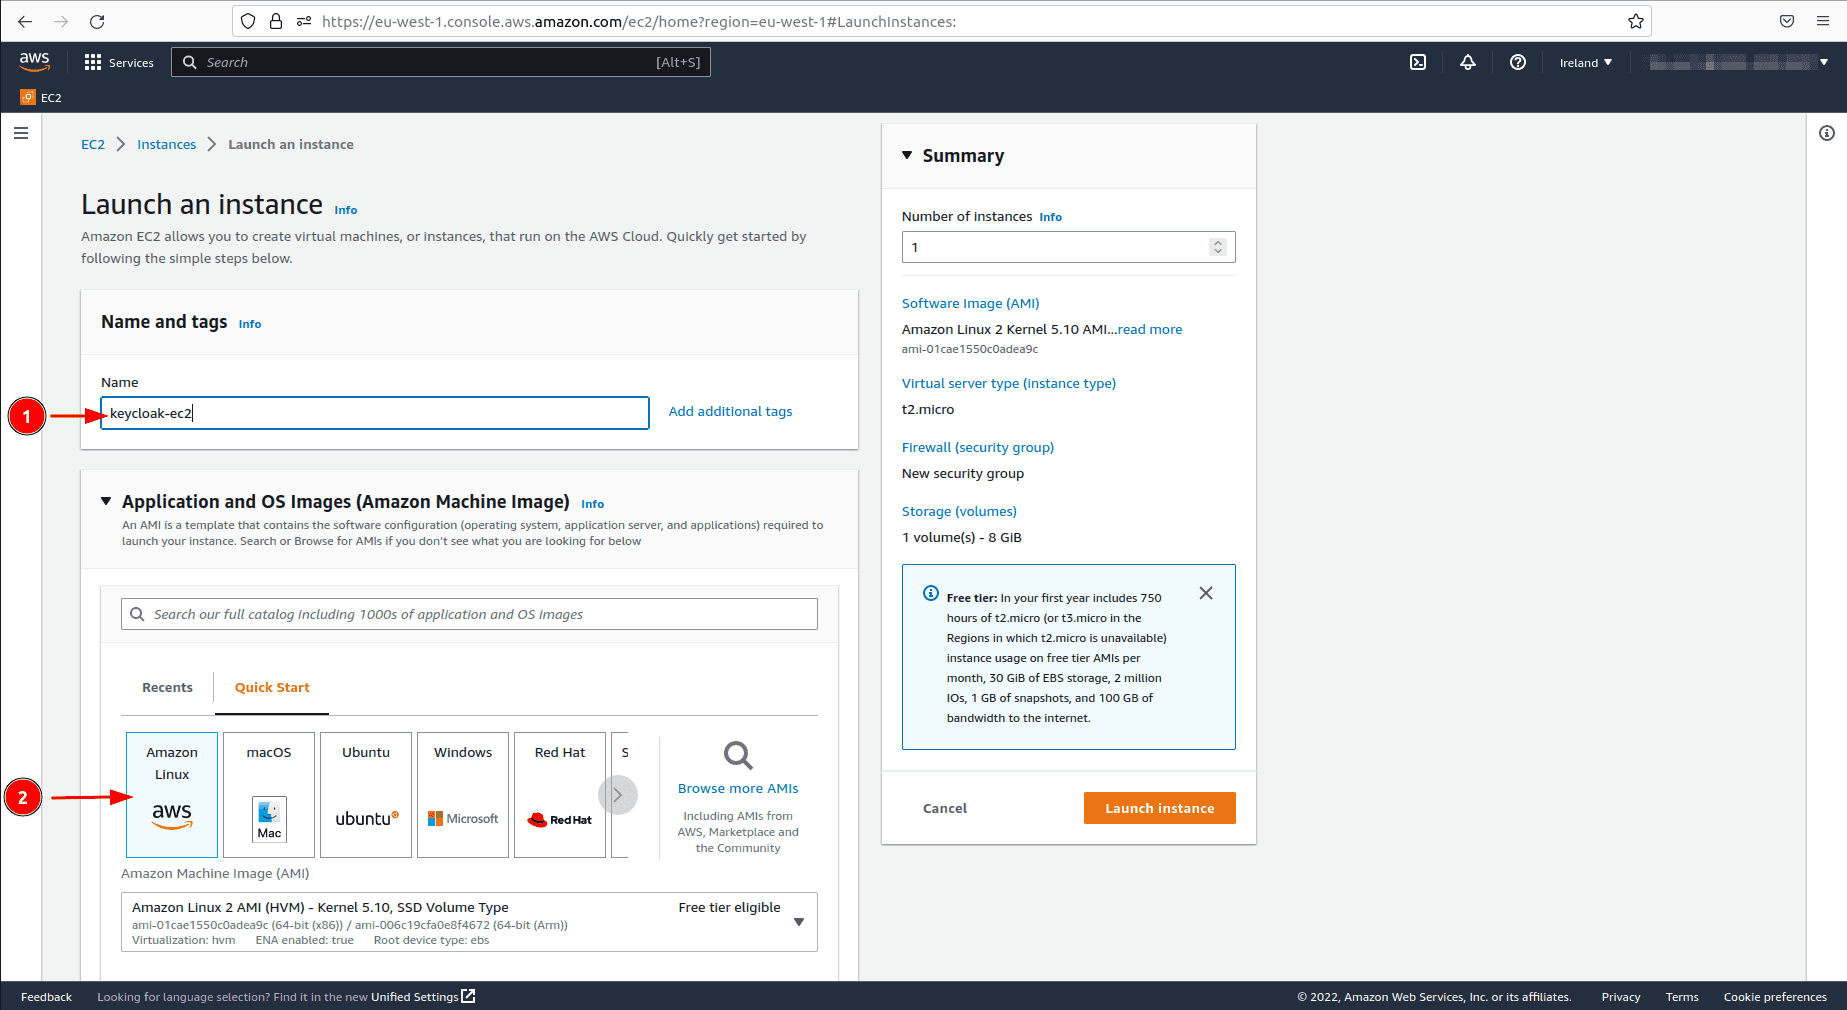
Give the instance a name.
-
In
Application and OS Images (Amazon Machine Image)choose the free tierAmazon Linux 2 Kernel 5.10 AMI 2.0.20221103.3 x86_64 HVM gp2AMI.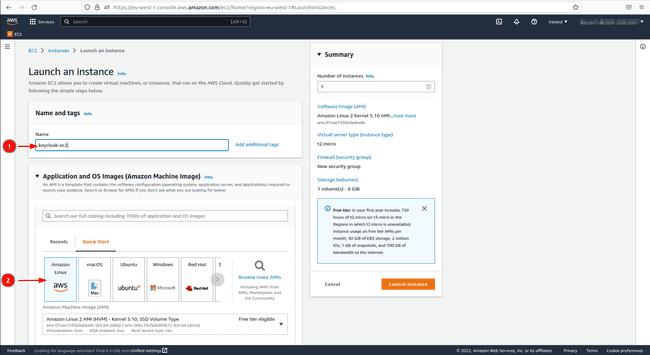
-
Choose the free tier
t2.microtype in “Instance type”. -
If you already have a key pair choose it in the interface otherwise create one and click on the type
RSA. -
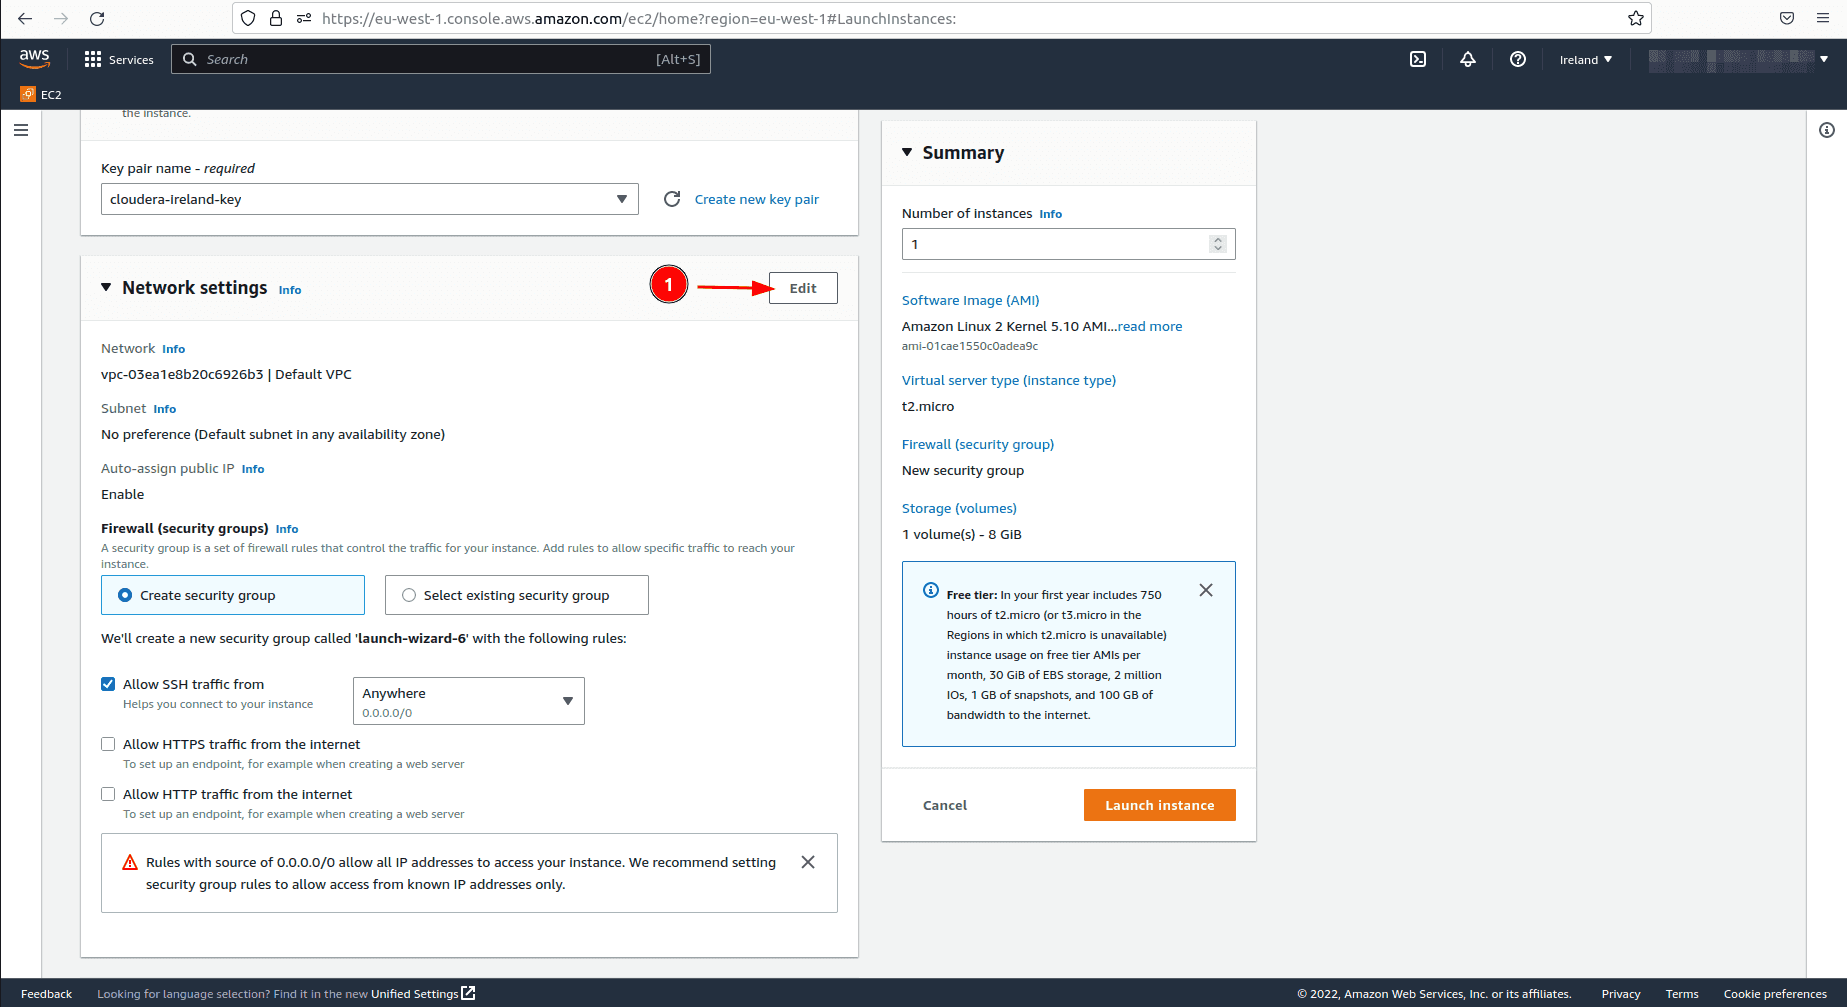
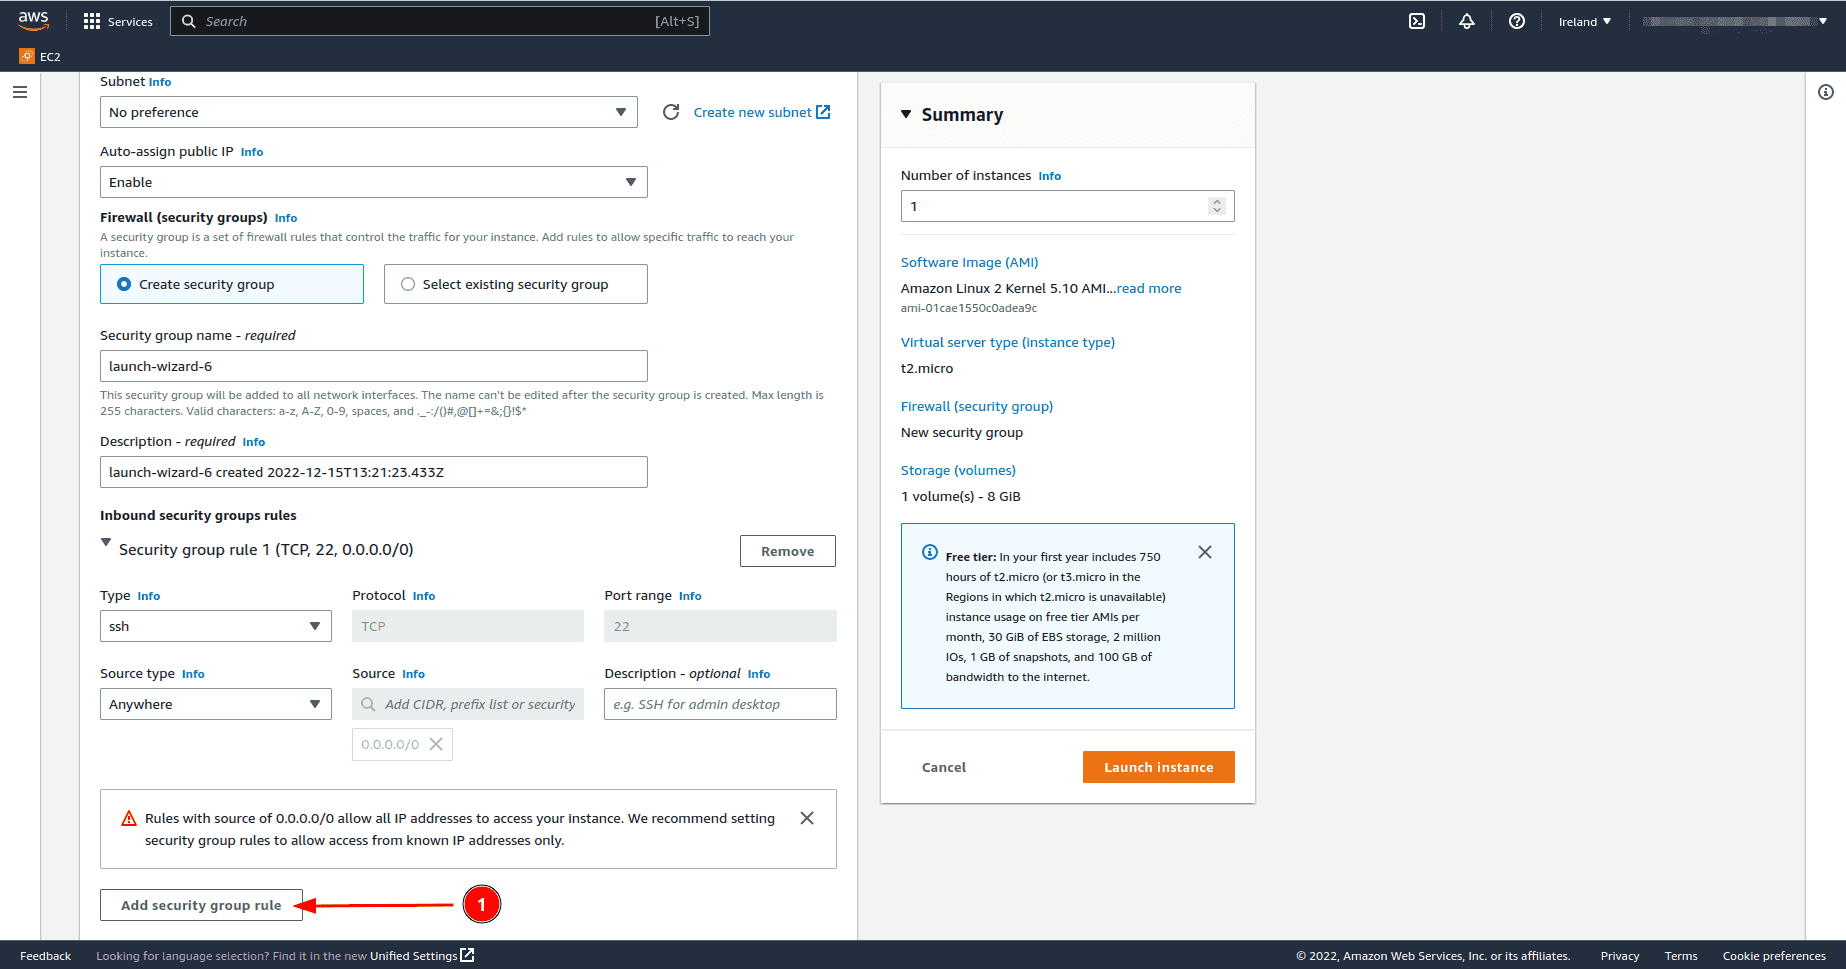
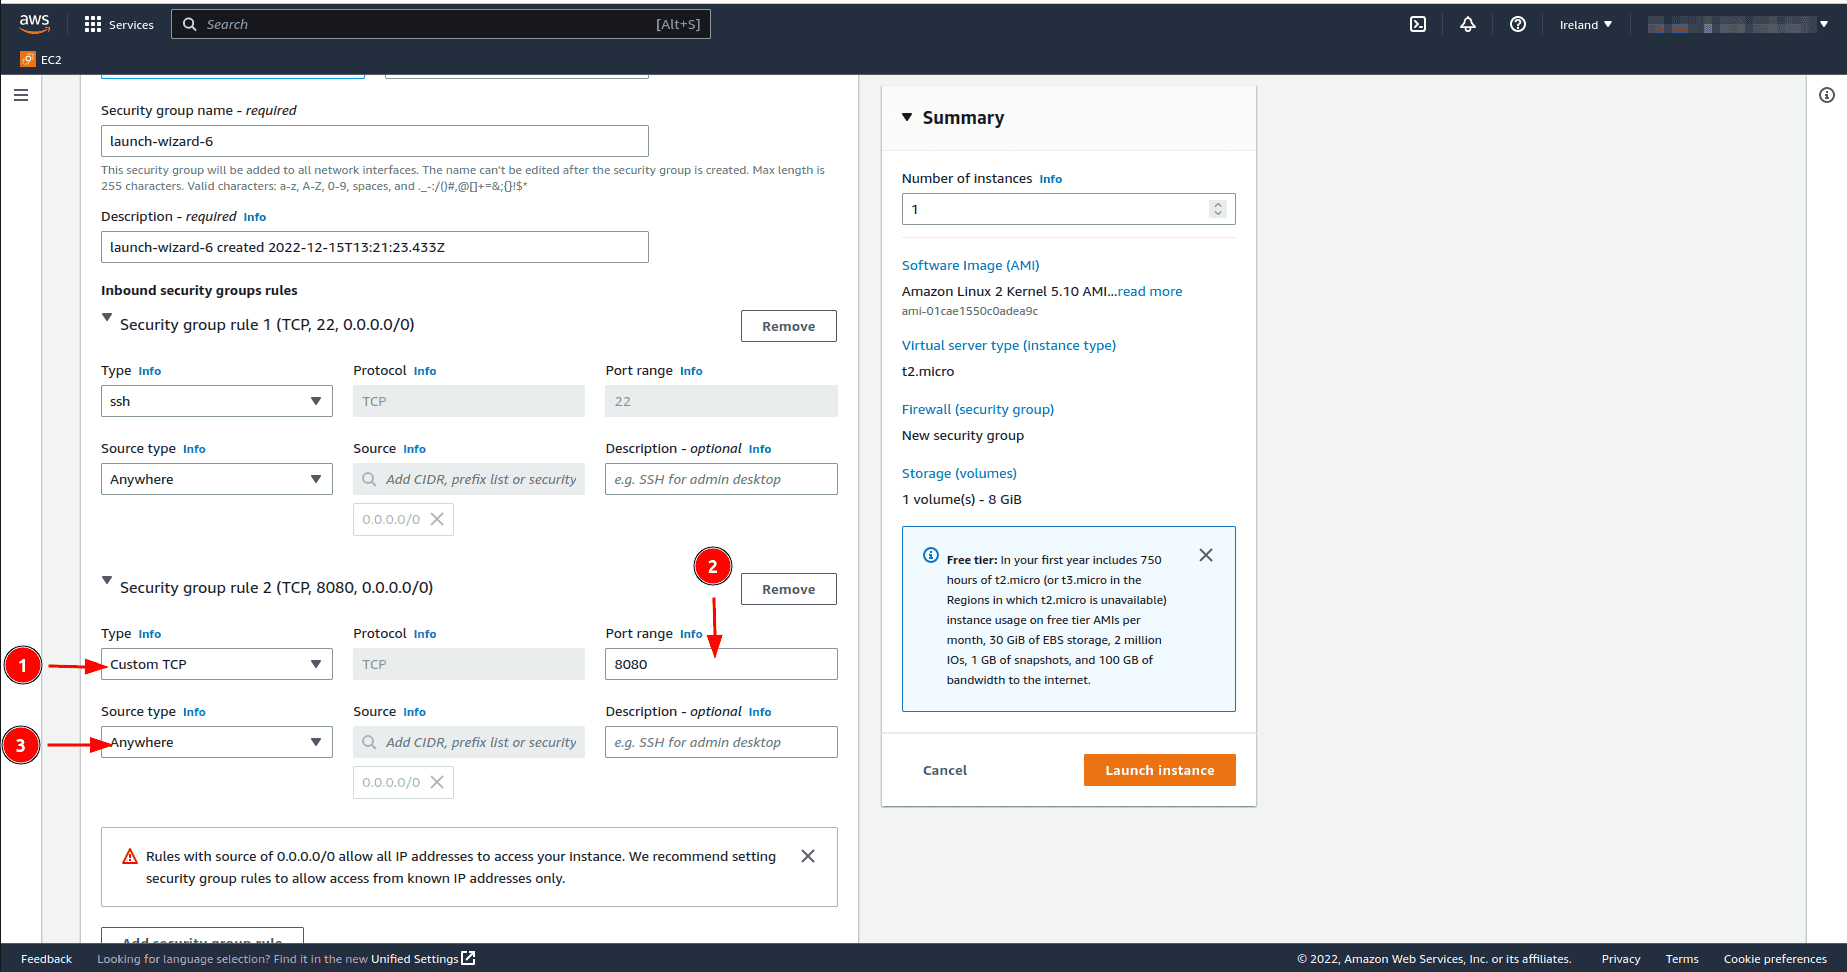
In network settings SSH port 22 which is there by default allows us to log into the instance from another machine. However, Keycloak hosted on our EC2 instance needs access to the public internet, we therefore open either port 8080 and/or port 8443 with the TCP protocol. Set the source to
Anywhere; this allows all users outside the virtual private network (VPC) to access the EC2 instance. Click onEdit, thenAdd security group ruleand add the details mentioned previously.
- Leave the storage how it is to 8 GB.
- In
Advanced details, there is the possibility to request a spot instance for cost saving, however, keep in mind that AWS can terminate the instance at any moment. In this same section underUser dataadd the following code to install Docker and Postgres at launch. The reason why we install Postgres will be explained later on.
#!/bin/bash
sudo yum update -y
sudo amazon-linux-extras install docker
sudo service docker start
sudo amazon-linux-extras enable postgresql13
sudo yum install postgresql postgresql-server -y
sudo postgresql-setup initdb
sudo systemctl start postgresql
sudo systemctl enable postgresql
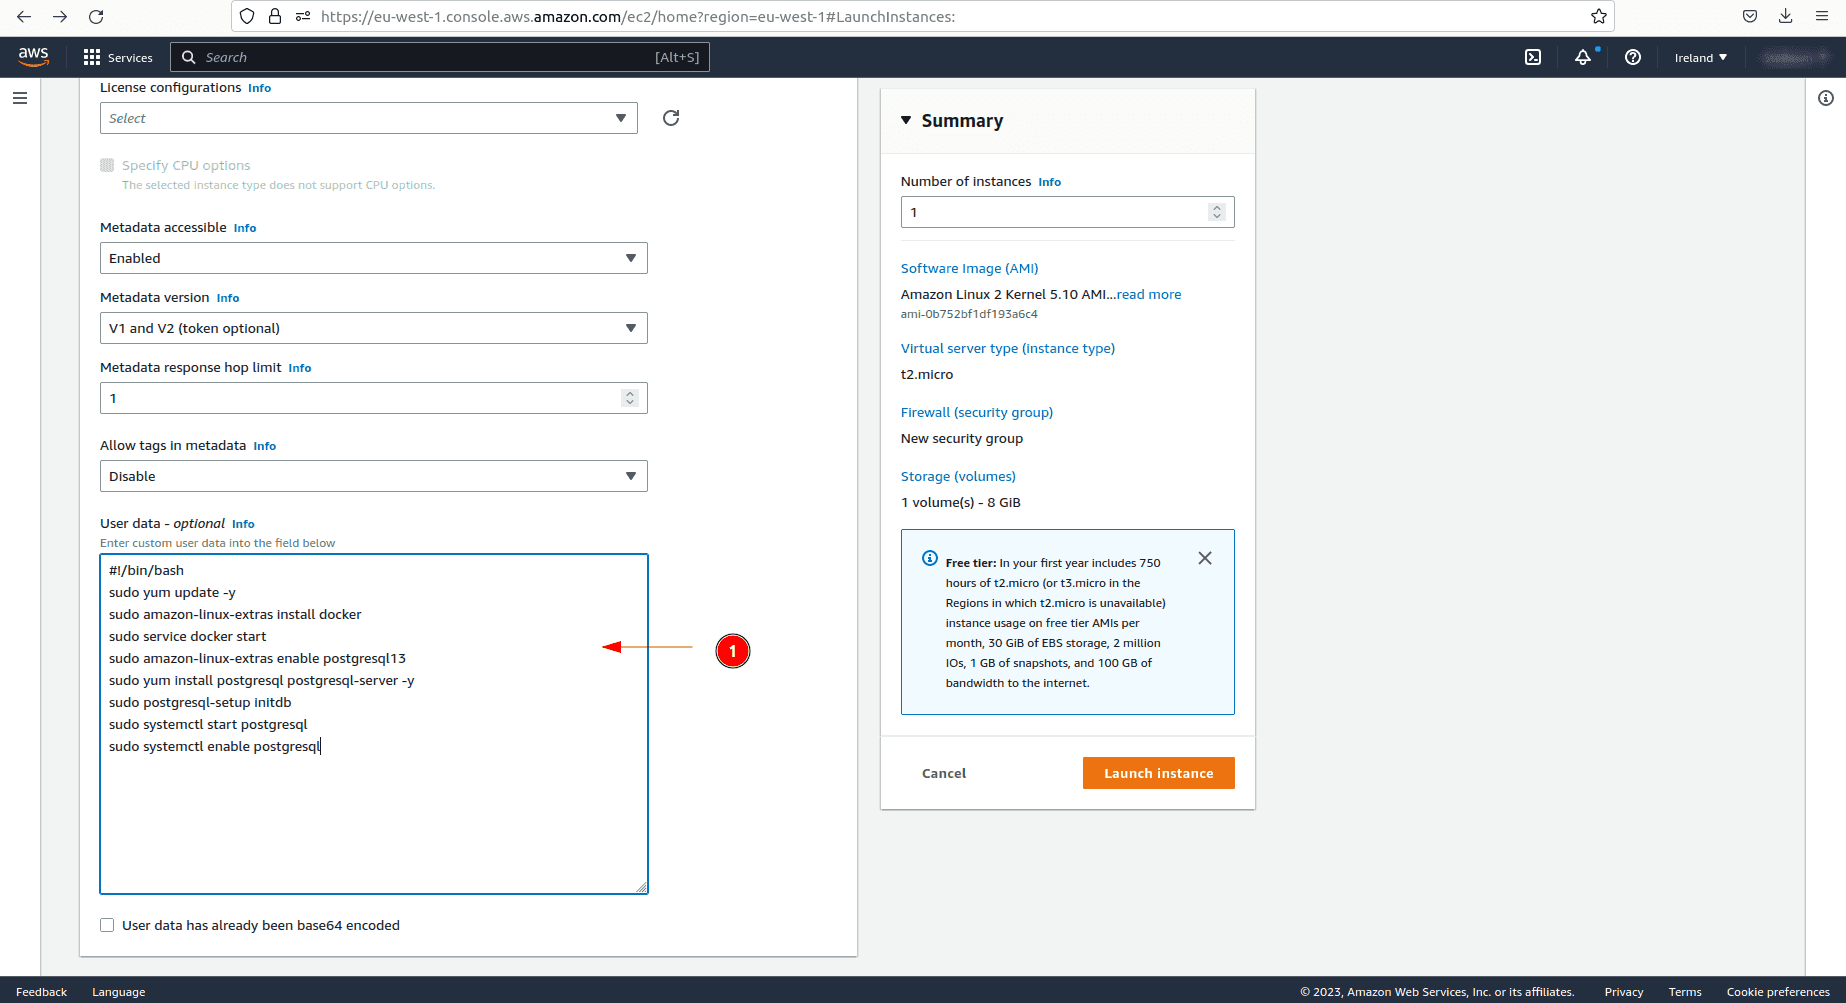
If you forget to paste this code in User data before launching the instance, you will still be able to run each code line individually in the created EC2 instance afterwards.
1.1.2 Create and use a launch template
Create a launch template from the previously created instance to easily reproduce the set-up.
-
As shown in the image, click on the instance.
-
Then click on
Actions. -
And finally click on
Create Template from Instance.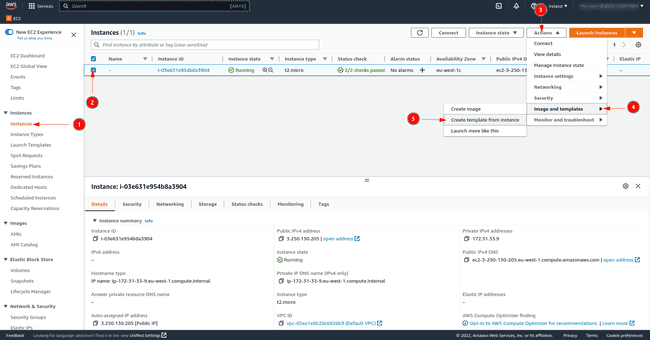
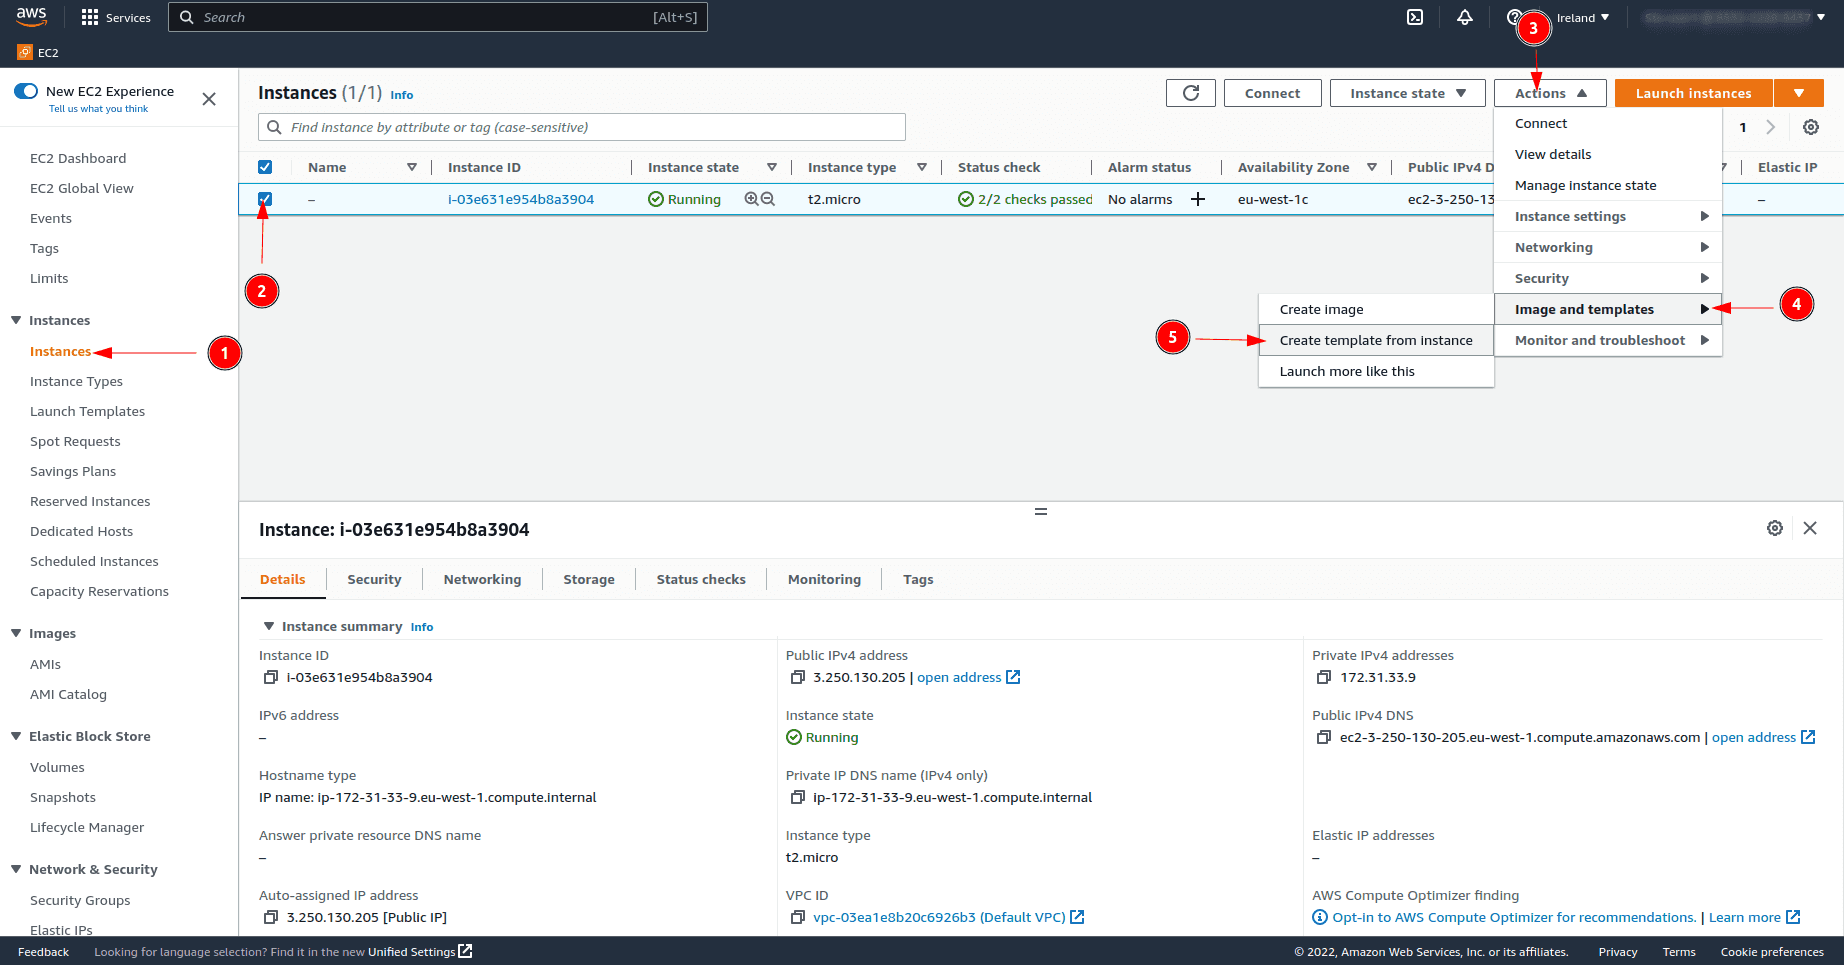
The launch template has been created and next time launch the instance from this template by clicking on Launch instance from template in the EC2 dashboard page as shown in the second image of the article.
1.2 Use the AWS CLI commands
If you have AWS CLI installed on your PC and are comfortable with the CLI commands, you may use them to set up the instance.
1.2.1 Set up the instance the first time
-
Log on your AWS account with the following command and then give your credentials as explained in the official documentation
aws configureGive your access key and private access key, then set your default region and choose
jsonas the default output format. -
Create a key for the EC2 instance in your default region if you do not have one yet.
aws ec2 create-key-pair \ --key-name <your_key_name> \ --query 'KeyMaterial' \ --output text > your_key_name.pem -
Get your default VPC Id.
aws ec2 describe-vpcs | grep VpcId -
Create a security group.
aws ec2 create-security-group \ --group-name <security-group-name> \ --description "test the cli security group" \ --vpc-id <your-vpc-id> -
Open ports 22, and do the same command for port 8080 and/or port 8443 by just replacing the port number.
aws ec2 authorize-security-group-ingress \
  --group-id <sg-id> \
  --protocol tcp --port 22 --cidr 0.0.0.0/0
aws ec2 authorize-security-group-ingress \ --group-id <sg-id> \ --protocol tcp --port 8080 --cidr 0.0.0.0/0aws ec2 authorize-security-group-ingress \ --group-id <sg-id> \ --protocol tcp --port 8443 --cidr 0.0.0.0/0
-
If you already have a security group with these ingress rules, search for it as follows:
aws ec2 describe-security-groups
-
Launch an EC2 instance of type T2 micro with an Amazon Linux AMI and with the Docker installation bash script. Paste the Docker installation code in a bash script and name it the same as in
user-dataof therun-instancecommand.aws ec2 run-instances --image-id ami-01cae1550c0adea9c \ --count 1 --instance-type t2.micro \ --key-name <your-keyname> \ --security-group-ids <your-sg-id> \ --user-data file://<docker-install-file-name> -
The following command creates a tag for the instance even though it is not mandatory.
aws ec2 create-tags --resources <InstanceID> --tags Key=Name,Value=KeycloakTo terminate the instance, use the following command:
aws ec2 terminate-instances --instance-ids <instance-id>
1.2.2 Using a launch template for reproducibility
Let’s put in a template file all these settings from the existing instance that has been created to reproduce the same setup each time we launch the instance.
-
First get the instance Id with the following command.
aws ec2 describe-instances | grep "InstanceId"Note that if you have several instances running at the same time, you will have several Ids. You should therefore exclude the
| grep "InstanceId"from the command and, in the long description, look which instance is concerned. -
Now extract all information to a json file by replacing the
instance-id.aws ec2 get-launch-template-data \ --instance-id <your-instance-id> \ --query "LaunchTemplateData" >> instance-data.json -
With the obtained file, create a launch template.
aws ec2 create-launch-template \
  --launch-template-name TemplateForWebServer \
  --version-description Version1 \
  --tag-specifications 'ResourceType=launch-   template,Tags=[{Key=purpose,Value=Keycloak}]' \
  --launch-template-data file://instance-data.json
Text in json format will appear on the console with the launch template Id.
If the launch template has already been created, get its Id with the following command.
aws ec2 describe-launch-template-versions \
--versions "$Latest,$Default"-
Once we have the launch template and its Id, launch the EC2 instance as follows
aws ec2 run-instances \
  --launch-template LaunchTemplateId=<launch-template-id>
1.3 Create the EC2 instance with Terraform
Another way to create all resources from scratch is to use Terraform. Terraform destroys all created resources with a simple command. In this case, it not only deletes the EC2 instance, but also the security group. The comfort of the Terraform scripts below is that they are applicable to all AWS users and therefore not customized for a specific one.
Keep in mind that the only element that the scripts below do not create is a new AWS SSH key for the instance. If you do not have one yet, please refer to the previous AWS CLI command or go in the web interface to create one and make sure it is created in the same region where you want to launch the EC2 instance.
-
Check if Terraform is installed, if not, find the instructions on the hashicorp website and verify that the version is superior to 1.2.8 with the command
terraform versionon the command line. -
Create a
main.tffile and paste the following code# terraform for ec2 type t2 micro, ami amazon-linux, Docker installed terraform { required_version = ">= 1.2.8" } # Get the default VPC resource "aws_default_vpc" "default" { tags = { Name = "Default VPC" } } # Create a security group that allows inbound traffic on port 8080 and 8443 resource "aws_security_group" "sg" { name = var.security_group_name description = "Allow inbound traffic on port 8080 and 8443" vpc_id = aws_default_vpc.default.id ingress { description = "open ssh port" from_port = 22 to_port = 22 protocol = "tcp" cidr_blocks = ["0.0.0.0/0"] ipv6_cidr_blocks = ["::/0"] } ingress { description = "open port 8080" from_port = 8080 to_port = 8080 protocol = "tcp" cidr_blocks = ["0.0.0.0/0"] ipv6_cidr_blocks = ["::/0"] } ingress { description = "open port 8443" from_port = 8443 to_port = 8443 protocol = "tcp" cidr_blocks = ["0.0.0.0/0"] ipv6_cidr_blocks = ["::/0"] } # Allows all outbound traffic egress { from_port = 0 to_port = 0 protocol = "-1" cidr_blocks = ["0.0.0.0/0"] ipv6_cidr_blocks = ["::/0"] } tags = { Name = var.security_group_name } } # Create a t2 micro instance with amazon-linux resource "aws_instance" "ec2" { ami = "ami-01cae1550c0adea9c" instance_type = "t2.micro" key_name=var.keyname vpc_security_group_ids = [aws_security_group.sg.id] user_data = <<-EOF #!/bin/bash sudo yum update -y sudo amazon-linux-extras install docker sudo service docker start sudo amazon-linux-extras enable postgresql13 sudo yum install postgresql postgresql-server -y sudo postgresql-setup initdb sudo systemctl start postgresql sudo systemctl enable postgresql EOF tags = { Name = var.aws_instance_name } } # Output the public ip output "instance_ip" { value = "${aws_instance.ec2.public_ip}" description = "Public IP address" } output "instance_dns" { value = "${aws_instance.ec2.public_dns}" description = "Public DNS" } -
Now create a
providers.tffile and paste the following code. Type the AWS region where the resources should be created and where the SSH key is locatedprovider "aws" { region = "<aws-region>" } -
Finally create a
variables.tffile, paste the following code and replace the variable namesvariable "keyname" { type = string default = "<your-keyname>" } variable "security_group_name" { type = string default = "<your-security-group-name>" } variable "aws_instance_name" { type = string default = "<your-instance-name>" } -
Once the 3 files have been created let’s initialize the environment
terraform init -
Let’s check that no errors have been written in the files
terraform plan -
Now launch the set up
terraform apply
- Use the
terraform refreshcommand to get the information of the created resources again. - Apply the
terraform destroycommand to destroy all resources created by terraform for the environment.
2 Log into the EC2 instance
-
We either get the public DNS name or the public IP address of the instance outputted by the terraform script. Alternatively, apply the following command to get the public DNS
aws ec2 describe-instances | grep "PublicDnsName"
If you have several ec2 instances, leave out the | grep "PublicDnsName" and search the information corresponding to your EC2 instance in the long json script which is shown on the screen.
-
If necessary ensure that the SSH key is not publicly viewable
chmod 400 <key-name> -
Log in the instance through SSH, it may take a few minutes for the instance to launch.
ssh -i "<key-name>" ec2-user@<Public-DNS-Name or Public-IP>
3 Create a Docker container with Keycloak
3.1 Demo example in development mode
Now we create a Docker container running Keycloak publicly for a demo purpose.
-
To avoid the
sudocommand for Docker, type the code below, exit your instance and log back in againsudo usermod -aG docker $USER -
Now let’s pull the image. At the time of writing the latest version is 20.0.3.
docker pull quay.io/keycloak/keycloak:latest -
Run the container by enabling port 8080 inside the container and on the instance.
# Set a password for admin user export KEYCLOAK_DEV_ADMIN_PASSWORD=<your password> # Run the container docker run -d \ --name keycloak-dev \ -p 8080:8080 \ -e KEYCLOAK_ADMIN=admin \ -e KEYCLOAK_ADMIN_PASSWORD=$KEYCLOAK_DEV_ADMIN_PASSWORD \ quay.io/keycloak/keycloak:latest \ start-dev -
If we type
docker pswe see that the container is running on port 8080.

- Open the web browser with [http://ec2-public-ip:8080] to access the page below.
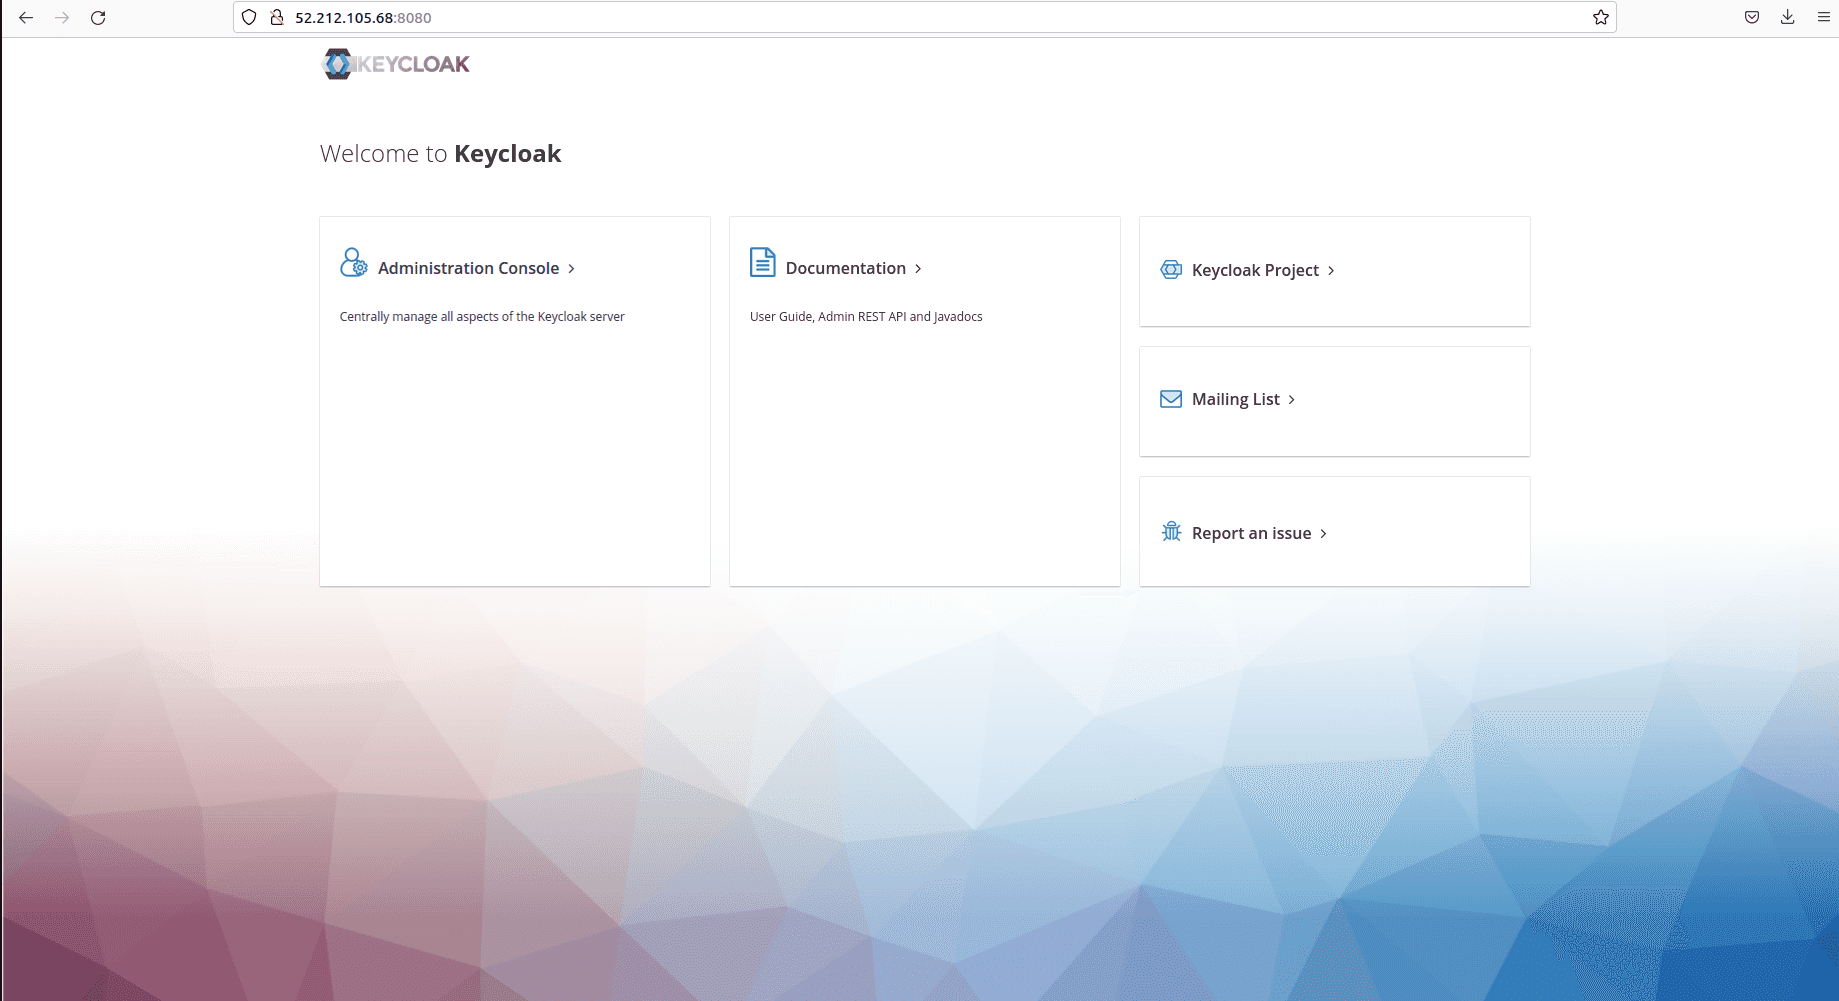
However, if we click on Administration Console we cannot log in because the data flow between your EC2 instance and the public internet is by default protected with SSL encryption in Keycloak.
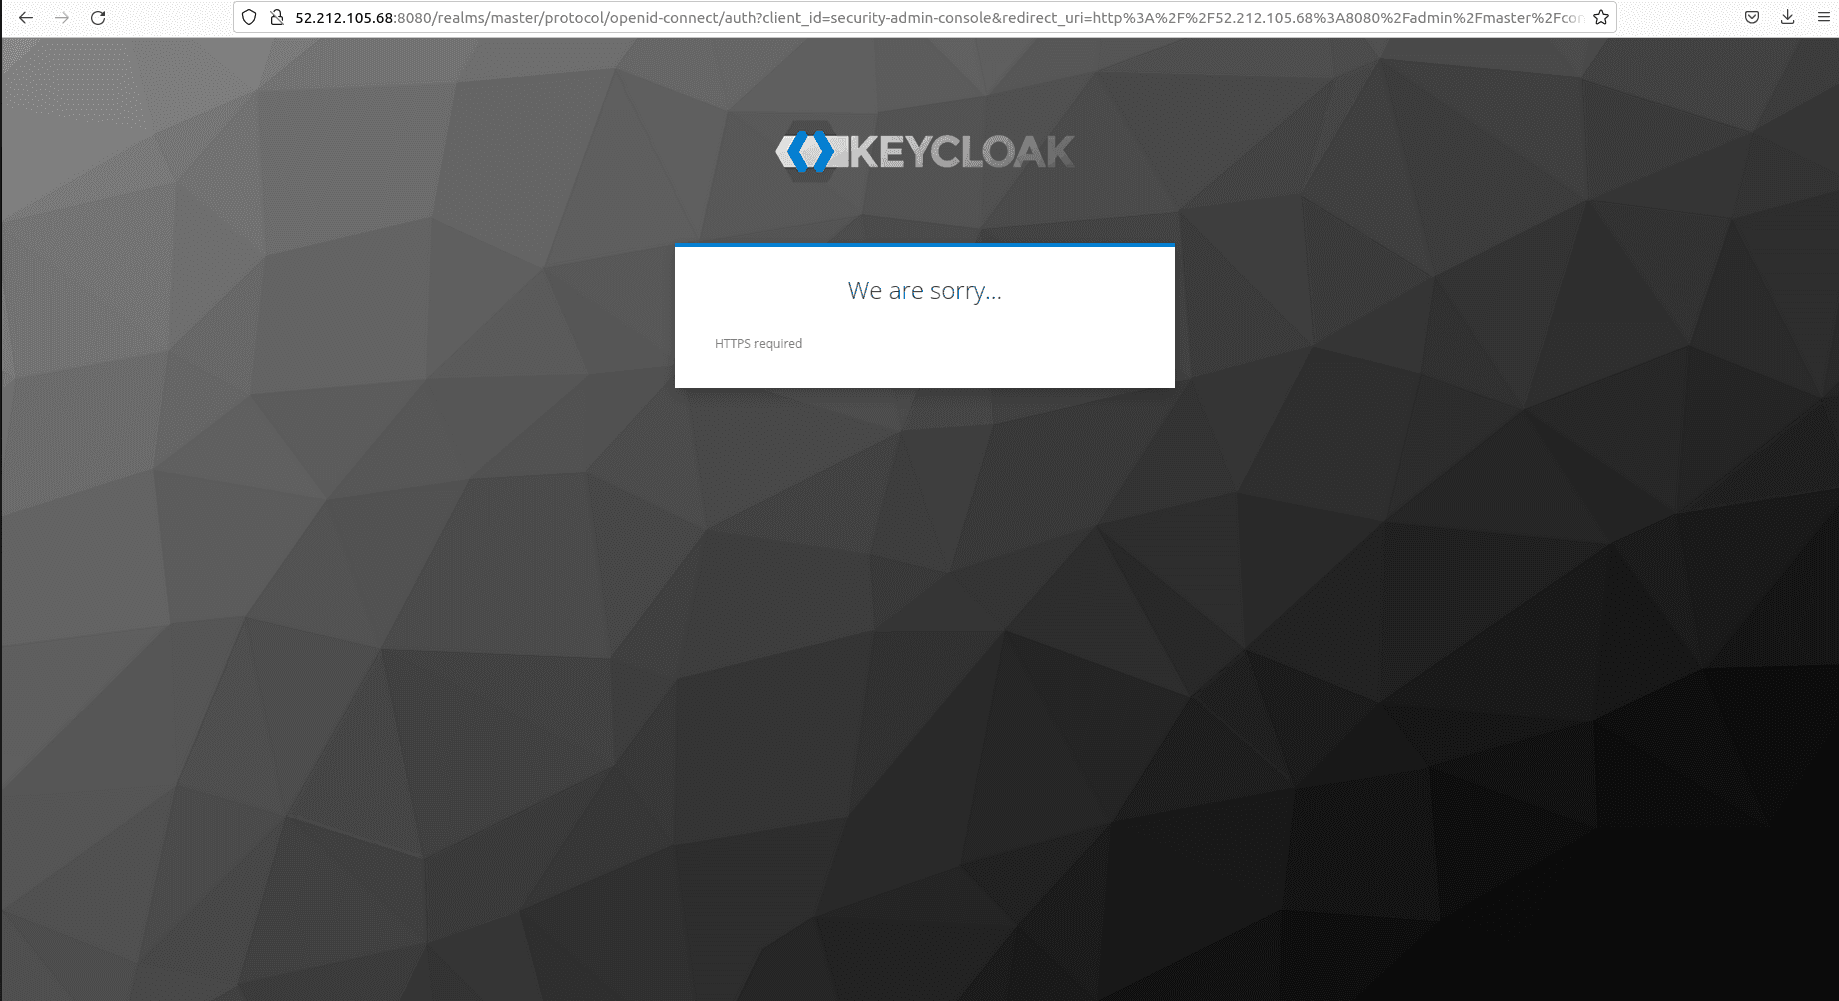
And adding https:// in front of the public IP only gives an error as follows
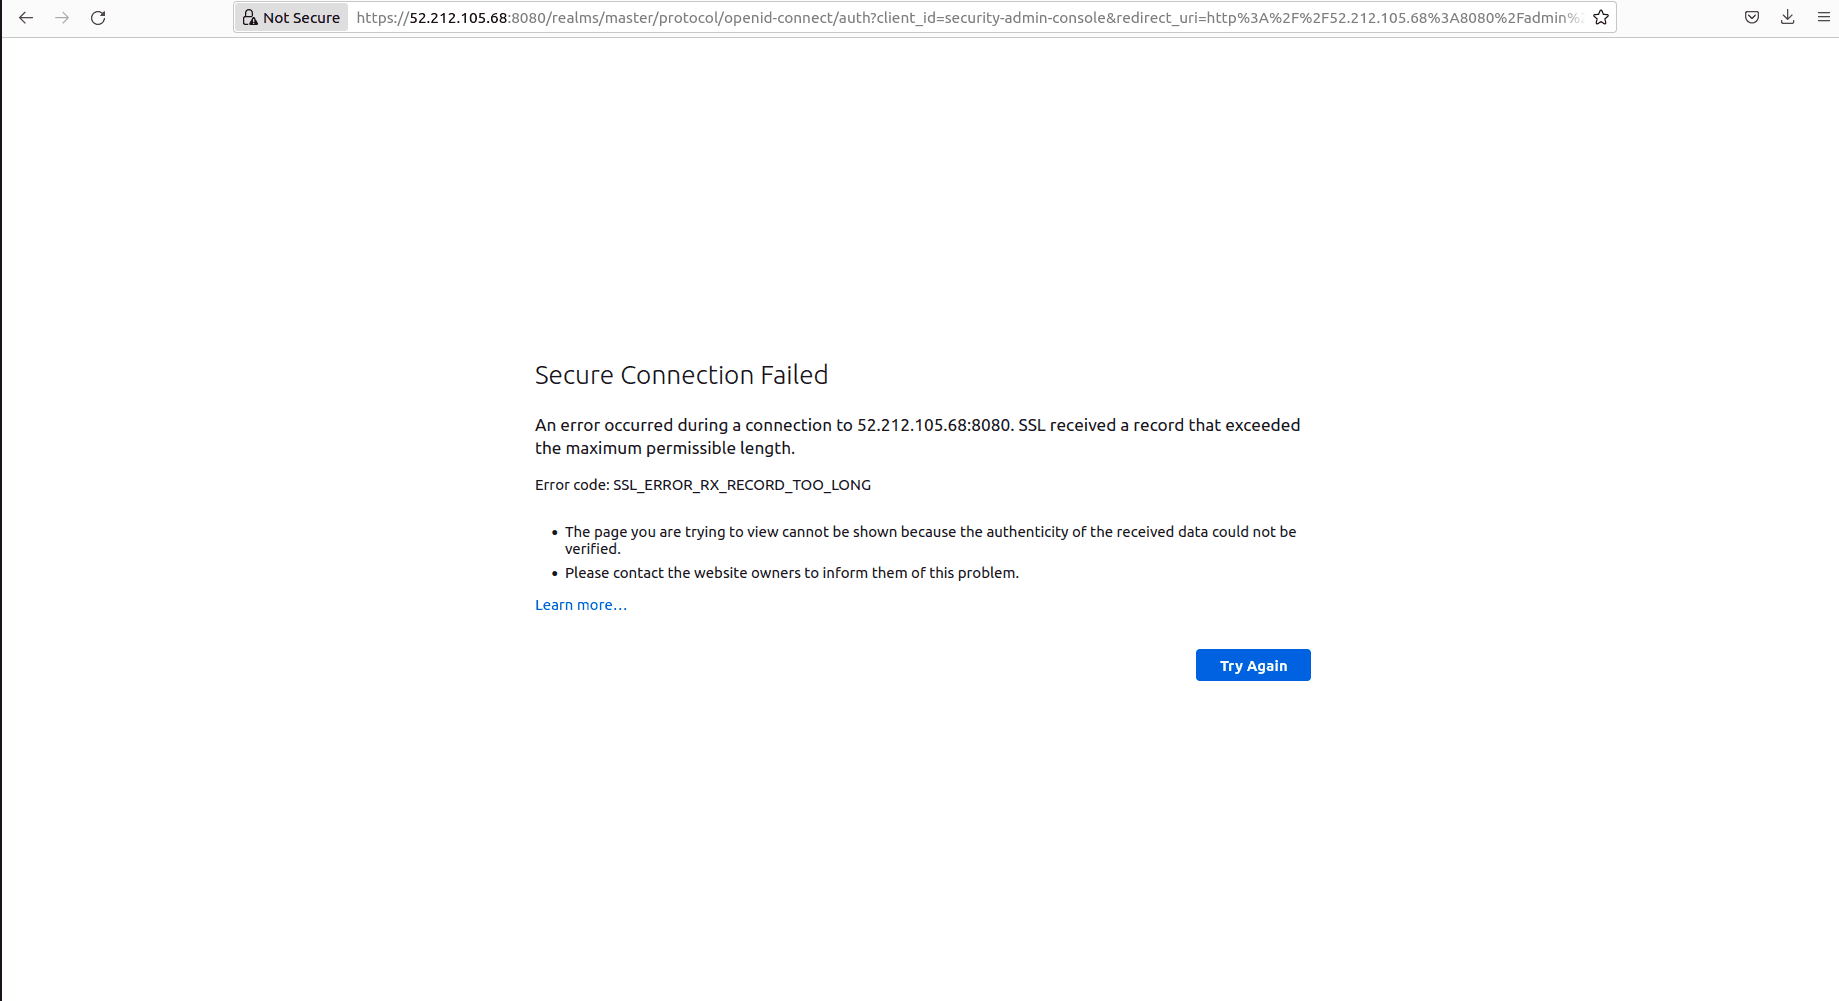
If we connect with a machine inside our VPC, we will have access to the console. In this example, we disable the SSL/TLS requirement to have access to Keycloak through the public internet.
-
To deactivate SSL/TLS let’s enter the container in interactive mode.
docker exec -it keycloak-dev bash -
In the container set the path to use the
kcadm.shscript.export PATH=$PATH:/opt/keycloak/bin -
Then run the following command to set the server and the user of the master realm.
kcadm.sh config credentials --server http://localhost:8080/ \ --realm master \ --user admin --password <your password> -
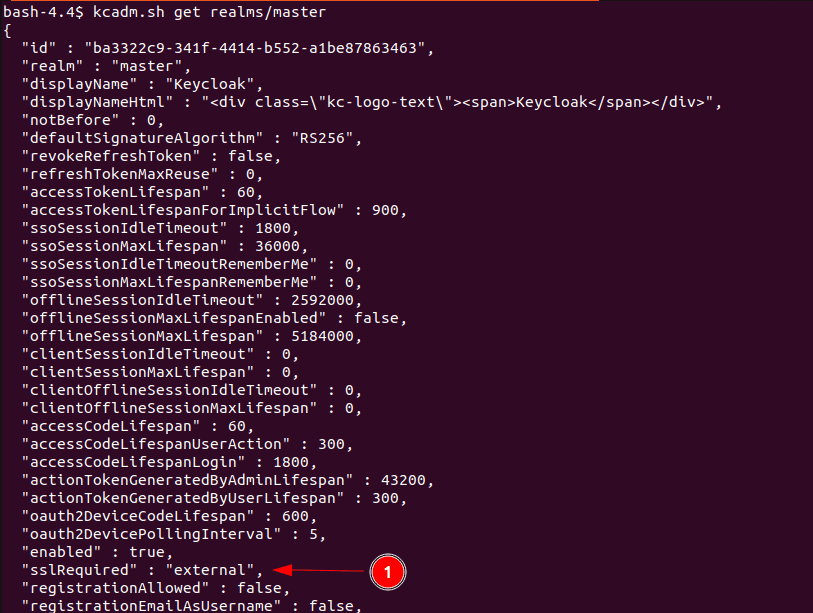
By typing the following command, we get the realm details outputted in json format and we see that the value for
sslRequiredis set toexternalat the bottom of the picture. This indicates that SSL/TLS is required outside of our VPC.kcadm.sh get realms/master
-
Disable the SSL/TLS requirement for the master realm.
kcadm.sh update realms/master -s enabled=true -s sslRequired=none -
Now on the browser click on “Administration Console” again and this time the login page appears.
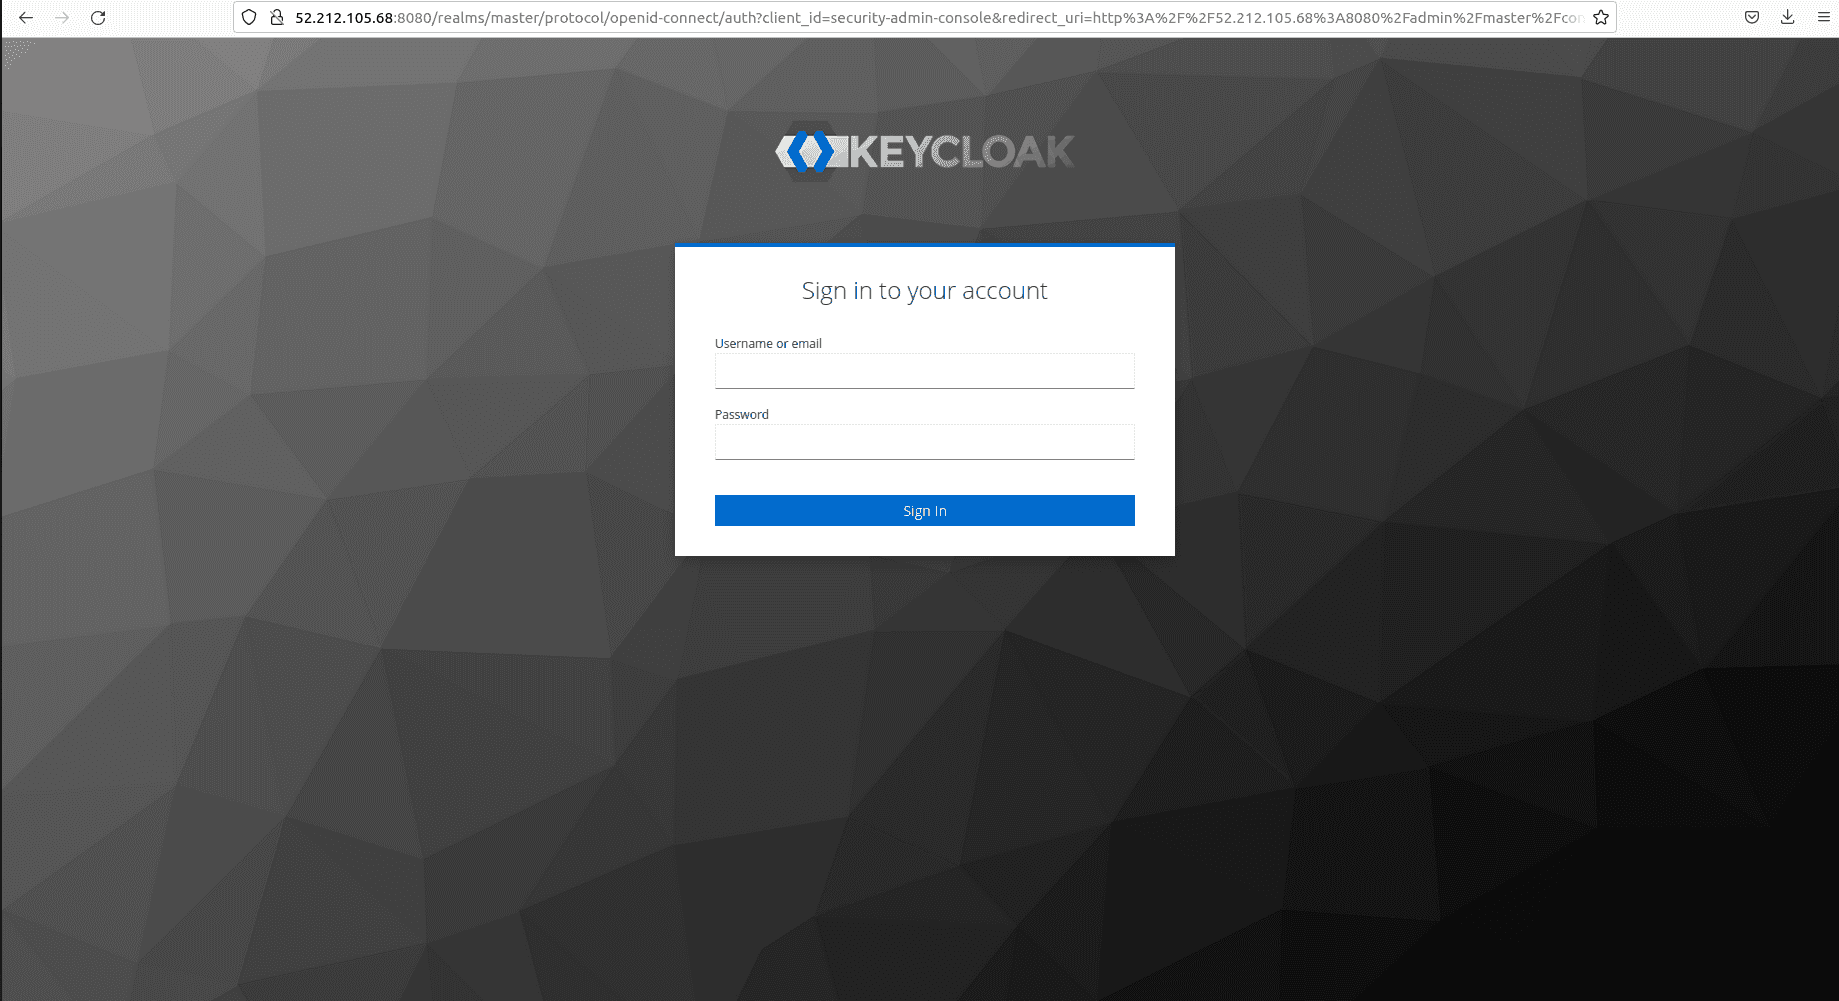
- Give the credentials and obtain the following page.
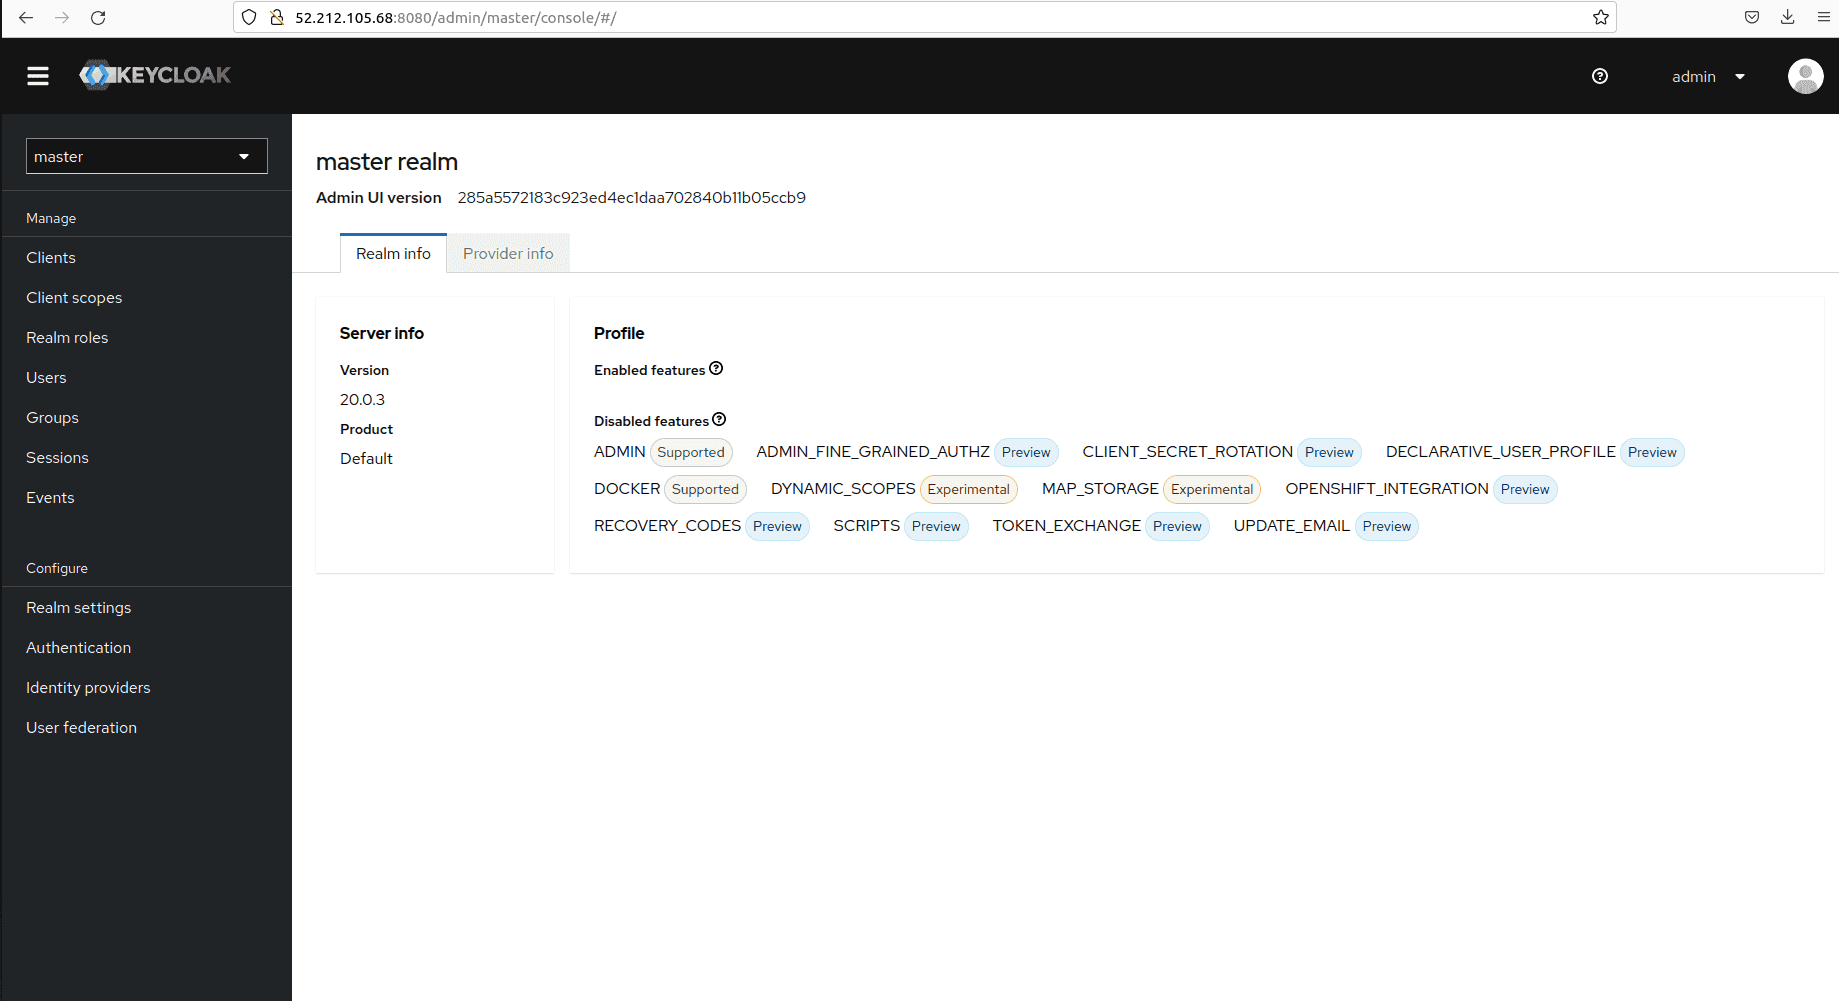
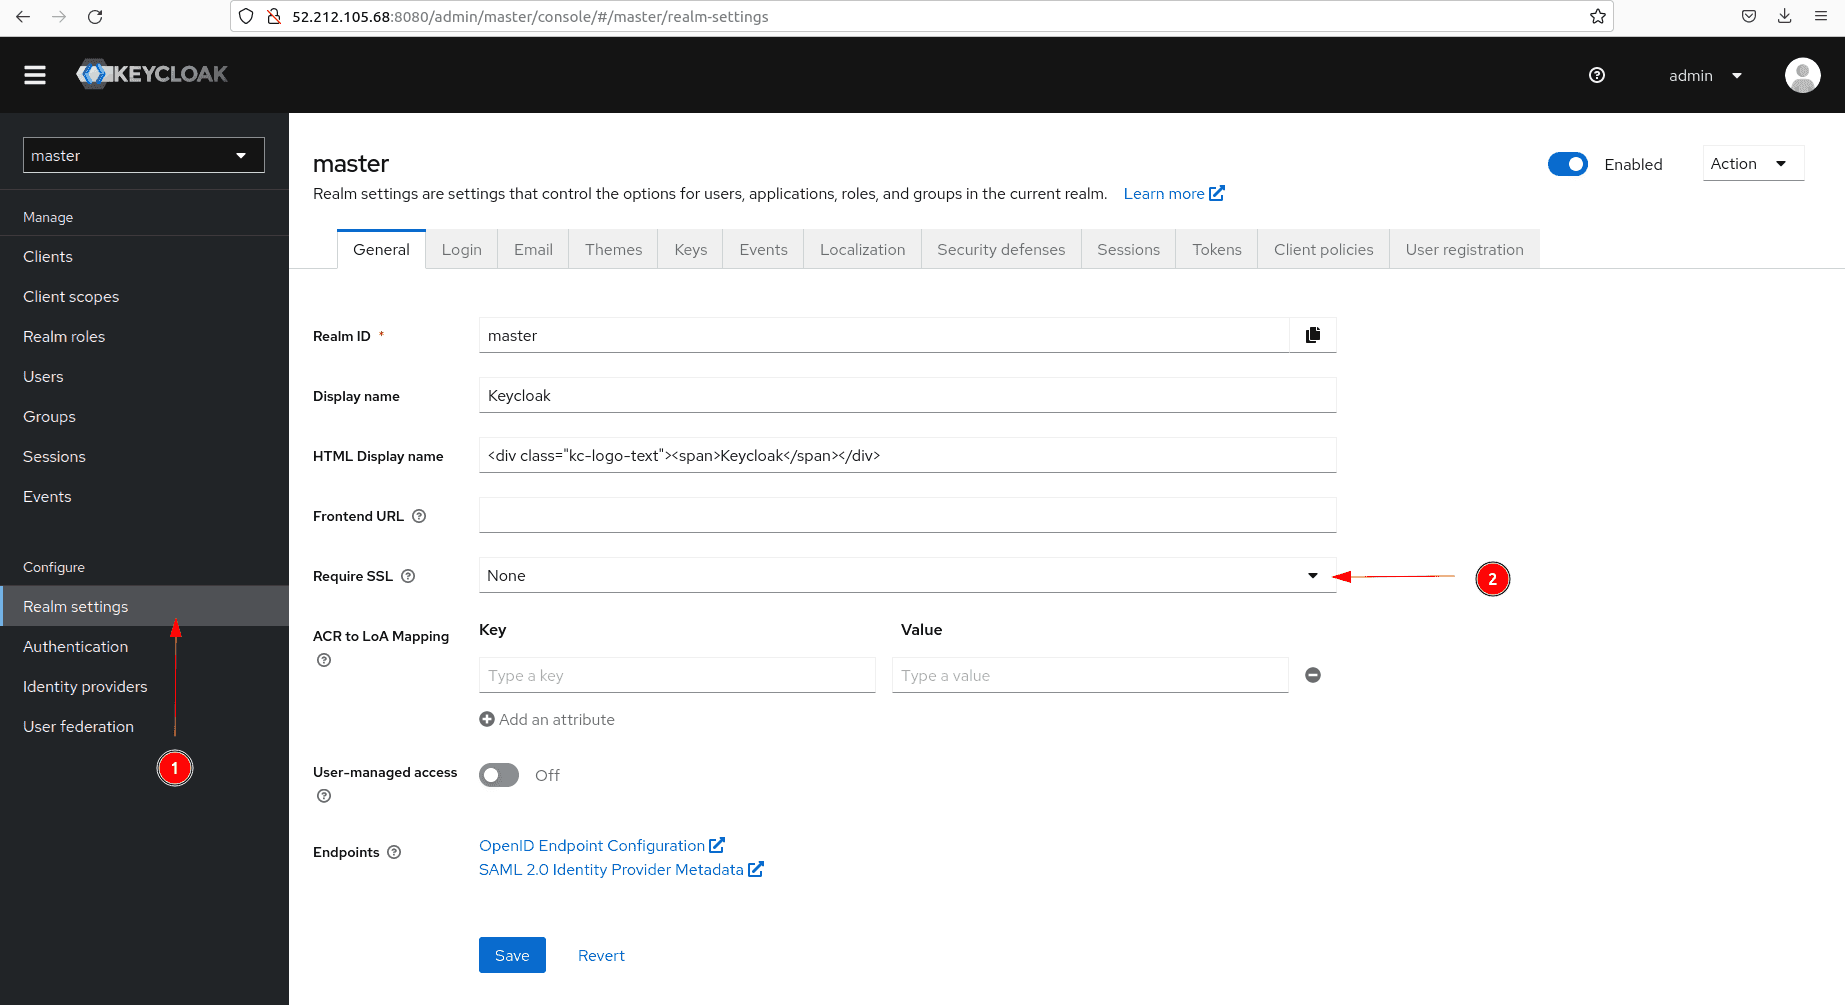
- If we go in the master realm to
Realm settings,the tabRequire SSLis now set toNone.
Keep in mind that disabling the SSL/TLS requirement is not recommended in production mode and/or if you deal with sensitive data.
Before turning to the next section, stop the container with the command docker stop keycloak-dev since the new container will require the same host port. Delete it with docker rm keycloak-dev as it is not being used any longer.
3.2 Deploy Keycloak in production mode with a self-signed SSL/TLS certificate
You might wonder why we have installed Postgres with the user data since we did not use it yet. Keycloak comes with an in-memory database called H2. However, it is insufficient for large data and therefore not recommended for use in production mode. That is the reason why we installed an external database to connect to Keycloak. In this case we use Postgres, however you have the choice to connect other databases such as Oracle or MySQL.
If you have not done the demo example in development mode, perform step 1 and 2 of that section and continue from here on.
-
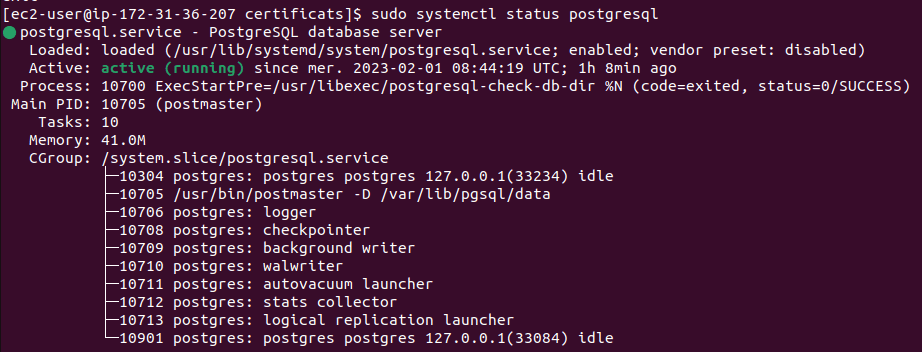
Check that Postgres is working
sudo systemctl status postgresql
-
Postgres has already a user created called
postgres. Let’s set the database password and then typeexitto leave.# Change to postgres user sudo su - postgres # Set DB password psql -c "ALTER USER postgres WITH PASSWORD '<your password>';" -
Open file
/var/lib/pgsql/data/pg_hba.confwithnanoorvimas root user. Under section# IPv4 local connections:, comment outhost all all 127.0.0.1/32 identand addhost all postgres 127.0.0.1/32 md5. This action enables only the user postgres on the localhost to access the database with a password. Postgres has no other purpose than being used by Keycloak in our case. You can find more about authentication methods on the Postgres website.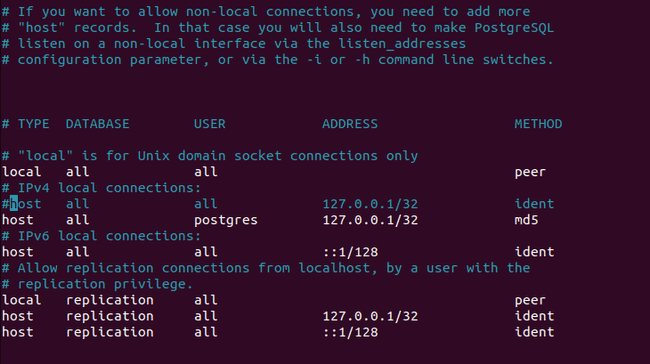
-
Restart Postgres.
sudo systemctl restart postgresql -
Create a folder for the SSL certificats.
mkdir certificates cd certificates -
Create the self-signed certificat and the key in pem format.
openssl req -newkey rsa:2048 -new -nodes -x509 -days 3650 -keyout key.pem -out cert.pem -
Set passwords and hostname. The database password must be same as the one you have set previously in Postgres.
export KEYCLOAK_ADMIN_PASSWORD=<your keycloak admin password> export DB_PASSWORD=<your db password> export KEYCLOAK_HOSTNAME=<your public ip>:8443 -
Create the container with the following command.
docker run -d  \
  --name keycloak-prod \
  -v /home/ec2-user/certificates:/certificates \
  --network=host \
  -e KEYCLOAK_ADMIN=admin \
  -e KEYCLOAK_ADMIN_PASSWORD=$KEYCLOAK_ADMIN_PASSWORD \
  quay.io/keycloak/keycloak:latest \
  start \
  --features=token-exchange \
  --https-certificate-file=/certificates/cert.pem \
  --https-certificate-key-file=/certificates/key.pem \
  --hostname=$KEYCLOAK_HOSTNAME \
  --proxy=edge \
  --db=postgres \
  --db-url=jdbc:postgres://localhost:5432/postgres \
  --db-username=postgres \
  --db-password=$DB_PASSWORD
Here we mount a volume with the certificates to the container. Keycloak then stores them in a keystore with the options
--https-certificate-fileand--https-certificate-key. More about configuring TLS is on the Keycoak website.We order the container to use the same network as the host with
--network=host. Therefore we do not have to do any network configuration on the container. Keycloak uses by default port 8080 and 8443 for respectively http and https. Postgres is connected through its default port 5432.Here, we set the public IP address as hostname as we want the Admin Console to be viewable on the public internet. With the option
--proxy=edge, our server is running behind a TLS termination proxy. Read the official documentation for further information on this topic.The last options in the command are mandatory to connect the Postgres database installed on the EC2 instance to the container.
-
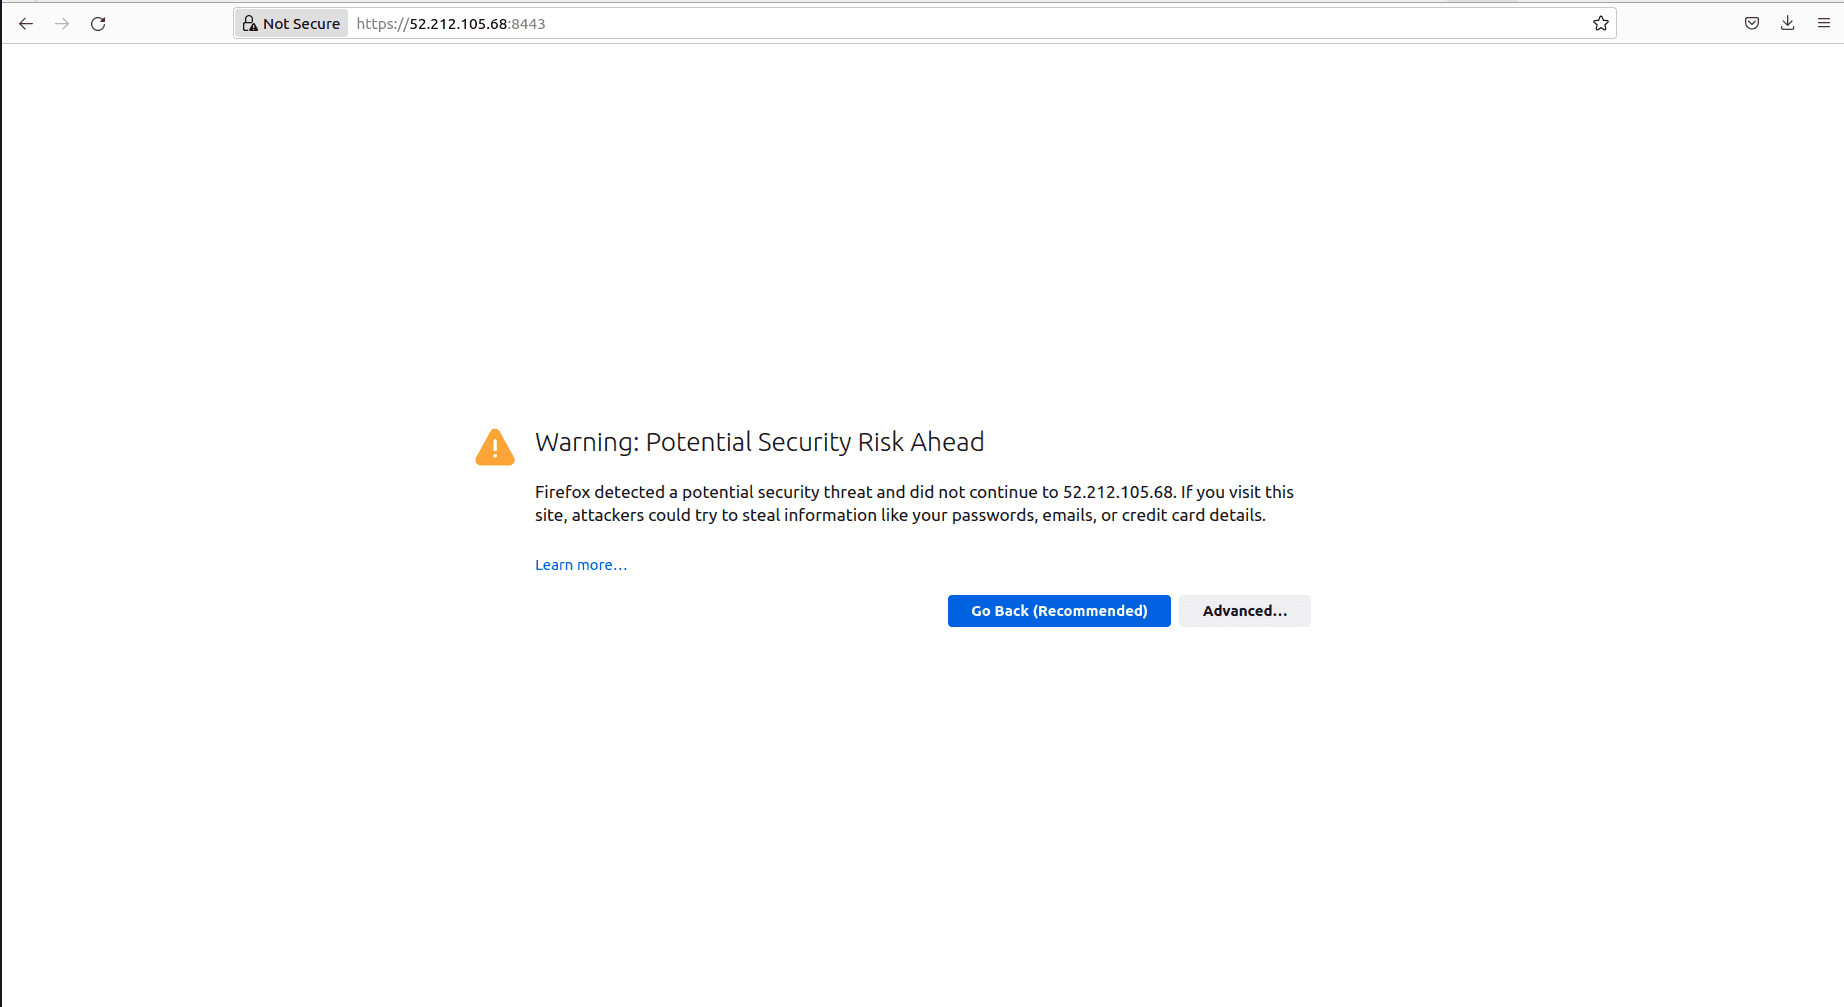
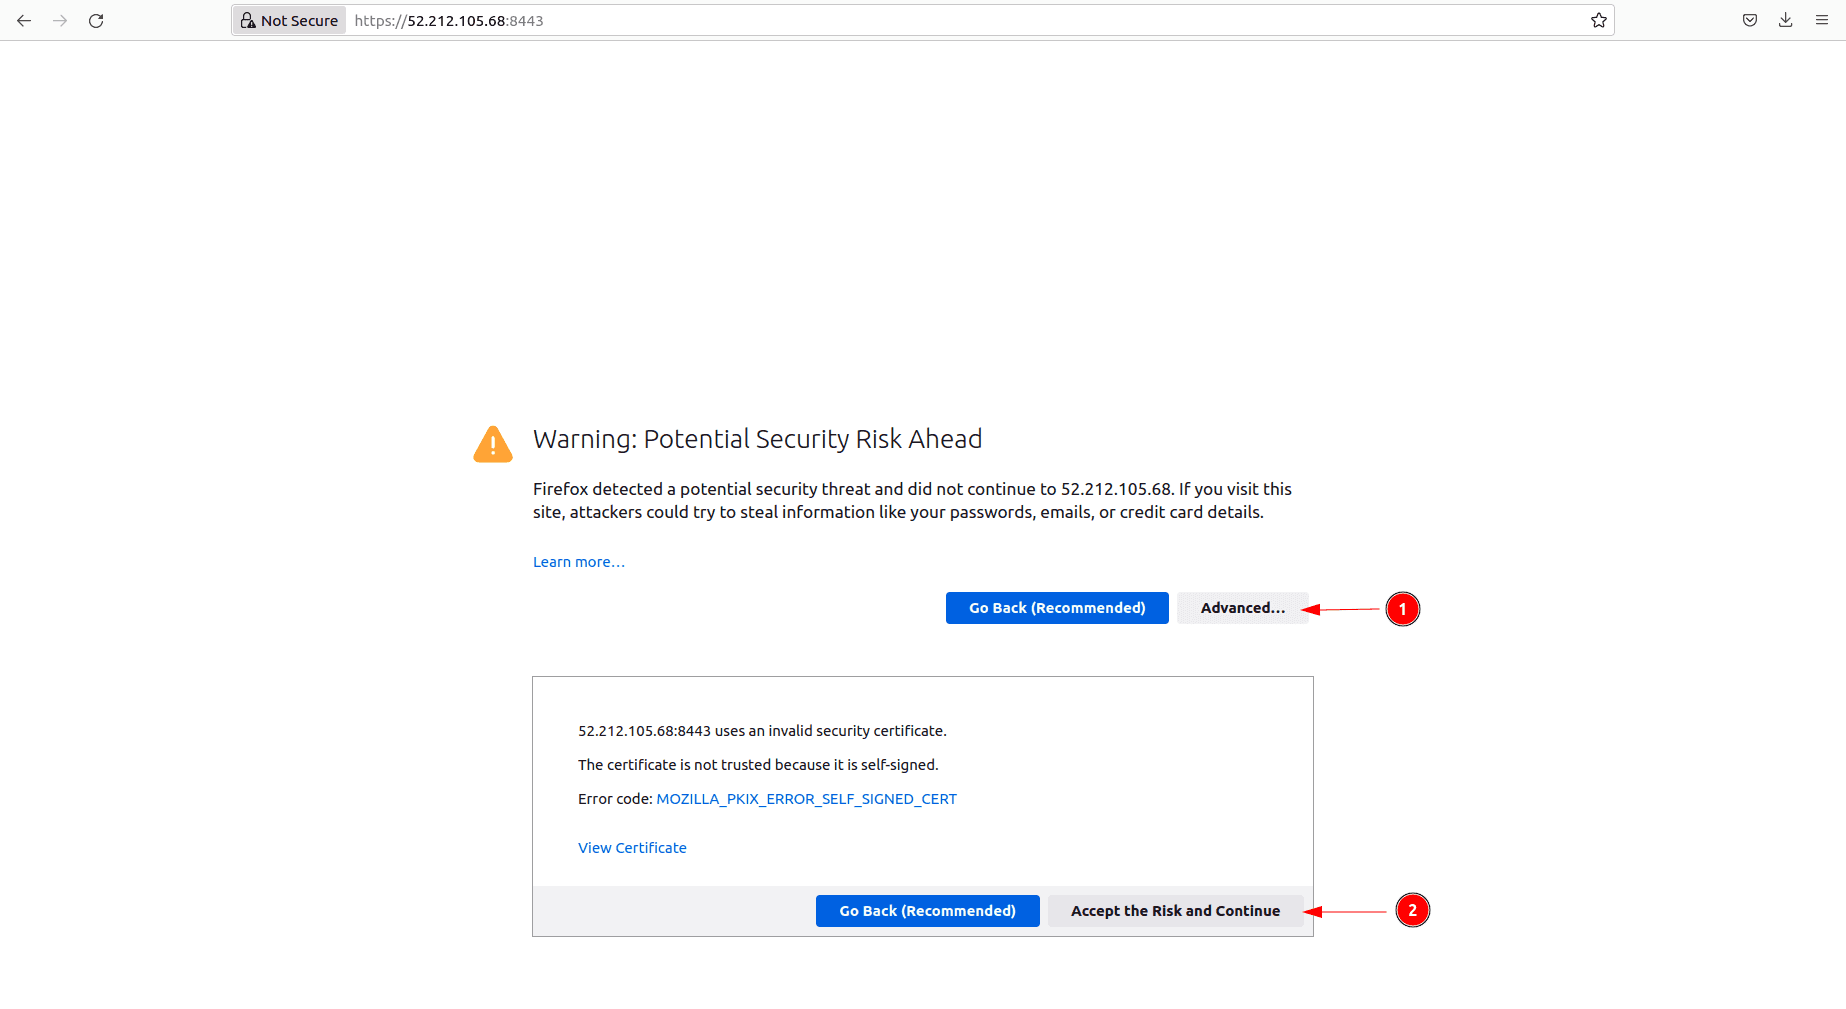
After about 30 seconds, open the web browser with [https://ec2-public-ip:8443] to access the page below in Firefox

-
Since we used a self-signed certificate we get a warning message. In Firefox, click on
Advancedand accept the risk and the browser links you then to the same console seen above.

Now that we have access to the Admin Console, we can use it for any further operations such as creating clients or users, which is explained in the Keycloak documentation.
Using the CLI commands
The use of the CLI commands first necessitates the configuration of the truststore.
-
Therefore, enter the container like in the previous section.
docker exec -it keycloak-prod bash -
Set the path for the executable files.
export PATH=$PATH:/opt/keycloak/bin -
Create a
truststore.jksfile with your pem certificate and then chose a password.cd /opt/keycloak keytool -import -alias root -keystore truststore.jks -file /certificates/cert.pem -
Configure the truststore to use the
truststore.jksfilekcadm.sh config truststore --trustpass <trustsore password> ~/truststore.jks
From now on, using further CLI commands does not differ from the demo example in development mode. You can find more CLI commands in the official documentation.
We have finally setup Keycloak in a Docker container on an EC2 instance and it is ready for any further operations.
Do not forget to terminate all your created resources once they are no longer being needed.
