


Installing Kubernetes on CentOS 7

Jan 29, 2019
Never miss our publications about Open Source, big data and distributed systems, low frequency of one email every two months.
This article explains how to install a Kubernetes cluster. I will dive into what each step does so you can build a thorough understanding of what is going on.
This article is based on my talk from the Adaltas 2018 Summit. During that talk, I demoed how to install a Kubernetes cluster from scratch. As a basic example of the power of Kubernetes, I installed a Ceph cluster using Rook. It allowed data to be persisted across application life-cycles.
What we are going to talk about
- Containers: a quick recap
- What is Kubernetes?
- What is Ceph?
- How are we going to install all this?
- Step by step guide
Containers, a quick recap
What is a container exactly? I often hear people compare containers to virtual machines (VMs, for short). While they do have some things in common, a container is NOT like a VM.
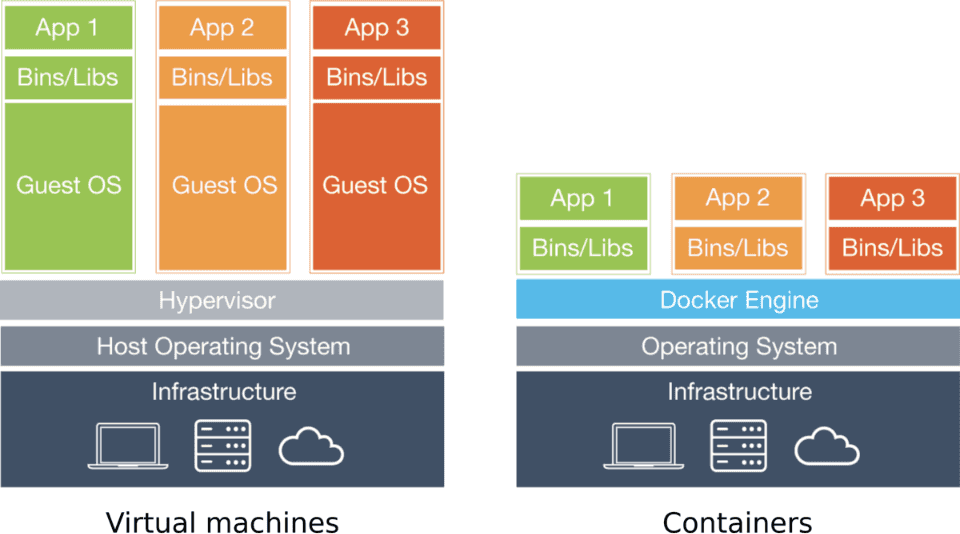
Virtual machines are named this way because they emulate a physical machine on which you can run any operating system: Linux, BSD, Windows, or any other OS. VMs are great for sharing a powerful server’s resources among apps that need to be isolated, for instance. The drawback with virtual machines is that they each run their own OS. Let’s say you have a powerful server that is running 20 VMs. That server is running a total of 21 operating systems at once: its own and one for each virtual machine. What if all 21 of those are Linux? It seems wasteful to run the same operating system so many times.
This is where containers come in. Unlike virtual machines, containers don’t run their own OS. This allows them to consume much fewer resources, while still isolating the different applications running on our server from one another. You can package pretty much any application inside a container. If it has any dependencies you can add those in too. Once this is done, you’ll be able to run your application with the help of a container engine.
So far containers seem pretty great, but what are they exactly?
On a technical level, a container is a process, or set of processes, isolated from the rest of the system by the kernel. If you want to learn more about this works, look into cgroups and namespaces.
On a functional level, containers are a new way of packaging and deploying applications with minimal overhead.
If our infrastructure already works with VMs, why should we use containers?
For starters, containers are faster, lighter, and more efficient than virtual machines, simply because of how they work. This comes down to the fact that processes running in a container are running on the actual server without any virtualization taking place. Second — and I believe this is where the value of containers really stands — containers are portable from one environment to another. They will work exactly the same on a developer’s laptop, in your CI/CD pipeline, or in production.
Now that I’ve explained why containers are awesome, how can we use them? Today, the most popular answer to that question is Docker. If you want to learn about alternatives, look into rkt or LXD (here is a great article about LXD written by a colleague of mine).

Docker provides an easy way of building and running containers. The contents of our container is specified inside a Dockerfile. In the example below, I build upon an existing container image, golang:alpine, install my app and its dependencies, and tell Docker where it can find my app’s main executable.
FROM golang:alpine
RUN apk add --no-cache git
RUN go get -u -v github.com/busser/nmon2influxdb
ENTRYPOINT ["/go/bin/nmon2influxdb"]
I can then use the Docker CLI to build and run my container:
docker build myapp --tag myapp:v1.0
docker run myapp:v1.0 --name myapp
While things are simple in a development environment, what about containers in production? How can we manage container lifecycle? When should the container be started? Should it be restarted if it crashes? How many instances of our container do we need to run? How do we maintain this cardinality? How do we start new containers when the load on our application gets too high? When we have multiple instances of our application running, how can we load-balance these services?
Docker fails to solve all these issues at scale. For the past few years, the Open-Source community has worked on solving these issues and have built several different container orchestrators. The dominant one today is, without a doubt, Kubernetes.
What is Kubernetes?
Kubernetes is a portable, extensible Open-Source platform for managing containerized workloads and services, that facilitates both declarative configuration and automation. It has a large, rapidly growing ecosystem. Kubernetes services, support, and tools are widely available.

Kubernetes was first built by Google based on their experience with Borg, their in-house container-management system and Open-Sourced it in 2014. It is now maintained by the Cloud Native Computing Foundation (CNCF), which is part of the Linux Foundation. Many companies contribute to Kubernetes, including Google, RedHat, CoreOS, IBM, Microsoft, Mesosphere, VMWare, HP, and the list goes on.
With such a huge community backing it, what can Kubernetes do?
It can deploy containerized applications painlessly, automate container deployment and replication, and group containers together to provide load-balancing. It allows declaring a target architecture, deploying rolling updates, separating the application from the underlying architecture, and detecting incidents and self-healing.
Before we carry on, here is some quick vocabulary:
- Pods are a small group of containers that are deployed together. This is the basic unit of all Kubernetes deployments. If a pod contains multiple containers, these will always be deployed on the same Kubernetes server and will always have the same cardinality.
- Services are a network abstraction of pod replicas. When you have multiple instances of your application, and therefore multiple pods, connecting to the corresponding service will redirect you to any of those pods. This is how load-balancing works in Kubernetes.
- Namespaces are a logical separation of Kubernetes components. For instance, you may have a namespace for each developer, or different namespaces for applications running in production.
- Persistent Volume Claims (PVC) are how a pod can keep using the same persistent storage space throughout its lifecycle. If a pod is deleted and then recreated — due to a version upgrade for example — it can use its old data as long as it uses the same persistent volume claim. We will use PVCs once Ceph is installed in our Kubernetes cluster later on.
What is Ceph?
Ceph is Open Source software designed to provide highly scalable object, block, and file-based storage under a unified system.

The reason why we should use Ceph is that it allows us to build a distributed filesystem on our Kubernetes workers. Deployed pods can use this filesystem to store data which will be persisted and replicated across the cluster.
How are we going to install all this?
Now that we’ve explained what Docker, Kubernetes, and Ceph are and what they are useful for, we can start setting up a Kubernetes cluster. To do this, we are going to use some tools built by the community.
The first is kubeadm, a command line interface for initializing Kubernetes master and worker nodes. This will provide us with a basic yet secure cluster.
kubeadm init --apiserver-advertise-address 12.34.56.78
kubeadm join 12.34.56.78:6443 --token abcdef.0123456789abcdef
Once our cluster is installed, we will use kubectl, a command line interface for interacting with the Kubernetes API. This will allow us to control our cluster, deploy pods, etc.
kubectl get pods
kubectl apply --filename myapp.yaml
In order to install Ceph on our cluster, we will use Rook. It will run a cloud-native storage service built on Open Source storage technologies like Ceph.

kubectl apply --filename rook-operator.yaml
kubectl apply --filename rook-cluster.yaml
Alright! Let’s get started.
Step by step guide
All of the commands we will run below should be run as a superuser like the root account.
Step 1: Prepare your servers
We will be using five servers for this install: one master node, three worker nodes, and one server that will act as a client. The reason we will use a separate server as client is to show that once a Kubernetes cluster is installed, it can be administered through its API from any remote server.
I personally used five virtual machines for this. I have KVM set up on my Arch Linux laptop. I used Vagrant to build and set up these five VMs. Here is my Vagrantfile, if you wish to use it (you may need to edit it so it works on your system):
# -*- mode: ruby *-*
# vi: set ft=ruby

if Vagrant::VERSION == '1.8.5'
  ui = Vagrant::UI::Colored.new
  ui.error 'Unsupported Vagrant Version: 1.8.5'
  ui.error 'Version 1.8.5 introduced an SSH key permissions bug, please upgrade to version 1.8.6+'
  ui.error ''
end

Vagrant.configure("2") do |config|
  config.vm.synced_folder ".", "/vagrant", disabled: true
  config.ssh.insert_key = false
  config.vm.box_check_update = false

  config.vm.box = "centos/7"
  config.vm.box_version = "=1708.01" # RedHat 7.4

  config.vm.provider :libvirt do |libvirt|
    libvirt.driver = "kvm"
    libvirt.uri = "qemu:///system"
  end

  cluster = {
    "master-1" => { :ip => "10.10.10.11", :cpus => 2, :memory => 2048 },
    "worker-1" => { :ip => "10.10.10.21", :cpus => 1, :memory => 4096, :disk => "50G" },
    "worker-2" => { :ip => "10.10.10.22", :cpus => 1, :memory => 4096, :disk => "50G" },
    "worker-3" => { :ip => "10.10.10.23", :cpus => 1, :memory => 4096, :disk => "50G" },
    "client-1" => { :ip => "10.10.10.31", :cpus => 1, :memory => 2048 },
  }

  cluster.each do | hostname, specs |
    config.vm.define hostname do |node|
      node.vm.hostname = hostname
      node.vm.network :private_network, ip: specs[:ip]
      node.vm.provider :libvirt do |libvirt|
        libvirt.cpus   = specs[:cpus]
        libvirt.memory = specs[:memory]
        if specs.key?(:disk)
          libvirt.storage :file, :size => specs[:disk]
        end
      end
    end
  end

end
What exactly does this Vagrantfile tell Vagrant to build? There are only two sections that are important.
This block tells Vagrant to build five VMs with the CentOS version matching RHEL 7.4:
config.vm.box = "centos/7"
config.vm.box_version = "=1708.01" # RedHat 7.4
This block specifies the specs of each VM:
cluster = {
  "master-1" => { :ip => "10.10.10.11", :cpus => 2, :memory => 2048 },
  "worker-1" => { :ip => "10.10.10.21", :cpus => 1, :memory => 4096, :disk => "50G" },
  "worker-2" => { :ip => "10.10.10.22", :cpus => 1, :memory => 4096, :disk => "50G" },
  "worker-3" => { :ip => "10.10.10.23", :cpus => 1, :memory => 4096, :disk => "50G" },
  "client-1" => { :ip => "10.10.10.31", :cpus => 1, :memory => 2048 },
}
The master node needs at least two CPU cores. The workers have more memory and an additional disk partition that we will use for Ceph.
Step 2: Install Docker
Every node of our Kubernetes cluster will need Docker to work.
All of the commands of this step will be run on master-1, worker-1, worker-2, and worker-3.
In order to install Docker’s Community Edition, we needed to configure yum to use Docker’s official repository.
# Add Docker's yum repository
yum-config-manager \
  --add-repo \
  https://download.docker.com/linux/centos/docker-ce.repo
We are purposefully installing version 17.09 of Docker, because this is the latest version for which Kubernetes has been fully tested (for now).
# Install Docker CE
yum install --assumeyes docker-ce-17.09.*

# Start and enable the Docker daemon service
systemctl daemon-reload
systemctl start docker
systemctl enable docker
Step 3: Install kubeadm and kubelet
Every node of our Kubernetes cluster will need kubeadm to initialize it, whether it be a master or worker. Kubernetes’ agent process, kubelet, also needs to be installed: it will be the one starting Docker containers on our servers.
When installing kubeadm, kubectl is also installed as a dependency, but we will not use it on our master or workers.
All of the commands of this step will be run on master-1, worker-1, worker-2, and worker-3.
The first thing we do is to disable memory swapping on our nodes. This is important because we would rather our containers crash than slow down for lack of sufficient RAM.
# Disable swap
swapoff -a
sed -i '/swap/d' /etc/fstab # remove swap line
Making SELinux permissive and configuring iptables to allow traffic between containers is necessary for Kubernetes to function properly.
# Make SELinux permissive
setenforce 0

# Pass IPv4/6 traffic to iptables' chains
cat <<EOF >  /etc/sysctl.d/k8s.conf
net.bridge.bridge-nf-call-ip6tables = 1
net.bridge.bridge-nf-call-iptables = 1
EOF
sysctl --system
Just like when installing Docker, installing kubeadm and kubelet requires configuring yum to use the official Kubernetes repository. Notice the exclude=kube* line in the kubernetes.repo file. The reason for this is that we want to avoid accidental upgrades of kubelet, which could lead to undefined behavior.
# Add Kubernetes' yum repository
cat <<EOF > /etc/yum.repos.d/kubernetes.repo
[kubernetes]
name=Kubernetes
baseurl=https://packages.cloud.google.com/yum/repos/kubernetes-el7-x86_64
enabled=1
gpgcheck=1
repo_gpgcheck=1
gpgkey=https://packages.cloud.google.com/yum/doc/yum-key.gpg https://packages.cloud.google.com/yum/doc/rpm-package-key.gpg
exclude=kube*
EOF
For the sake of this demo, I chose to install Kubernetes v1.11. The reason I did not go with v1.12 (the latest version at time of writing) is that there were some issues between Kubernetes v1.12 and Flannel v0.10.0. If you don’t know what Flannel is, that’s okay; we’ll get to it soon.
# Install kubeadm, kubelet and kubectl
yum install \
  --assumeyes \
  --disableexcludes kubernetes \
  kubeadm-1.11.* \
  kubectl-1.11.* \
  kubelet-1.11.*

# Start and enable kubelet service
systemctl daemon-reload
systemctl start kubelet
systemctl enable kubelet
You can run the command below to see that the kubelet daemon is in a crashloop. This is perfectly normal and there is nothing to worry about. Since the nodes have not been initialized by kubeadm yet, kubelet fails to start, and systemd tries to restart it every ten seconds.
# Notice that kubelet is in a crashloop, which is OK
watch -n0 systemctl status kubelet # Ctrl+C to exit watch
Step 4: Initialize the master
We are now ready to initialize our Kubernetes master node.
All of the commands of this step will be run on master-1.
Start by pulling all the Docker images your master node will need to be initialized. This could take some time, depending on your Internet connection.
# Pull required Docker images
kubeadm config images pull
Now we can use kubeadm to initialize our master node. In the command below, we need to specify the master’s IP address because this is the address that the will be advertised by the Kubernetes API server. We also specify the range that Kubernetes will use when giving IP addresses to individual pods.
The command will output, among other things, a kubeadm join command. We could use this command to add workers to our cluster later on, but for the sake of learning we are going to generate our own similar command.
# Initiate master node
kubeadm init \
  --pod-network-cidr 10.244.0.0/16 \
  --apiserver-advertise-address 10.10.10.11
# 10.244.0.0/16 is required by Flannel's default settings
# 10.10.10.11 is the master node's IP address
# Save kubeadm join command somewhere
This command just did quite a few things. The main ones are generating SSL certificates for the different Kubernetes components, generating a configuration file for kubectl, and starting the Kubernetes control plane (API server, etc.).
At this point, the kubelet daemon is starting several pods on your master node. You can see its progress with this command:
watch -n0 \
  kubectl \
    --kubeconfig /etc/kubernetes/admin.conf \
    --namespace kube-system \
    get pods \
    --output wide
You can use Ctrl+C to exit the watch command.
NAME                               READY     STATUS    RESTARTS   AGE       IP                NODE       NOMINATED NODE
coredns-78fcdf6894-blnjn           0/1       Pending   0          35m       <none>            <none>     <none>
coredns-78fcdf6894-k5726           0/1       Pending   0          35m       <none>            <none>     <none>
etcd-master-1                      1/1       Running   0          35m       192.168.121.213   master-1   <none>
kube-apiserver-master-1            1/1       Running   0          35m       192.168.121.213   master-1   <none>
kube-controller-manager-master-1   1/1       Running   0          35m       192.168.121.213   master-1   <none>
kube-proxy-2wvvp                   1/1       Running   0          35m       192.168.121.213   master-1   <none>
kube-scheduler-master-1            1/1       Running   0          35m       192.168.121.213   master-1   <none>
These pods are:
- An instance of etcd, which is where Kubernetes stores its metadata;
- The Kubernetes API server, which we will interact with through
kubectl; - The Kubernetes controller manager, which will make sure that the correct number of pods are running when we deploy our application;
- The Kubernetes scheduler, which will decide on which node each of our pods should run;
- The Kubernetes proxy, which will run on each node in the cluster and manage load-balancing between our different services.
The coredns pods are stuck with the Pending status, which is because we have yet to install a network plugin inside our cluster. We’ll do just that once we’ve added our workers to our cluster.
Step 5: Prepare to add workers
The kubeadm init command we ran earlier provided a kubeadm join command that we could use to add workers to our cluster. This command contains a token that proves to Kubernetes that this new node is allowed to become a worker.
All of the commands of this step will be run on master-1.
You can get a list of existing authentication tokens by running this command:
kubeadm token listYou will see that the kubeadm init command from earlier created a token already. Let’s create a new one. Run this command:
kubeadm token create --description "Demo token" --ttl 1hThis command will output a token that looks like this: cwf92w.i46lw7mk4cq8vy48. Save yours somewhere.
There is one more thing we need to build our kubeadm join command: a hash of the SSL certificate used by the API server. This is so that the worker nodes we are going to add can make sure they are talking to the right API server. Run this convoluted command to obtain your hash:
openssl x509 -pubkey -in /etc/kubernetes/pki/ca.crt | openssl rsa -pubin -outform der 2>/dev/null | openssl dgst -sha256 -hex | sed 's/^.* //'This should output a long hash like this one:
12920e76e48212ff292e45d716bba76da5d3230f1e1ef4055a586206b5e69138We are now ready to build our kubeadm join command, using our token and our hash. It is simply this (don’t run it yet):
kubeadm join \
  --token cwf92w.i46lw7mk4cq8vy48 \
  --discovery-token-ca-cert-hash sha256:12920e76e48212ff292e45d716bba76da5d3230f1e1ef4055a586206b5e69138 \
  10.10.10.11:6443
Don’t forget the sha256 before the hash.
The IP and port at the end of the command are where the API server is listening.
We are now ready to add our three workers to our cluster. To see it happen in real time, you can run this command in another shell on master-1:
watch -n0 kubectl --kubeconfig /etc/kubernetes/admin.conf get nodesStep 6: Add workers
All we need to do to add workers to our Kubernetes cluster is run our kubeadm join command from earlier on each worker.
All of the commands of this step will be run on worker-1, worker-2, and worker-3.
kubeadm join \
  --token cwf92w.i46lw7mk4cq8vy48 \
  --discovery-token-ca-cert-hash sha256:12920e76e48212ff292e45d716bba76da5d3230f1e1ef4055a586206b5e69138 \
  10.10.10.11:6443
If you are still running the last command from step 5, you will see the worker nodes get added once you have run the kubeadm join command.
Now that the workers are added, we don’t need kubeadm anymore. Every step that follows will make use of kubectl. In other words, from now on we can manage by using only the Kubernetes API.
When listing the cluster’s nodes with kubectl, you may notice that their status displays as NotReady. This is normal and we are going to fix it soon by adding a network plugin to our cluster.
Step 7: Configure the client
This is where our client-1 machine comes in. We are going to configure kubectl on that server. The reason we are using a separate server is simple: it’s to show we don’t need access to the actual nodes of a Kubernetes cluster in order to use it.
First off, we need to get kubectl’s configuration, also known as kubeconfig, from master-1:
cat /etc/kubernetes/admin.confThis file contains all the information kubectl needs to connect to the Kubernetes API as cluster-admin, a role you could compare to root on a server. Make sure this file remains secure.
Just like when installing kubeadm and kubelet on the cluster’s nodes, we need to configure yum on client-1 to use the official Kubernetes repository.
# Add Kubernetes' yum repository
cat <<EOF > /etc/yum.repos.d/kubernetes.repo
[kubernetes]
name=Kubernetes
baseurl=https://packages.cloud.google.com/yum/repos/kubernetes-el7-x86_64
enabled=1
gpgcheck=1
repo_gpgcheck=1
gpgkey=https://packages.cloud.google.com/yum/doc/yum-key.gpg https://packages.cloud.google.com/yum/doc/rpm-package-key.gpg
exclude=kube*
EOF
Now, we can install kubectl.
# Install kubectl
yum install \
  --assumeyes \
  --disableexcludes kubernetes \
  kubectl-1.11.*
We will save kubectl’s configuration file as $HOME/.kube/config.
# Configure kubectl
mkdir --parents ~/.kube
vi ~/.kube/config # paste kubectl configuration from master node
Once you’ve saved the contents of /etc/kubernetes/admin.conf from master-1 in $HOME/.kube /config on client-1, you can run kubectl commands from client-1. For example:
kubectl get nodesNotice that we don’t need the --kubeconfig option anymore. This is because $HOME/.kube/config is the default location of kubectl’s configuration.
Step 8: Install a network plugin
I mentioned network plugins a few times in the earlier parts of this article, saying it was why we shouldn’t worry about our nodes being in a NotReady state, for instance. Now that our master and worker nodes are all added to our Kubernetes cluster, we are ready to install a network plugin.
All of the commands of this step will be run on client-1.
Out of the box, Kubernetes does not know how to manage connections between different pods. This is especially true when pods are running on different worker nodes. Because networking was not very well addressed by container runtimes like Kubernetes, the community started the Container Network Interface (CNI) project, now managed by the CNCF. A network plugin is an implementation of CNI that allows Kubernetes to provide network functionalities to its pods. Many different third-party network plugins exist. For example, the Google Kubernetes Engine (GKE) uses Calico.
For today’s example, we will opt for Flannel, a pod network add-on developed by CoreOS. The Flannel team provides a YAML file that tells Kubernetes how to deploy their software on your cluster. We can provide this YAML file to kubectl and it will make the necessary calls to the Kubernetes API for us.
# Install Flannel network plugin
kubectl apply \
  --filename https://raw.githubusercontent.com/coreos/flannel/v0.10.0/Documentation/kube-flannel.yml
Kubernetes will promptly deploy one instance of Flannel onto each of our nodes, master and workers alike. You can see the corresponding pods with this command:
kubectl get pods --namespace kube-system --output wideYou should get something like this:
NAME                               READY     STATUS    RESTARTS   AGE       IP                NODE       NOMINATED NODE
coredns-78fcdf6894-l6dw8           1/1       Running   0          4h        10.244.2.2        worker-2   <none>
coredns-78fcdf6894-zzqrf           1/1       Running   0          4h        10.244.2.3        worker-2   <none>
etcd-master-1                      1/1       Running   0          4h        192.168.121.143   master-1   <none>
kube-apiserver-master-1            1/1       Running   0          4h        192.168.121.143   master-1   <none>
kube-controller-manager-master-1   1/1       Running   0          4h        192.168.121.143   master-1   <none>
kube-flannel-ds-45h7l              1/1       Running   0          18m       192.168.121.154   worker-1   <none>
kube-flannel-ds-bw7z4              1/1       Running   0          18m       192.168.121.143   master-1   <none>
kube-flannel-ds-jzcfd              1/1       Running   0          18m       192.168.121.83    worker-2   <none>
kube-flannel-ds-vmqdh              1/1       Running   0          18m       192.168.121.204   worker-3   <none>
kube-proxy-4mfnl                   1/1       Running   0          4h        192.168.121.154   worker-1   <none>
kube-proxy-59l9j                   1/1       Running   0          4h        192.168.121.143   master-1   <none>
kube-proxy-qwfkc                   1/1       Running   0          4h        192.168.121.83    worker-2   <none>
kube-proxy-rrk5v                   1/1       Running   0          4h        192.168.121.204   worker-3   <none>
kube-scheduler-master-1            1/1       Running   0          4h        192.168.121.143   master-1   <none>
You may also notice that our coredns pods are finally running. This is because they were waiting for a network plugin to be installed.
You can check the status of our four different nodes:
kubectl get nodesYou should see something like this:
NAME       STATUS    ROLES     AGE       VERSION
master-1   Ready     master    4h        v1.11.4
worker-1   Ready     <none>    4h        v1.11.4
worker-2   Ready     <none>    4h        v1.11.4
worker-3   Ready     <none>    4h        v1.11.4
Our nodes are now ready too, since Flannel now provides crucial networking functionalities.
We now have a working Kubernetes cluster!
