


Introduction to Ludwig and how to deploy a Deep Learning model via Flask

Mar 2, 2020
Never miss our publications about Open Source, big data and distributed systems, low frequency of one email every two months.
Over the past decade, Machine Learning and deep learning models have proven to be very effective in performing a wide variety of tasks such as fraud detection, product recommendation, autonomous driving, etc. Indeed several of these models are currently in production worldwide. The challenge number 1 is to be able to develop, test and put into production Machine Learning and/or Deep Learning models faster and more efficiently.
This article is about Ludwig v0.2.1, a toolbox developed by Uber AI, built on top of Tensorflow which allows experienced or novice users to be able to train and test Deep Learning models without necessarily writing code. We will, first, introduce you Ludwig, then develop a model for detecting cells infected or not with Malaria and see how easily you can put it into production with Flask.
Presentation
Ludwig is a toolbox built on top of Tensorflow that allows you to train and test Deep Learning models without necessarily writing code. It allows users to build a Deep Learning model by simply providing a tabular file (such as CSV) containing the data and a YAML configuration file which specifies the input and output features as well as the various characteristics defining the model. The simplicity of the configuration file allows faster prototyping, potentially reducing development time to a few minutes. If more than one output target variable is specified, Ludwig will perform multitasking, learning to predict all outputs simultaneously, a task that usually requires a custom code. Ludwig can be used by experienced developers to quickly train and test advanced Deep Learning models, as well as novices who would like to train basic Deep Learning models.
Ludwig provides two main features:
- Training and validation of the different models.
- The ability to view different types of information related to the model.
The core design principles are:
- No coding required: no coding skills are required to train a model and use it for obtaining predictions.
- Generality: a new data type-based approach to Deep Learning model design that makes the tool usable across many different use cases.
- Flexibility: experienced users have extensive control over model building and training, while newcomers will find it easy to use.
- Extensibility: easy to add new model architecture and new feature data types.
- Understandability: Deep Learning model internals are often considered black boxes, but Ludwig provide standard visualizations to understand their performance and compare their predictions.
The new idea introduced by Ludwig is the notion of coders and decoders specific to a data type, which gives a highly extensible architecture. This means that each type of data supported (text, images, categories, etc.) has a specific preprocessing function.
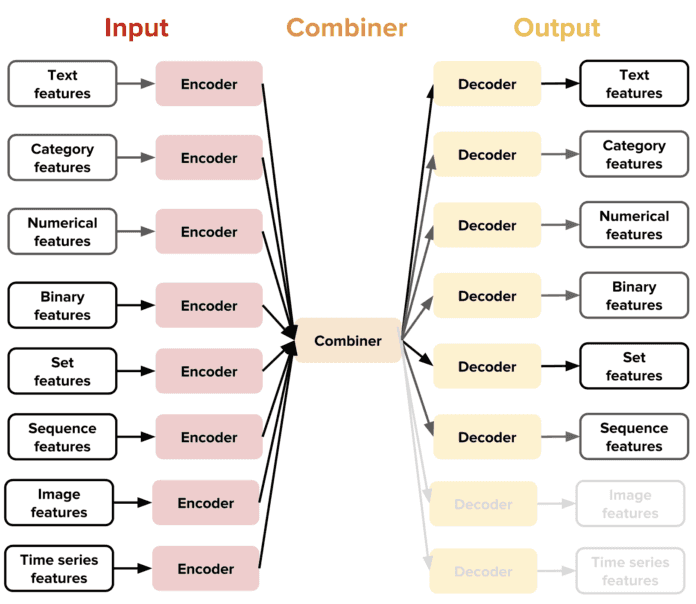
This design allow the user to have access to combinators which combine the encoders of all the input features, process them and return the result to the output decoders. For example, by combining a text encoder and a category decoder, the user can obtain a text classifier, while the combination of an image encoder and a text decoder will allow the user to get an image captioning template.
Currently the available datatypes in Ludwig are:
- Binary
- Numerical
- Category
- Set
- Bag
- Sequence
- Text
- Timeseries
- Image
- Audio
- Date
- H3
- Vector
Ludwig gives the possibility of training models on one or more GPUs. It also allows you to use Horovod, a framework that allows you to distribute your processing. A programming API is also available to use Ludwig from your python code/script. This information is very important. In fact, Ludwig only supports tabular files, such as CSV files, as input. However with the use of the API it is possible to use Ludwig with dataframes Pandas. This makes it possible to be able to provide input data of all types, by means of preprocessings to transform them into dataframes Pandas. A visualization tool makes possible to analyze the learning and test performances of the models and to compare them.
Ludwig installation
Ludwig has been developed and tested with Python 3 in mind. Ludwig’s basic requirements are the following:
- Tensorflow
- Numpy
- Pandas
- Scipy
- Scikit-learn
- Cython
- H5py
- Tabulate
- Tqdm
- PyYAML
- Absl-py
We recommend you to use a virtual environment (virtenv or conda) in order to have an isolated Python environment. We decided to use conda for its simplicity. You can download anaconda (a conda environment including the most used data science packages) for Python 3 here: https://www.anaconda.com/distribution/. Once downloaded just run the bash installation script:
cd ~/Downloads
bash Anaconda3*.sh
To use the environment, you must first activate it. Let’s install Ludwig.
conda activate
pip install ludwig
The pip install ludwig installs only the basic requirements. However, different features require additional dependencies. They are divided into several categories so that you can install only the ones you really need. The objective is to have an isolated and minimalist virtual environment in order to be able to maintain and deploy your environment easily and efficiently.
Anaconda, which allows you to have the most used data science packages, does not allow you to have the most minimalist environment possible. For this, we recommend that you download miniconda instead available here: https://docs.conda.io/en/latest/miniconda.html. We use anaconda, to simplify the experiment.
The different categories of the different features are:
- Text:
pip install ludwig[text]- spacy
- bert-tensorflow
- Image:
pip install ludwig[image]- scikit-image
- Audio:
pip install ludwig[audio]- soundfile
- Visualization:
pip install ludwig[viz]- matplotlib
- Model Serving:
pip install ludwig[serve]- fastapi
- uvicorn
- pydantic
- python-multipart
Any combination of extra packages can be installed at the same time with pip install ludwig[text,image].
If you plan to train your models on GPU, you will have to uninstall tensorflow, installed by default, in order to install tensorflow-gpu instead.
pip uninstall tensorFlow
pip install tensorflow-gpu
We have two ways of using Ludwig, in command line by specifying the file containing the model definition and the input data in CSV or using the API from a code/script python. We will first prepare our datasets for the experiment.
Datasets preparation
We will use the dataset named “Malaria Cell Images Dataset” available on Kaggle. The dataset contains 27,558 cells images. 13779 for infected cells and 13779 for healthy cells. We will create a work directory in which we will work throughout the article and in which we will copy the data that we have previously downloaded. The directory tree is as follows:
workdir
├── Parasitized
│   ├── C167P128ReThinF_IMG_20151201_110011_cell_162.png
│   ├── C167P128ReThinF_IMG_20151201_110011_cell_163.png
│   ├── ...
└── Uninfected
    ├── C100P61ThinF_IMG_20150918_144104_cell_128.png
    ├── C100P61ThinF_IMG_20150918_144104_cell_127.png
    └── ...
We will rename the default directories and create three more from them in order to create three datasets (train, validate and test). train and validation to develop the model and test to validate, or not, the model.
#Delete all the files "Tumbs.db"
rm -rf Parasitized/Thumbs.db
rm -rf Uninfected/Thumbs.db

#Rename directories
mv Parasitized Parasitized_all
mv Uninfected Uninfected_all

#Create the new directories
for i in "_train" "_test" "_validation"; do mkdir Parasitized$i && mkdir Uninfected$i; done

#Transfer data into the specific directory
echo "---Parasitized---"
cd Parasitized_all
cp `ls Parasitized_all | head -5000` ../Parasitized_train
cp `ls Parasitized | tail -n+5001 | head -5000 | wc -l` ..Parasitized_validation
cp `ls Parasitized | tail -n+5001 | tail -3779 | wc -l` ..Parasitized_test

echo "---Uninfected---"
cd Uninfected_all
cp `ls Uninfected_all | head -5000` ../Uninfected_train
cp `ls Uninfected_all | tail -n+5001 | head -5000 | wc -l` ../Uninfected_validation
cp `ls Uninfected_all | tail -n+5001 | tail -3779 | wc -l` ../Uninfected_test
You can change the items number that will be present in the different datasets in order to test quickly. The larger the volume of the datasets is, the longer the training of the model will be. The directory tree should look like this:
workdir
├── Parasitized_all
│   ├── ...
├── Parasitized_test
│   ├── ...
├── Parasitized_train
│   ├── ...
├── Parasitized_validation
│   ├── ...
├── Uninfected_all
│   ├── ...
├── Uninfected_test
│   ├── ...
├── Uninfected_train
│   ├── ...
└── Uninfected_validation
   └── ...
Now that we have our data directories, we are going to create our three datasets:
- malaria_cells_train.csv
- malaria_cells_validation.csv
- malaria_cells_test.csv
We will use a Python script “create_dataset.py”, written by Gilbert Tanner, which we have modified to simplify the creation of our datasets:
import os
import pandas as pd
import argparse

def folder_structure_to_csv(path: str, name: str):

    all_folders = [["Parasitized_train","Uninfected_train"],["Parasitized_test","Uninfected_test"],
                   ["Parasitized_validation","Uninfected_validation"]]
    for folders in all_folders :
        paths = []
        labels = []
        for folder in folders:
            for image in os.listdir(path+'/'+folder):
                paths.append(folder+'/'+image)
                labels.append(folder.split("_")[0])
            df = pd.DataFrame({'image_path': paths,'label': labels})
            split_name=name.split(".")
            save_path=split_name[0]+"_"+folder.split("_")[-1]+"."+split_name[-1]
            df.to_csv(save_path, index=None)


if __name__ == '__main__':
    parser = argparse.ArgumentParser(description='Create CSV from folder structure of a data-set')
    parser.add_argument('-p', '--path', type=str, required=True, help='Path to the data-set directory')
    parser.add_argument('-n', '--name', type=str, required=True, help='Name of the data-set')
    args = parser.parse_args()
    folder_structure_to_csv(args.path, args.name)
To create the datasets:
python create_dataset.py -p `pwd` -n malaria_cells.csvWe will thus have our three datasets with the following structure:
| image_path | label |
|---|---|
| Parasitized_train/C109P70ThinF_IMG_20150930_102716_cell_187.png | Parasitized |
| Uninfected_train/C136P97ThinF_IMG_20151005_144727_cell_100.png | Uninfected |
| ... | ... |
Ludwig use
The purpose of this demo is to develop and test a Deep Learning model which allow us to predict if a cell is infected by Malaria or not. This section will be organized as follows:
- Ludwig command line
- Ludwig via the programming API
- Visualization of the model statistics
Ludwig in command line
To train a model, you need a model definition and the dataset in CSV format. A model definition is a YAML configuration file that specifies the input and output features as well as the different characteristics of the model. You can have more information, on the Ludwig official documentation. You can also find use cases examples here. This is a simple model definition for our use case:
input_features:
    -
        name: image_path
        type: image
        encoder: stacked_cnn
        preprocessing:
            resize_method: crop_or_pad
            width: 128
            height: 128

output_features:
    -
        name: label
        type: category

training:
    batch_size: 8
    epochs: 2
This model definition defines the input and output features as well as the various parameters necessary for modeling. We have defined:
- the input feature:
- the corresponding column in our dataset
- the data type
- the encoder:
stacked_cnnto apply a convolutional neural network. You can also test withresnetto use the ResNet method. You can find more encoders on the official documentation. - pre-processing: we have resized the images so that all the images are uniform
- the output feature:
- the corresponding column in our dataset
- the data type
- the training phase:
- the value of the batch_size
- the number of epochs: We chose 2 to quickly test
In order to train our model we will provide the following to Ludwig:
- the training dataset
- the validation dataset
- the model definition
- the output directory (by default “result”)
ludwig train --data_train_csv malaria_cells_train.csv --data_test_csv malaria_cells_validation.csv --model_definition_file model_definition.yaml --output_directory result_demo


╒══════════╕
│ TRAINING │
╘══════════╛

2019-12-06 16:13:44.099617: I tensorflow/core/platform/cpu_feature_guard.cc:142] Your CPU supports instructions that this TensorFlow binary was not compiled to use: AVX2 FMA
2019-12-06 16:13:44.122479: I tensorflow/core/platform/profile_utils/cpu_utils.cc:94] CPU Frequency: 2904000000 Hz
2019-12-06 16:13:44.123563: I tensorflow/compiler/xla/service/service.cc:168] XLA service 0x563d9e31edd0 executing computations on platform Host. Devices:
2019-12-06 16:13:44.123610: I tensorflow/compiler/xla/service/service.cc:175]   StreamExecutor device (0): <undefined>, <undefined>
2019-12-06 16:13:44.439433: W tensorflow/compiler/jit/mark_for_compilation_pass.cc:1412] (One-time warning): Not using XLA:CPU for cluster because envvar TF_XLA_FLAGS=--tf_xla_cpu_global_jit was not set.  If you want XLA:CPU, either set that envvar, or use experimental_jit_scope to enable XLA:CPU.  To confirm that XLA is active, pass --vmodule=xla_compilation_cache=1 (as a proper command-line flag, not via TF_XLA_FLAGS) or set the envvar XLA_FLAGS=--xla_hlo_profile.

Epoch 1
Training: 100%|█████████████████████████████| 1250/1250 [03:11<00:00,  6.36it/s]
Evaluation train: 100%|█████████████████████| 1250/1250 [00:35<00:00, 35.48it/s]
Evaluation test : 100%|█████████████████████| 1250/1250 [00:34<00:00, 36.16it/s]
Took 4m 21.4362s
╒═════════╤══════════╤════════════╤═════════════╕
│ label   │     loss │   accuracy │   hits_at_k │
╞═════════╪══════════╪════════════╪═════════════╡
│ train   │   0.5079 │     0.7602 │      1.0000 │
├─────────┼──────────┼────────────┼─────────────┤
│ test    │ 139.5151 │     0.0000 │      0.2605 │
╘═════════╧══════════╧════════════╧═════════════╛


Epoch 2
Training: 100%|█████████████████████████████| 1250/1250 [03:13<00:00,  5.88it/s]
Evaluation train: 100%|█████████████████████| 1250/1250 [00:38<00:00, 32.25it/s]
Evaluation test : 100%|█████████████████████| 1250/1250 [00:37<00:00, 36.56it/s]
Took 4m 29.5023s
╒═════════╤═════════╤════════════╤═════════════╕
│ label   │    loss │   accuracy │   hits_at_k │
╞═════════╪═════════╪════════════╪═════════════╡
│ train   │  0.3946 │     0.8311 │      1.0000 │
├─────────┼─────────┼────────────┼─────────────┤
│ test    │ 59.6096 │     0.3000 │      0.1752 │
╘═════════╧═════════╧════════════╧═════════════╛
At the end, an output directory is created, named result_demo. At each execution, a new directory will be created. The directories will be named experiment_run for the first one and the others will be named experiment_run_$i with $i going from 1 to the number minus 2. Since we have made only one launch, we have only one directory named experiment_run. It is in this directory that our model is saved as well as all the characteristics and statistics of the model. The tree structure of the created directory is as follows:
tree result_demo

experiment_run/
├── description.json
├── training_statistics.json
└── model
    ├── checkpoint
    ├── log
    │   └── train
    │       └── events.out.tfevents.1575645224.Precision5520
    ├── model_hyperparameters.json
    ├── model_weights.data-00000-of-00001
    ├── model_weights.index
    ├── model_weights.meta
    ├── model_weights_progress.data-00000-of-00001
    ├── model_weights_progress.index
    ├── model_weights_progress.meta
    ├── training_progress.json
    └── train_set_metadata.json
The directory consists of:
- description.json: which describes the model
- training_statistics.json: the training model statistics
- the model
In order to predict from the model we will provide the following to Ludwig:
- the test dataset
- the model
- the output directory (by default “results”):
ludwig predict --data_csv malaria_cells_test.csv --model_path result_demo/experiment_run/model/ --output_directory result_demo/output


╒═══════════════╕
│ LOADING MODEL │
╘═══════════════╛

╒═════════╕
│ PREDICT │
╘═════════╛

2019-12-06 16:30:37.706708: I tensorflow/core/platform/cpu_feature_guard.cc:142] Your CPU supports instructions that this TensorFlow binary was not compiled to use: AVX2 FMA
2019-12-06 16:30:37.730468: I tensorflow/core/platform/profile_utils/cpu_utils.cc:94] CPU Frequency: 2904000000 Hz
2019-12-06 16:30:37.731185: I tensorflow/compiler/xla/service/service.cc:168] XLA service 0x56411fbb6d30 executing computations on platform Host. Devices:
2019-12-06 16:30:37.731203: I tensorflow/compiler/xla/service/service.cc:175]   StreamExecutor device (0): <undefined>, <undefined>
2019-12-06 16:30:38.049110: W tensorflow/compiler/jit/mark_for_compilation_pass.cc:1412] (One-time warning): Not using XLA:CPU for cluster because envvar TF_XLA_FLAGS=--tf_xla_cpu_global_jit was not set.  If you want XLA:CPU, either set that envvar, or use experimental_jit_scope to enable XLA:CPU.  To confirm that XLA is active, pass --vmodule=xla_compilation_cache=1 (as a proper command-line flag, not via TF_XLA_FLAGS) or set the envvar XLA_FLAGS=--xla_hlo_profile.
WARNING:tensorflow:From /home/user/anaconda3/lib/python3.7/site-packages/tensorflow/python/training/saver.py:1276: checkpoint_exists (from tensorflow.python.training.checkpoint_management) is deprecated and will be removed in a future version.
Instructions for updating:
Use standard file APIs to check for files with this prefix.
Evaluation: 100%|█████████████████████████████████| 1/1 [00:00<00:00, 20.76it/s]
Saved to: result_demo/output
The results are saved in the result_demo/output/ directory. In this directory we have the results in several files of different formats. The results are the predicted labels for each of the images provided in the test dataset. We thus created a model and predicted data from it. It is possible to provide an advanced model definition. You can find examples of advanced model definition in the official documentation or on the Gilbert Tanner website for different use cases.
Ludwig API
As mentioned earlier, using the API allows us to use Ludwig with Pandas dataframes. This provides greater flexibility, for example, to cross data from different sources. We will need a pre-processing part of the data, which ultimately allows us to use Ludwig on all types of data. The following script makes it possible to train the same model as the one of the previous section, with the possibility of providing Pandas dataframes or CSV files as desired.
import ludwig
import yaml
import pandas as pd
from ludwig.api import LudwigModel

#Load CSV
train = pd.read_csv("malaria_cells_train.csv")
test = pd.read_csv("malaria_cells_test.csv")
validation = pd.read_csv("malaria_cells_validation.csv")

# train a model
model_definition = {
    "input_features":
        [
            {"name": "image_name", "type": "image", "encoder":"stacked_cnn","preprocessing":

                                                {"resize_method": "crop_or_pad", "width":128, "height":128}
            }
        ],
    "output_features":
        [
            {"name": "label", "type": "category"}
        ],
    "training":

            {"batch_size": 8, "epochs": 2}
}

model = LudwigModel(model_definition)

train_stats = model.train(data_train_df=train,data_test_df=validation)
# or  train_stats =  model.train(data_train_csv="malaria_cells_train.csv",data_test_csv="malaria_cells_validation.csv")

# or load a model
model_path = "result_demo/experiment_run/model"
model = LudwigModel.load(model_path)

# obtain predictions
predictions = model.predict(data_df=test)
# or predictions = model.predict(data_csv="malaria_cells_test.csv")

model.close()
Visualization of the model statistics
You can visualize multiple types of information related to your model. There are two kind of visualization that we will talk about. You can find more information on the official Ludwig documentation.
Visualize training statistics of the model
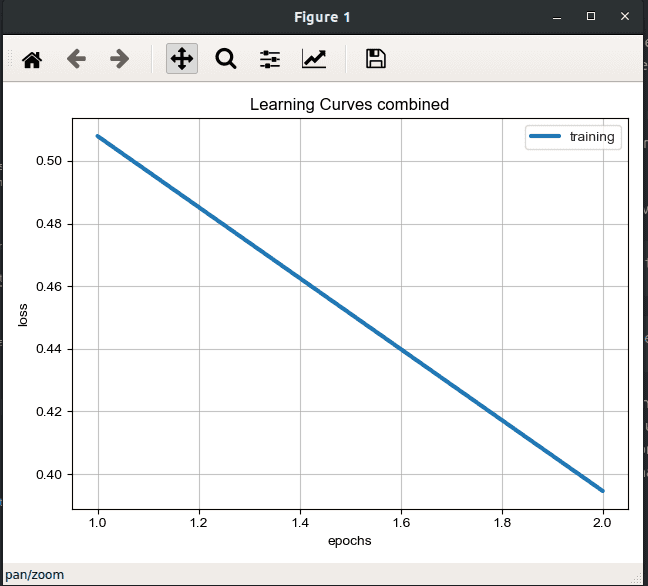
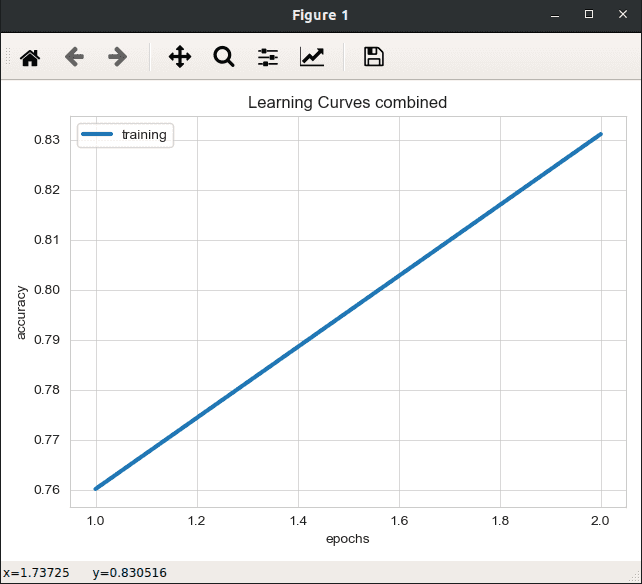
We can visualize different information related to the training of our model according to the different epochs as:
- errors
- model accuracy
- etc.
To visualize we have to provide:
- The
training_statistics.jsonfile located in theresult_demo/experiment_run/training_statistics.json
ludwig visualize --visualization learning_curves --training_statistics result_demo/experiment_run/training_statistics.json
Compare different models
We can also compare two models so that we can identify the strengths of one and the weaknesses of the other. We can use this to refine our model. For this we have to provide:
- The
test_statistics_model.jsonfile for the two models.
In our case, we just have a model, but here is the command:
ludwig visualize --visualization compare_performance --test_statistics path/to/test_statistics_model_1.json path/to/test_statistics_model_2.json

The two model training methods, in command line or using the API, allow us to easily and quickly train Deep Learning models. Another advantage of Ludwig is that it is easy to put the pre-trained model into production. Knowing that the model is actually a directory making less than 200MB, it is easy to move and transfer the models. Now we have our model pre-trained, we are going to put it into production with Flask. We will set up an API that allow to load a cell image and return the information about how infected the cell is.
Putting into production using Flask
Flask is a Python web development framework. There are others, the best known are Django and Flask. By combining the Python programming language and a very rich template system, you can quite easily create a web application. In our case, Flask would allow us to create a simple web application or API that can be deployed on many different platforms and thus simplify the production of Machine Learning/Deep Learning models written in Python.
To install Flask:
pip install FlaskTo get started, here is a basic application.py code to create a minimalist web application:
from flask import Flask
app = Flask(__name__) # create a Flask app

@app.route("/")
def hello():
    return "Hello World!"

if __name__=='__main__':
app.run()- We import the Flask module
- We create a route to the root of the web application
- We choose to return a Hello World
To launch the application:
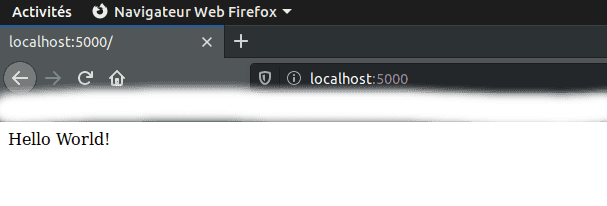
python application.pyWe can now open the URL at http://localhost:5000, 5000 being the default port, and read the following message on screen: Hello World!.
The Flask development server is not intended for use on production systems. It was designed specifically for development purposes and performs poorly under high load. For deployment configurations, we will use gunicorn. This does not change the way we develop. The change will be made when the web application is launched. Instead of running
python application.pyit will begunicorn -w 4 -b localhost:5000 application:app. This will launch a more resistant and more secure web server with several processes, here 4.
We will develop our web server from this minimalist code. A Flask type tree is as follows:
├── application.py
├── static
│   ├── file.css
│   └── file.js
├── templates
    ├── index.html
└── upload.html- The application .py script
- a
staticdirectory which will contain all CSS and JavaScript files - a
templatesdirectory which will contain the HTML pages of our website.
We will create a templates directory. The static folder is not necessary in our case since we are going to make minimalist html pages.
mkdir templatesWe will now create an index.html file in this directory:
<!DOCTYPE html>
<html >
  <head>
    <meta charset="utf-8">
    <title>Malaria Cells Detection </title>
  </head>
  <body>
    <div>
          <h1>Upload an image</h1>
          <hr>
          <form action="/" method="POST" enctype="multipart/form-data">
              <label>Select image</label>
                <input type="file" name="image" id="image">
                <label for="image">Select image...</label>
            <button type="submit">Upload</button>
          </form>
<br>
<br>
          {% if result %}
        		<h2>  The results are : </h2>
        		{{ result | safe }}
        	{% endif %}
    </div>
  </body>
</html>
This code will be used to load an image and display a result if there is one. We will have a result after the user has loaded an image. All the backend part is done via the following application.py script:
from flask import Flask, render_template, url_for, request
import ludwig
import pandas as pd
from ludwig.api import LudwigModel

app = Flask(__name__)

to_predict={"image_path":["Uploads/image_to_predict.png"]}

# load the model
model_path = "result_demo/experiment_run/model"
model = LudwigModel.load(model_path)

@app.route("/",methods=["POST","GET"])
def home():
    if request.method == "GET" :
        return render_template("index.html",uid="GET")

    elif request.method == "POST" :
        if request.files:
            image = request.files["image"]
            image.filename = "image_to_predict.png"
            image.save("Uploads/"+image.filename)
            result = model.predict(data_dict=to_predict)
        return render_template("index.html", result=result.to_html())

if __name__ == "__main__":
    app.run()
This code allows:
- To prepare the prediction dataset with the downloaded image which will always be called
image_to_predict.png - We are loading our pre-trained Deep Learning model.
- We define only one route
/. - We define a series of processing based on the request made:
- For a GET request:
- We display the
index.htmlpage without result.
- We display the
- For a POST:
- We verify that the user has loaded an image
- We save the image in the
Uploadsdirectory by renaming it. - We use our model to predict whether the cell in the image is infected or not
- We return the result in HTML table form at the same time as the
index.htmlpage
- For a GET request:
This script is not optimal. It provides a simplified vision of what can be done via Flask to put into production a Machine Learning/Deep Learning model.
Let’s start the web server:
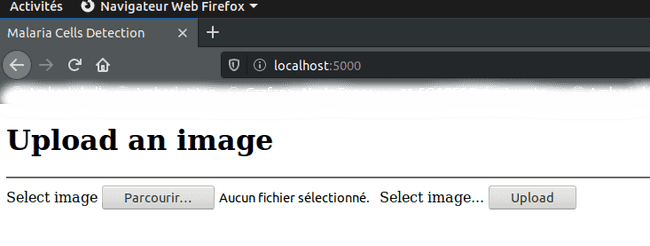
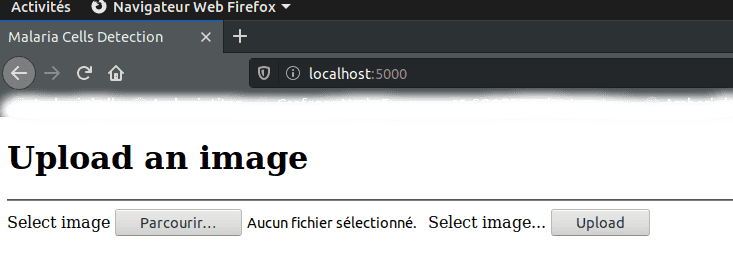
gunicorn -w 4 -b localhost:5000 application:appThis is what our web application looks like:
-
By accessing the application
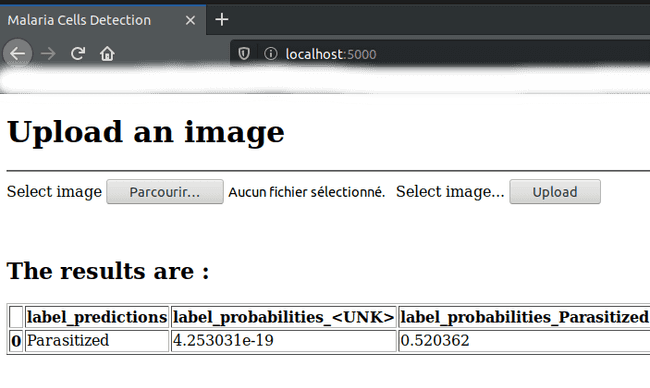
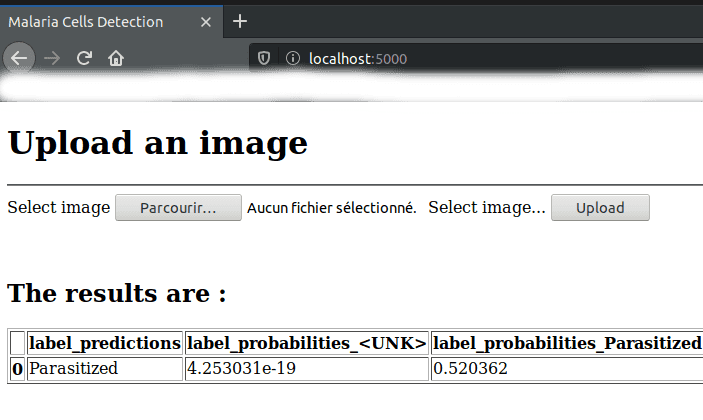
-
Having loaded an image
Conclusion
Ludwig is a toolbox built on top of Tensorflow that allows you to train and test Deep Learning models without necessarily having to write code. Indeed, the experienced users can train advanced Deep Learning models, focusing on the model, without having to waste time unnecessarily on development and/or problems related to scripts and not to the model. And novice users can easily start and progress at their own ryhtm in training models. In addition to the ease of use, Ludwig allows us to easily transfer our pre-trained model without having to go through formats pickle or hdf5 which can sometimes be very large. Following our Ludwig test, we can conclude that it is a very interesting technology, which we will continue to follow. The current version of Ludwig is 0.2.1, major changes are expected.
